Lachha paratha recipe
Lachha paratha recipe – the layered paratha that goes perfect with any curry dish or as a breakfast with pickle.
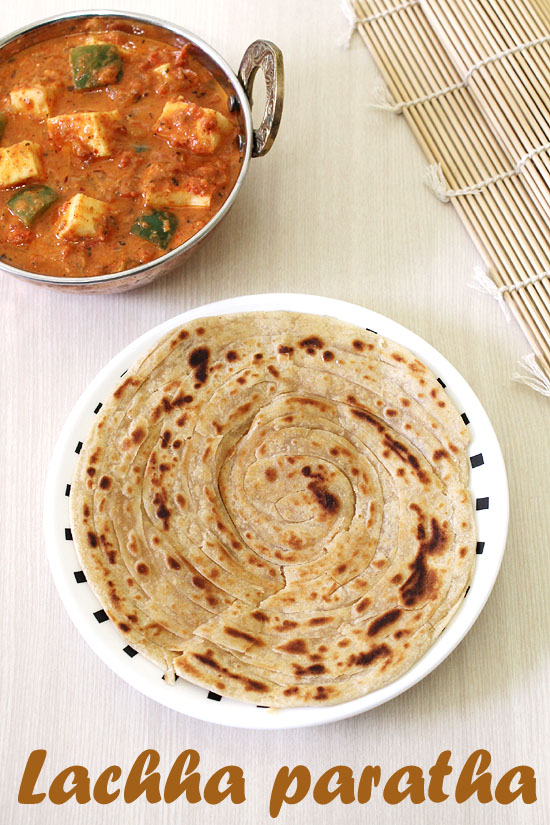
The texture of this lachedar paratha is crispy, flakey yet soft. This is the BEST recipe and makes PERFECT laccha paratha.
Here I have used mostly whole wheat flour and very little all purpose flour. But to make it more healthy, you can replace the all purpose with wheat flour.
Here I have added milk while making the dough. Milk makes the paratha really soft and melt in your mouth texture.
Making this at home is little time consuming compared to the regular paratha. But of course not that tricky at all. The below step by step photos will make it much easier for you.
I have eaten this lachha paratha at many restaurants and those are loaded with oil or ghee. So I prefer those ones occasionally.
But hubby likes it so much that I have tried making this at home. Also I have reduce the amount of oil quite a bit. Still the texture is perfect flaky and soft. You must give it a try.
This lachha paratha recipe is inspired from Sanjeev Kapoor’s recipe book.
Check out more paratha recipes
ajwain paratha // onion paratha // methi paratha // masala paratha
(Step by Step Photos):
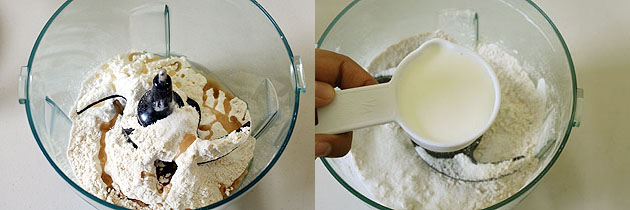
1) First we will knead the dough. For that purpose I have used food processor. You can do it by hand just like any other dough. Take both flours (whole wheat and all purpose flour), salt, sugar. Drizzle 1 tablespoon of oil. Pulse it couple of times till everything is incorporated. If doing by hand use your fingertips.
2) Now add milk and water. If doing by hand then add little at a time and keep kneading.
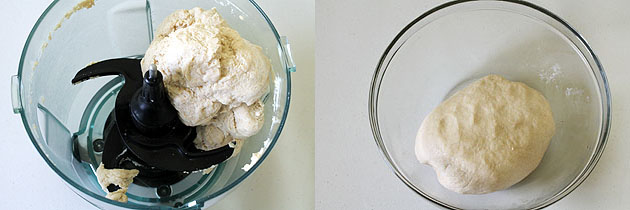
3) pulse it till it come together like a dough.
4) Dough should be soft and smooth. Cover it and let it rest for 15 minutes.
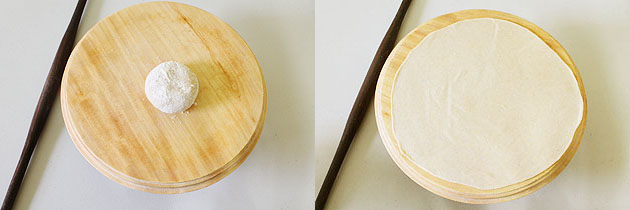
5) After resting time. Knead it one more time to smooth out. Then divide it into 10 equal portions. Make smooth balls and flatten it between your palm one by one. Work with one disc at a time. Dip into dry flour.
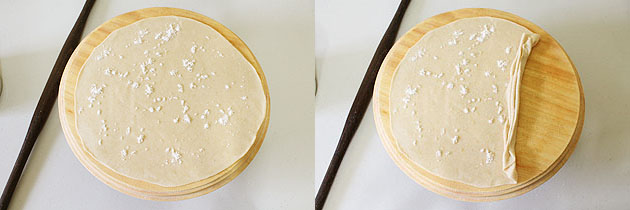
6) Start rolling using rolling pin. Roll out in a large circle of 10-12 inch diameter. If it is not proper circle, still it is fine.
7) Now apply ½ teaspoon of ghee all over it and sprinkle little flour.
8) Now start folding and pleating as shown here. Make sure to make small pleats which gives more layers.
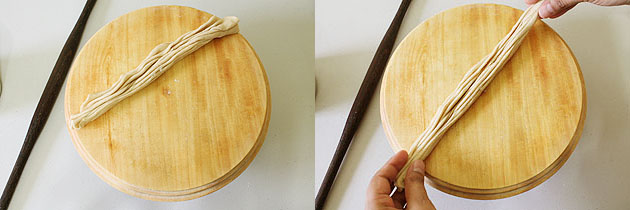
9) Keep pleating all the way, it will be like a folded paper fan.
10) Now hold the two ends of paratha and very gently swing it and tap it on the board for couple of times. This way it will get stretched slightly
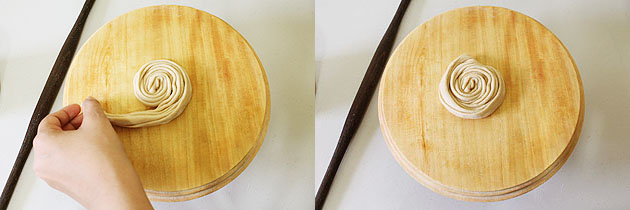
11) Now start rolling into spiral form.
12) Press the end to join together. Keep it aside and do the same with rest of the balls.
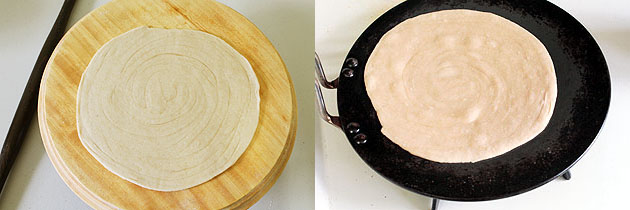
13) Now take one spiral disc, dust it lightly with flour and start rolling. Do the rolling part with gentle pressure. Roll out into 7 inch diameter circle. It should be of the medium thickness.
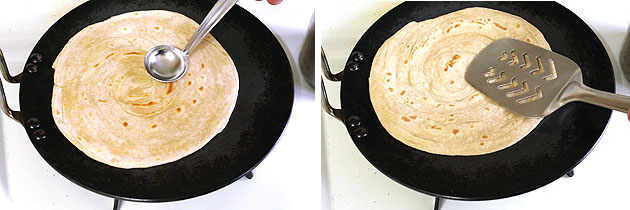
14) heat the tawa on medium heat. Once hot place the rolled paratha on it. After few seconds you will notice bubble on the surface.
15) That time flip the paratha and cook the other side for few seconds. Then apply oil on the surface.
16) Flip it and cook by pressing gently using spatula till the bottom side has light brown spots and no more uncooked doughy part seen. Again apply oil on this surface.
17) Flip and cook the other side similarly by pressing with spatula.
18) Once done remove it from the tawa. Now carefully, crunch it slightly using your hands to separate the layers. Be very careful not to burn yourself from the steam.
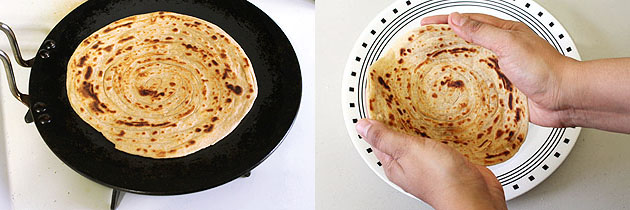
Serve directly to the person’s plate or store in insulated container (which is lined with paper towel to absorb the moisture from heat). Repeat the same rolling and frying process for rest.
NOTE: Always keep the thickness of the lachha paratha to medium. If it is rolled to thick then it will take too much time to cook. If it is too thin then it won’t have that good flaky texture of the layers.
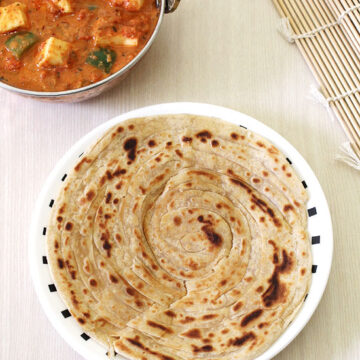
Serving suggestion: This lachha paratha can be served with any gravy dish aka curry as a meal. It can be served with dal fry or dal makhani too. For serving it as a breakfast, have some mango pickle or chutney on side.
Lachha paratha recipe (How to make lachha paratha recipe)
US measuring cups are used (1 cup = 240 ml)
Ingredients
- 1 ½ cups Whole wheat flour (Chapati atta), + more for dusting
- ½ cup All purpose flour (Maida)
- 1 + 2 tablespoon Ghee (clarified butter), or oil, + more for frying
- Salt to taste
- 1 teaspoon Sugar
- ¼ cup Milk
- ½ cup + 2 tablespoons Water
Instructions
Making the dough:
- In a bowl, mix all purpose flour, whole wheat flour and salt. Drizzle 1 tablespoon of oil or ghee and mix using fingertips.
- Now add milk and water to knead into a smooth and soft dough. Cover it and let it rest for 15 minutes.
- Then knead again two three times to get the smooth dough.
Making lachha paratha recipe:
- Divide the dough into 10 equal portions and make smooth balls and flatten between your palm one by one.
- Dust one disc using dry flour and roll into 10-12 inch diameter circle. Apply 1/2 teaspoon of ghee or oil on top and sprinkle little flour.
- Now start folding and pleating all the way. Then by holding two ends, swing and tap on board to stretch it slightly.
- Now roll into spiral like swiss roll. Make all the rolls similarly.
- Now dust one roll and using rolling pin roll into 6 inch diameter circle.
- Fry the paratha on hot tawa using oil till both sides have golden brown spots
- Once done remove it from the tawa. Now carefully, crunch it slightly using your hands to separate the layers.
i have always seen this on tv but i could never get the layers properly. i think i was just rolling it like cylinder instead of pleats. and it has to be pressed lightly. plus ur step by step instructions make it look easy but patience is the key
and ya thanks for ur tip on that garlic cheese bread. i have convection wala oven and mayb it wud work, wud try it out and see. i still have to figure out how to work the timer
hehe
my mom used to make these parathas for us…it is very time consuming..kudos to you for all the pictures..lovely parathas..