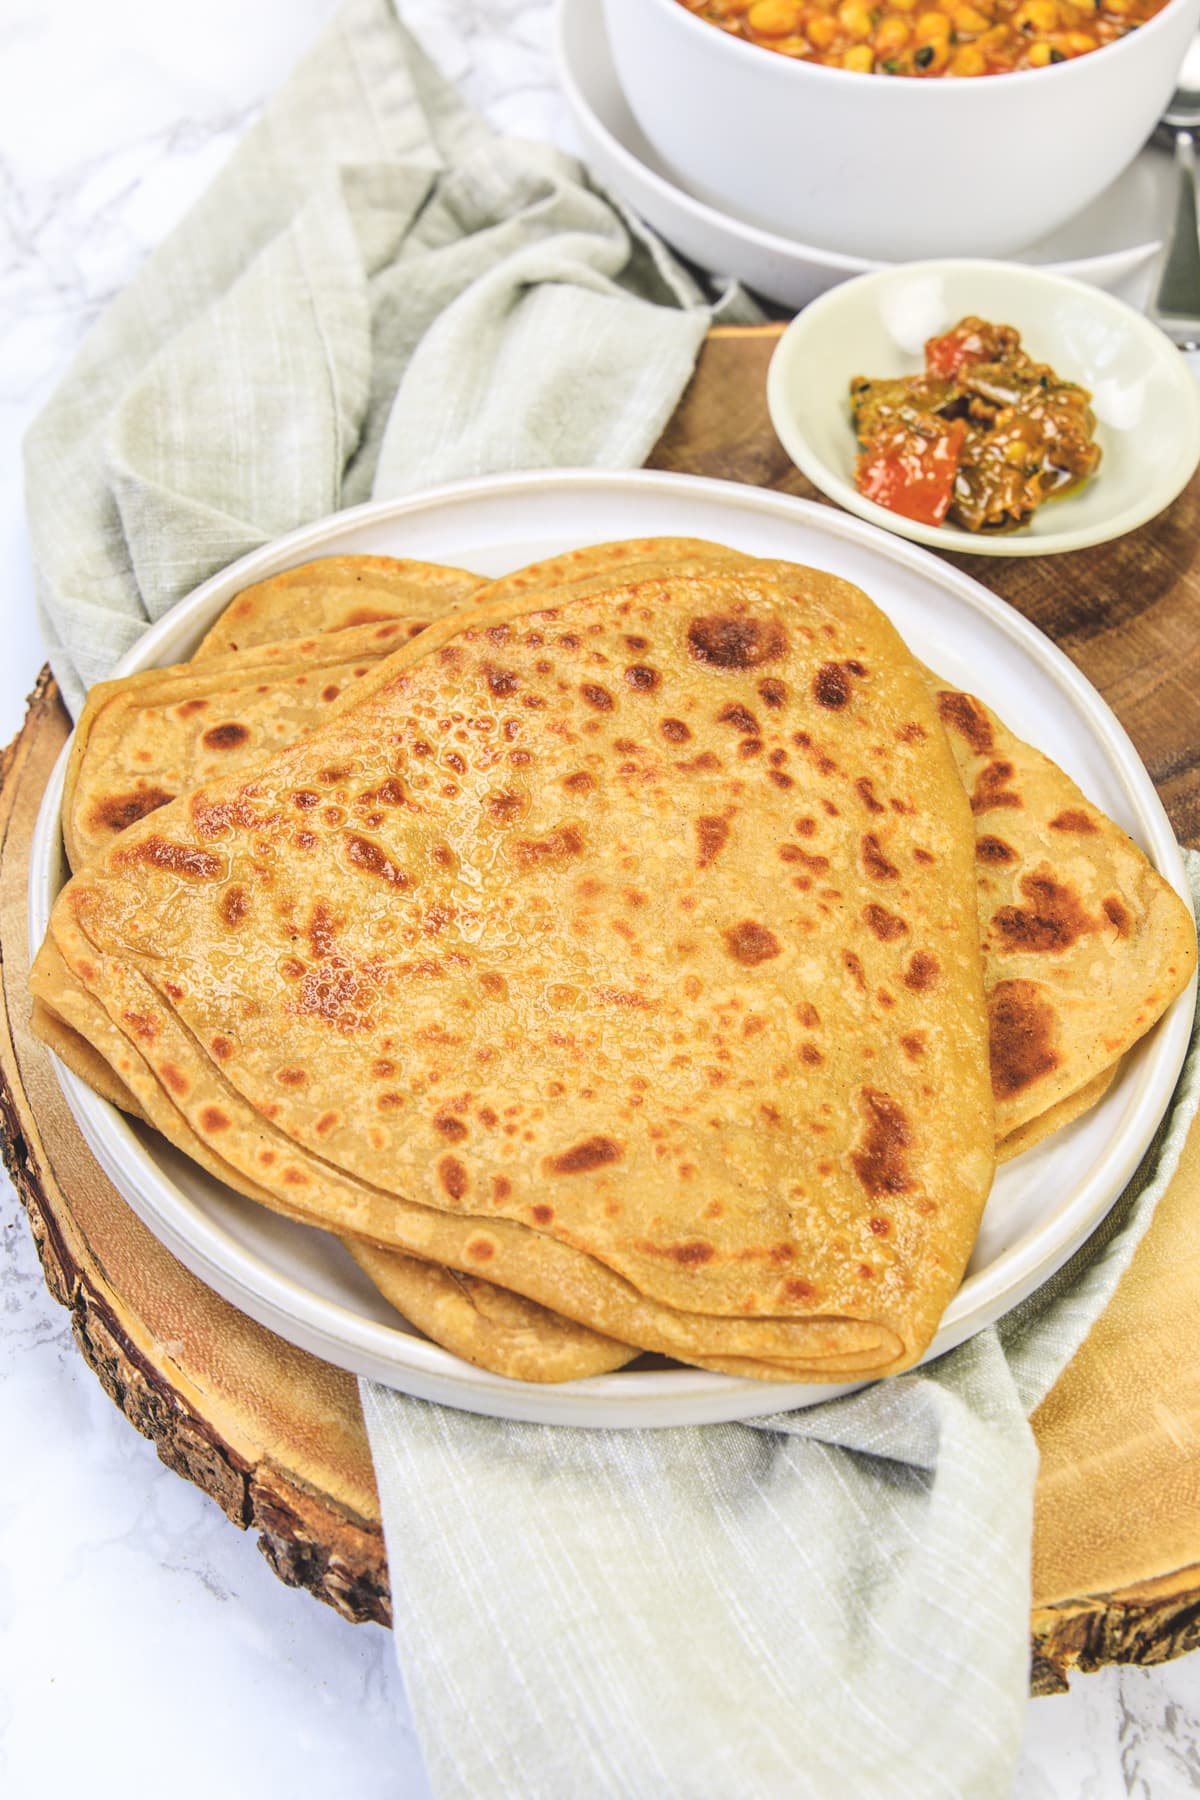
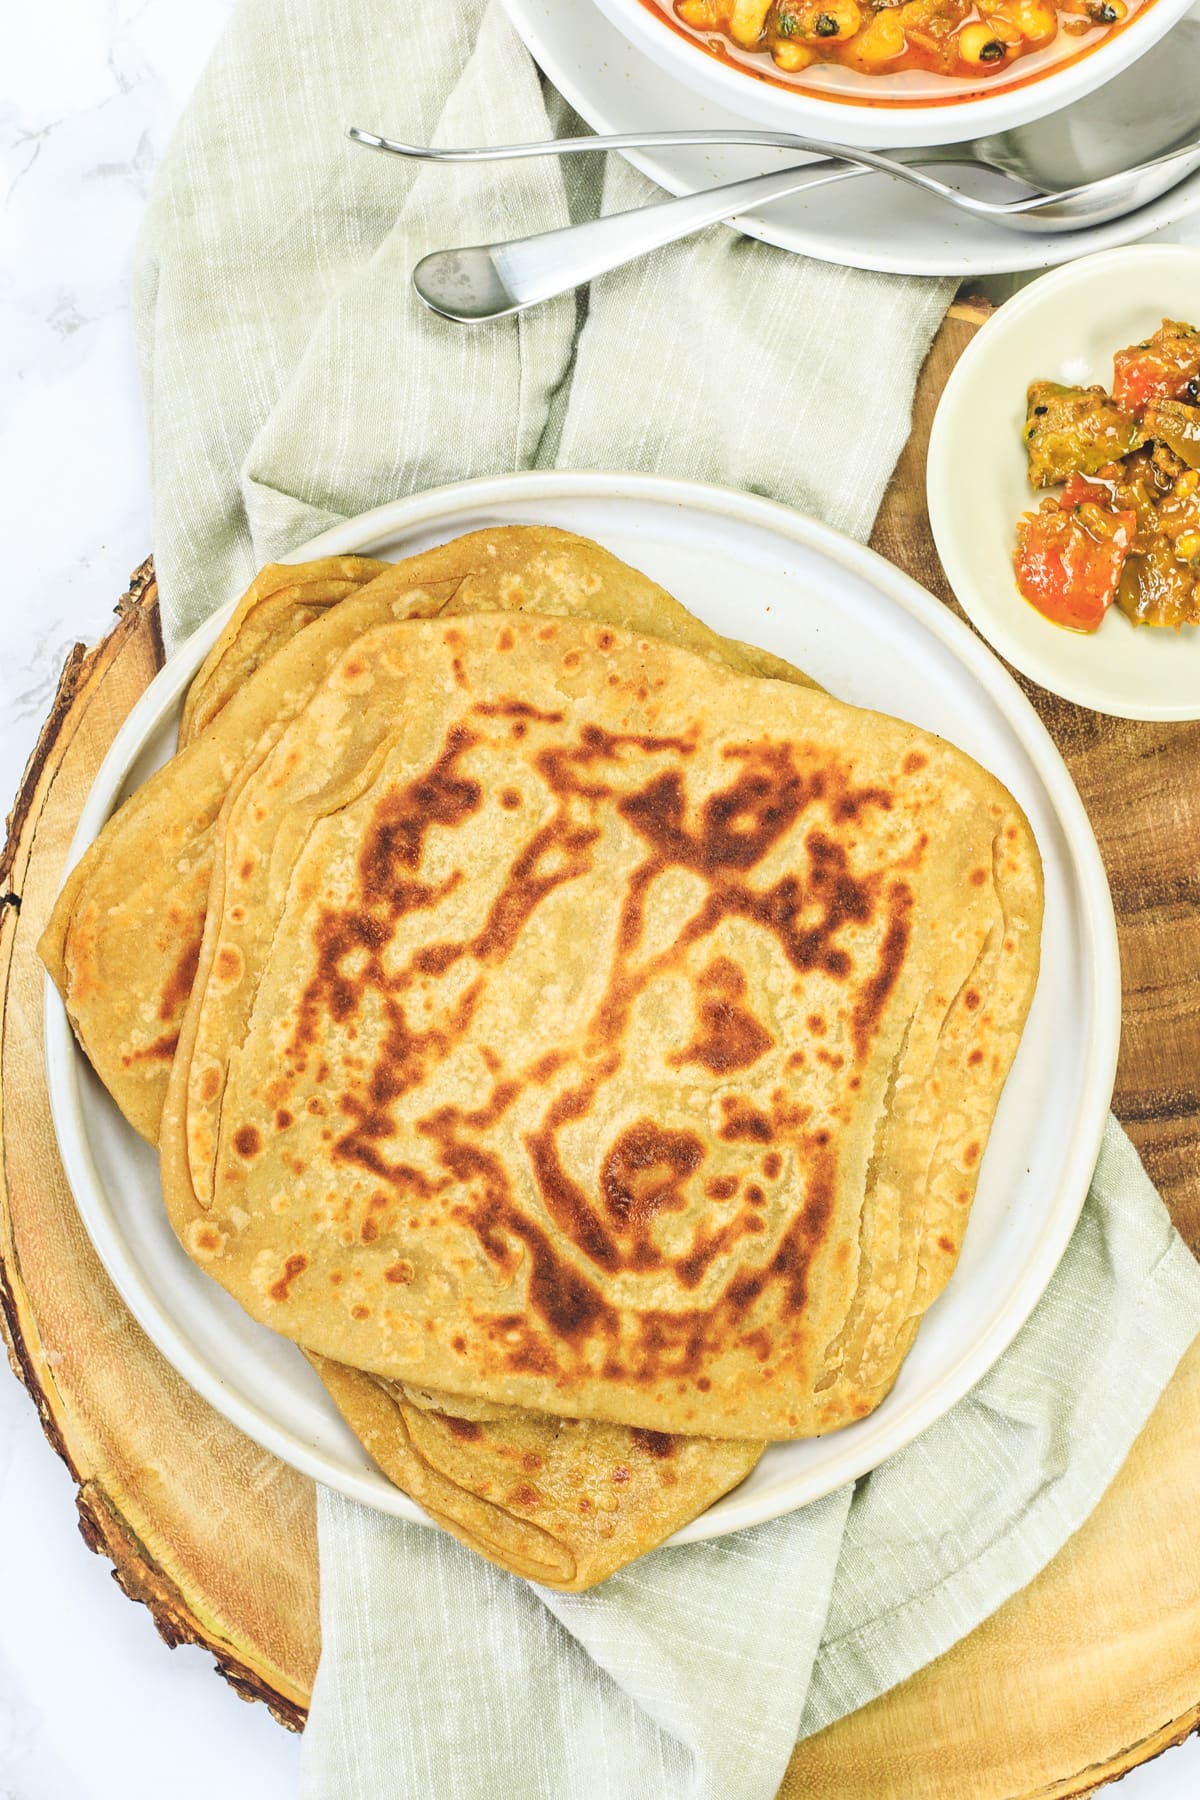
Learn how to make paratha with this detailed step-by-step recipe. Follow this paratha recipe with the tips mentioned and paratha will turn out flaky, crisp yet soft, and perfect every single time.
Once you try it you’ll never buy the frozen pack of paratha, trust me! This can be served as breakfast or as a meal with curry or dal.
Jump to:
What Is Paratha?
Paratha is an unleavened Indian flatbread made with whole wheat flour. The paratha dough is made from wheat flour, salt, oil, and water. Then the small dough ball is rolled into layered flatbread (by folding method similar to puff pastry) and cooked on the skillet (or tawa) using oil.
Paratha word is the combination of the words ‘Parat’ means layers and ‘Atta’ means dough. It translates to layers of dough that are cooked.
There are three types of parathas
- The first is plain paratha or sada paratha. This is what I am sharing today, it is also known as tawa paratha as it is cooked on a tawa (not tandoor).
- Second is flavored paratha where veggies or spices are added to the dough to make different flavors of paratha e.g. ajwain paratha, methi paratha, palak paratha, etc.
- Third is stuffed paratha such as aloo paratha, mooli paratha, paneer paratha, etc.
Texture:
- Flaky layers with crisp edges (as you’ve drizzled the oil while cooking, this gives crispy, nutty, and golden brown edges).
- Soft (not chewy at all) inside layers (steam is trapped inside while cooking and it helps to cook the dough and makes the soft inside layers).
- Paratha is thicker than roti (or chapati) with a flaky texture.
❤️ You’ll Love This Tawa Paratha Recipe
Beginner friendly: Lots of tips are shared to make every process (kneading the dough, rolling, folding into layers, and cooking) easy for beginners. Once you get the hang of it, it is such a quick process.
Easy to make: Doesn’t require any special skill or practice as you need for stuffed paratha.
Make ahead option: Knead the dough in a large batch and freeze it in portions for later days.
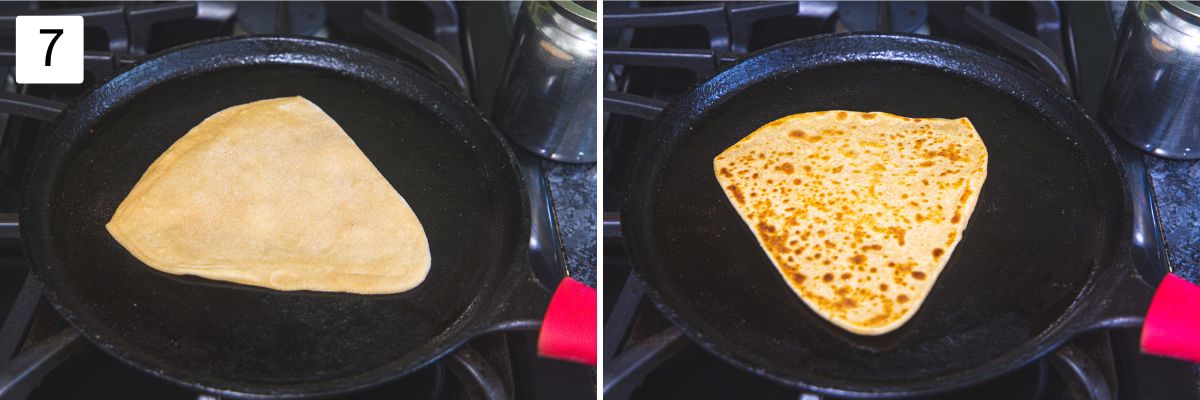
Paratha rolled in two shapes: Square and Triangle. Choose whatever you prefer.
🧾Ingredient Notes
Here is a pic of the ingredients you’ll need to make this plain paratha recipe.
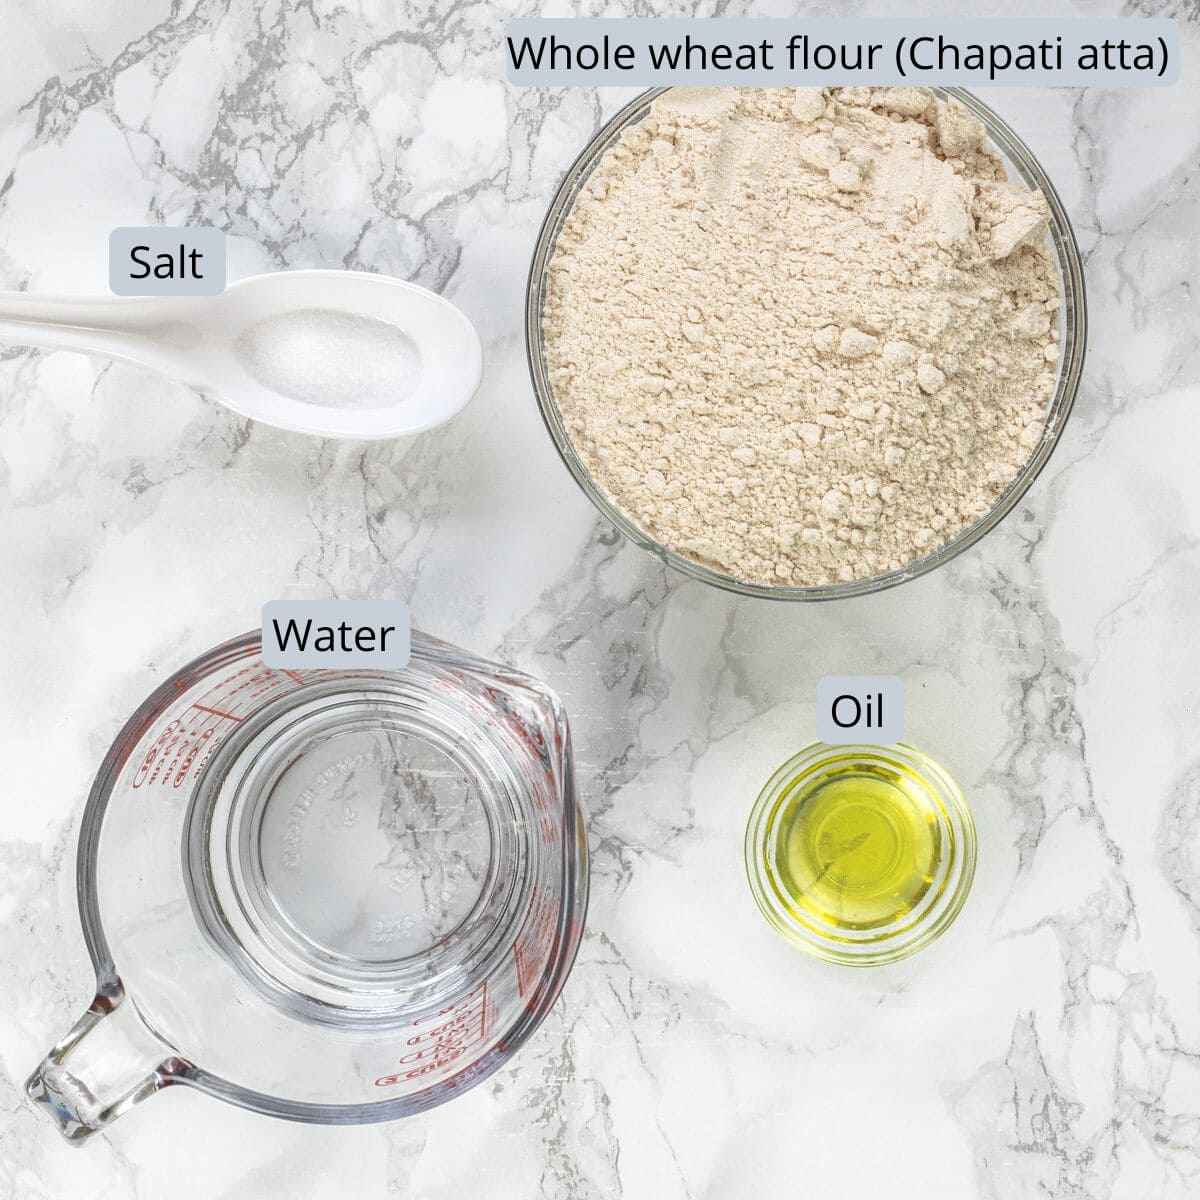
- Whole wheat flour (atta): This wheat flour is not the same wheat flour that we get in American grocery stores.
- Atta is made from a semi-hard wheat variety aka durum wheat. This hard wheat is high in protein.
- The atta is made by stone grinding, this process imparts a unique taste to the roti, paratha, or any bread made from the chapati atta. During the grinding process, a high temperature is produced by the friction of traditional stone/chakki. Because of this high temperature, the freshly ground atta has a toasty, nutty smell.
- So in India, my mom used to grind the atta at home using a stone mill (Ghanti). Many prefer to buy it from the nearby mill fresh every week.
- In the USA, we don’t get fresh chakki atta. I buy the chapati atta from Indian grocery stores. I prefer sharbatti atta (e.g. Royal chakki atta or Aashirvaad atta) or 24 Mantra organic atta.
- Salt: It is added so the paratha doesn’t taste flat.
- Water: Use room temperature or warm water to make the paratha dough.
- Oil: In Punjab or North India, mustard oil is used. But those who are not used to the flavor of mustard oil will find it pungent in taste. So use any oil that you prefer.
- You can use ghee as well.
- Oil or ghee is added while kneading the dough, between layers while folding the dough, and drizzled over paratha while cooking.
👩🍳How To Make Paratha? (Stepwise Photos)
Knead The Paratha Dough:
- You can do this step by hand or use the kitchen aid stand mixer.
- If making a smaller batch then you must knead the dough by hand.
- To knead the paratha dough in the stand mixer, you must use a minimum of 2 cups of flour (you can use more but cannot use less than 2 cups).
1) Add water and oil to a stand mixer bowl.
2) Add chapati atta and salt.
3) Attach the dough hook attachment.
4) Start the mixer on low speed and knead the dough.
NOTE: If kneading the dough by hand, then add little water at a time and continue kneading using the bottom palm of your hand until you get the smooth dough.
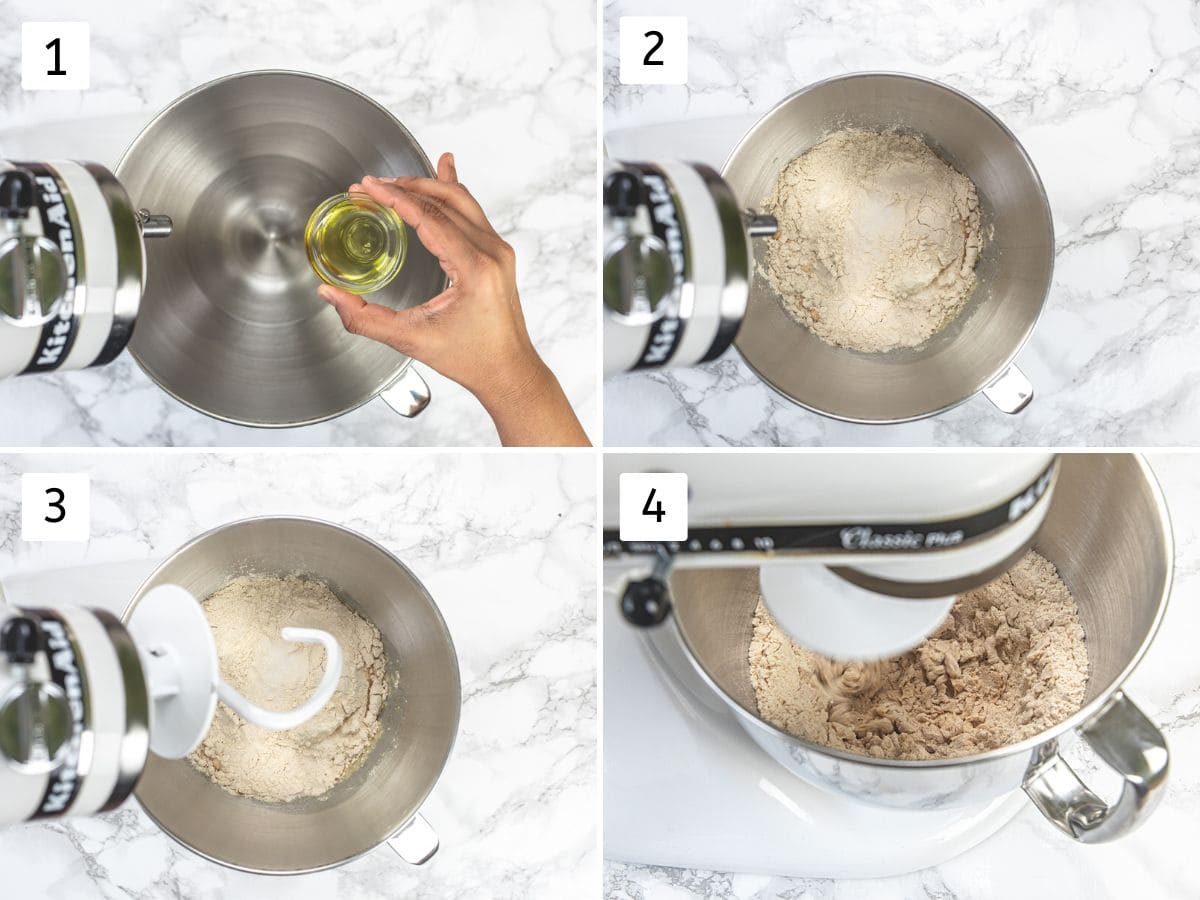
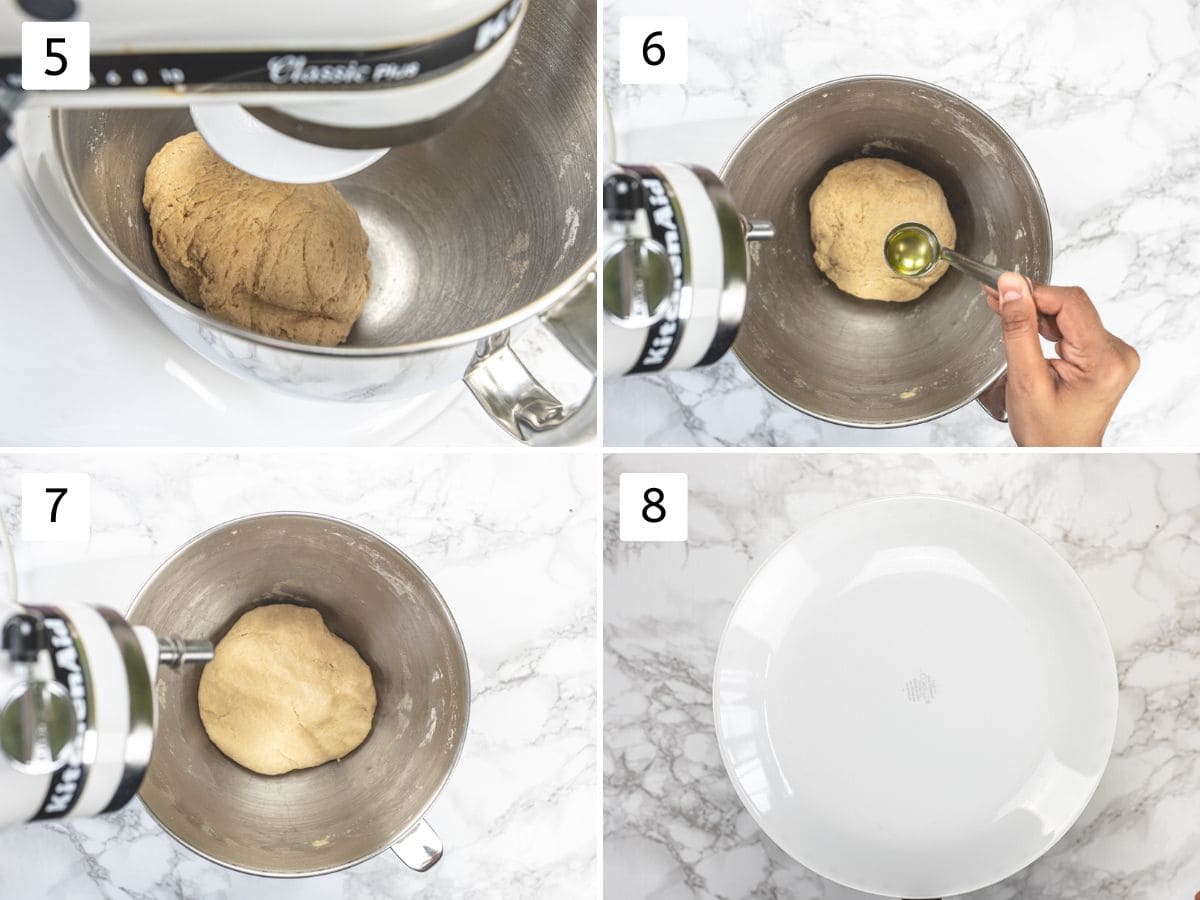
5) Once you feel the dough is starting to come together then increase the speed a little bit but still on low speed (no.2 or 4). Keep kneading until it forms a dough. You may need to stop the mixer and check if it needs more water or if it's sticky then you may need a sprinkle of more flour. Adjust as needed and continue kneading.
6) Add a teaspoon of oil over the dough.
7) Spread it over the dough ball and smooth it out. The dough should be smooth and medium soft (not too soft like roti, but not too hard like kachori or mathri).
8) Cover it with a plate or a towel and let it rest for 10-15 minutes.
Rolling The Paratha (Square):
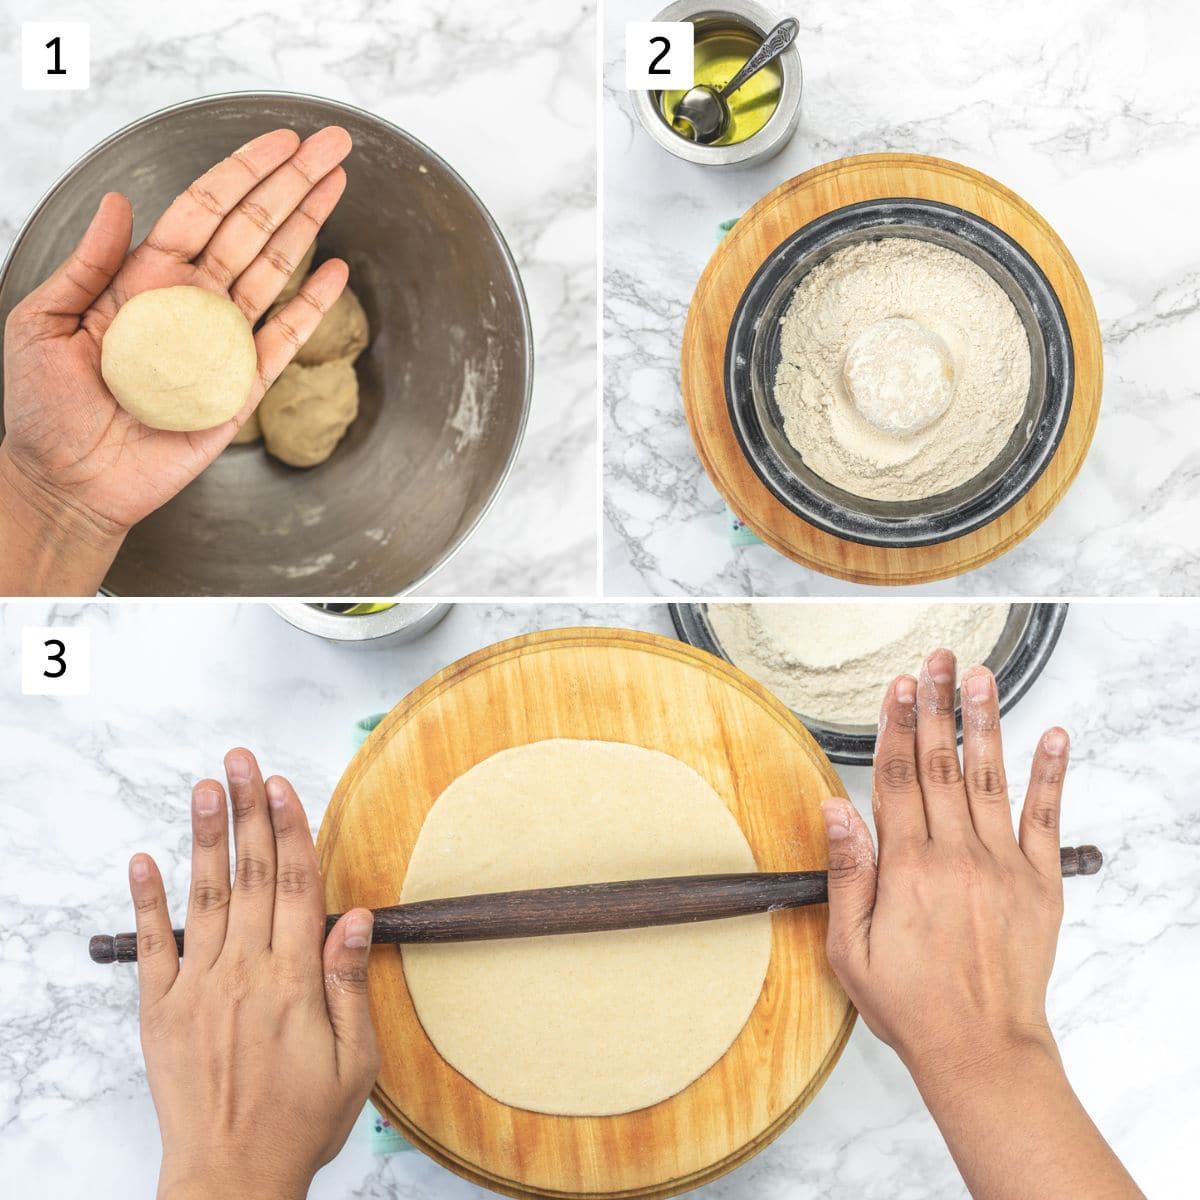
1) After the resting time, knead the dough again 2-3 times to smooth it out. Then divide into 8 equal portions. Work with one portion at a time, make a smooth ball, and flatten it between your palms to make a disc.
2) Dust both sides of the disc into dry flour and place it on a rolling board (or surface).
3) Roll into a 6-inch diameter circle.
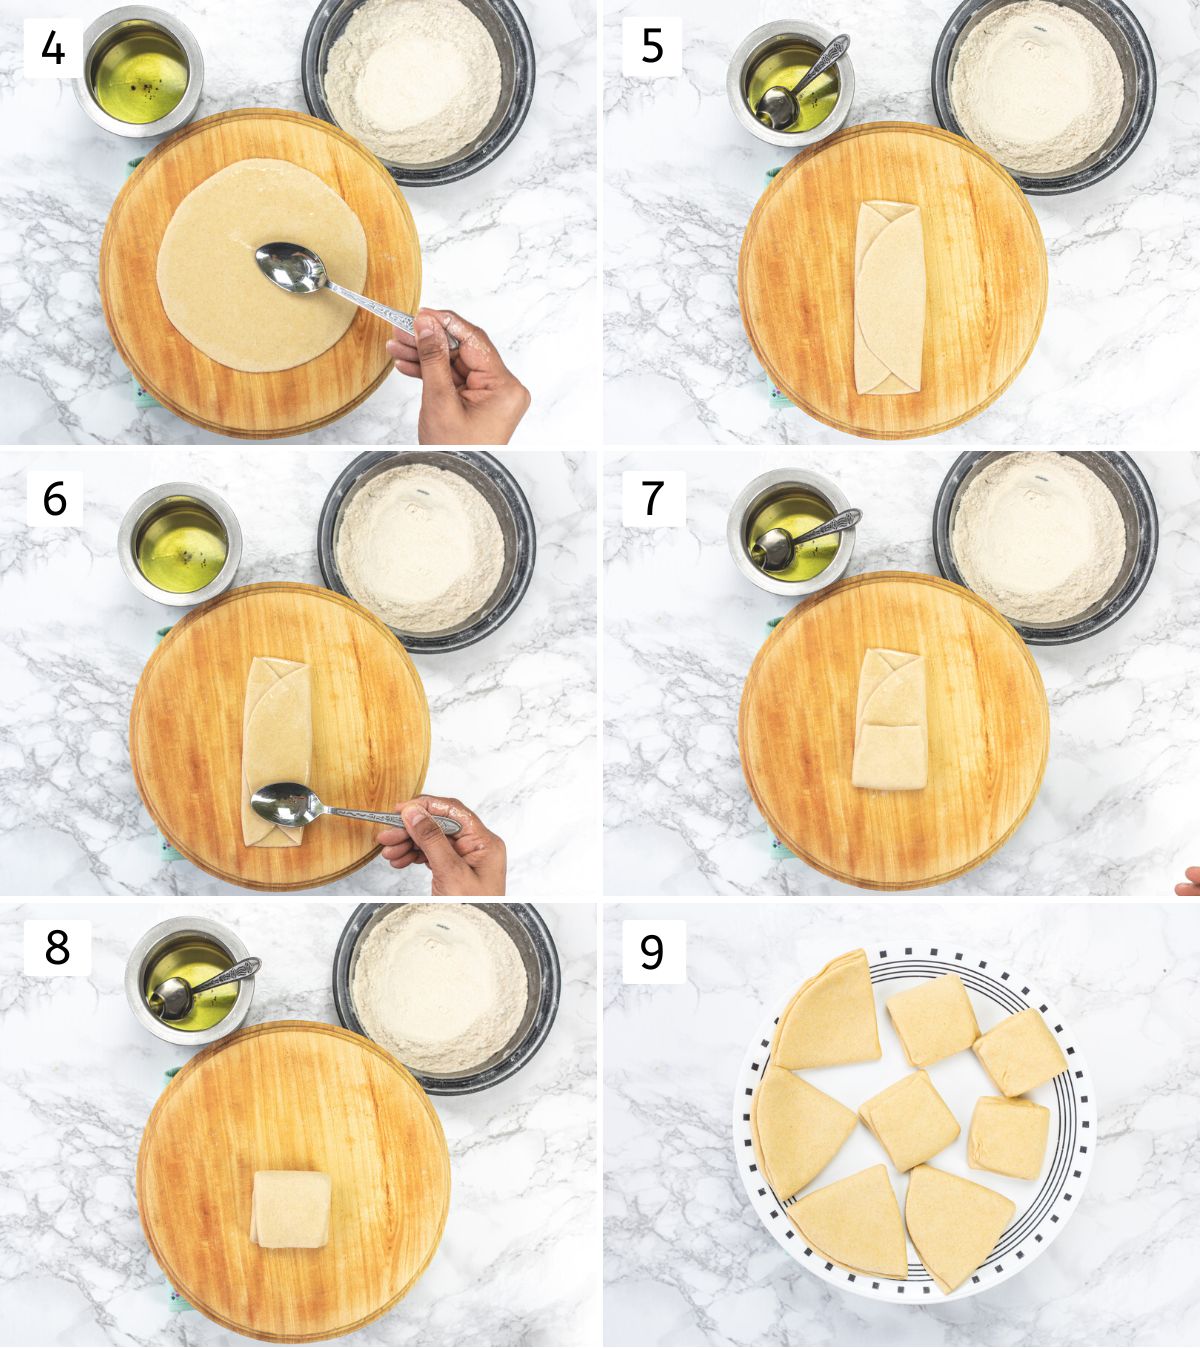
4) Drizzle and spread the oil on the rolled surface evenly.
5) Fold the ⅓ portion halfway and fold the other ⅓ portion on top of the first fold (it will overlap).
6) Again apply oil on the surface.
7) Repeat the same ⅓ portion folding from one side and the second fold by overlapping.
8) It will look like a square.
9) Keep the square dough on a plate and repeat the same for the rest of the dough balls. Keep them covered with a kitchen towel.
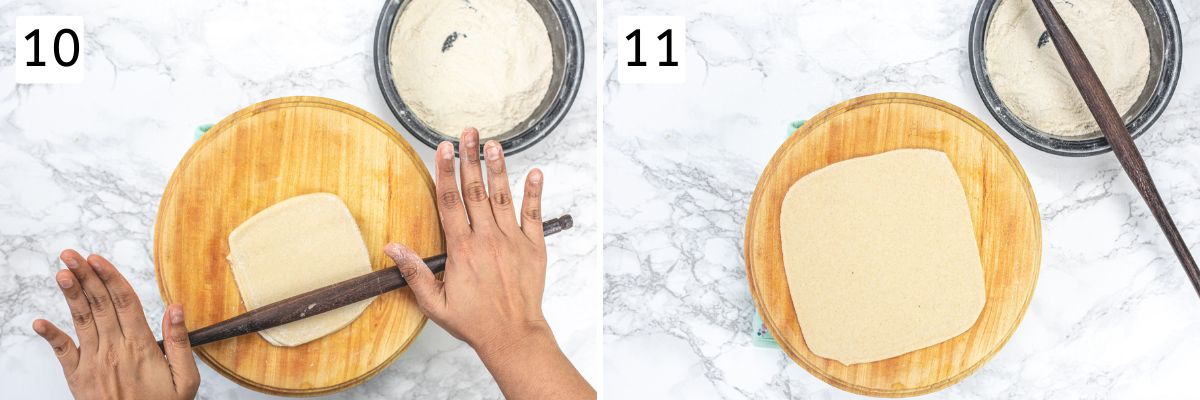
10) Dust the square dough in dry flour from both sides.
11) Roll by applying even pressure on all the sides and keep the square shape intact. You can lift and turn the paratha at 90 degrees angle to roll at even thickness from all sides.
Rolling The Paratha (Triangle):
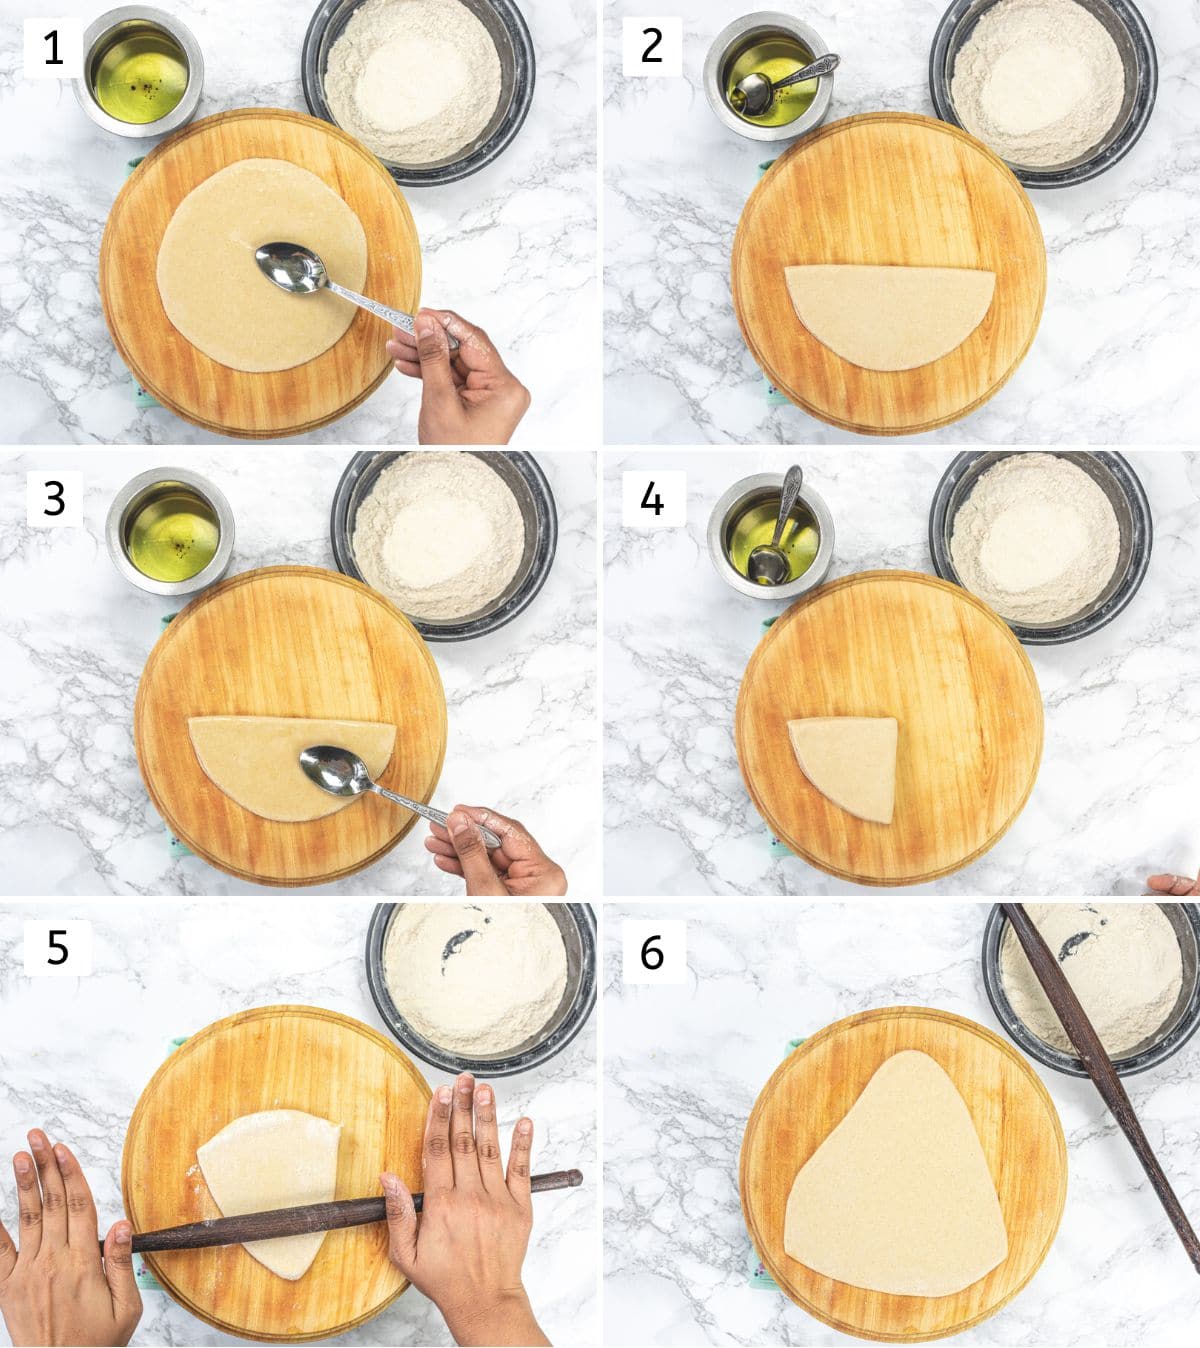
1) Roll into a 6-inch diameter circle. Drizzle and spread the oil on the rolled surface evenly.
2) Fold the rolled circle into half by making a half-moon shape.
3) Spread oil on the half-moon surface.
4) Fold it in half again and it gives a triangle shape.
5) Dust both sides of the triangle shape with dry flour.
6) Roll by rolling all three corners and make sure the rolled paratha has even thickness from all sides.
Cooking Paratha On Tawa:
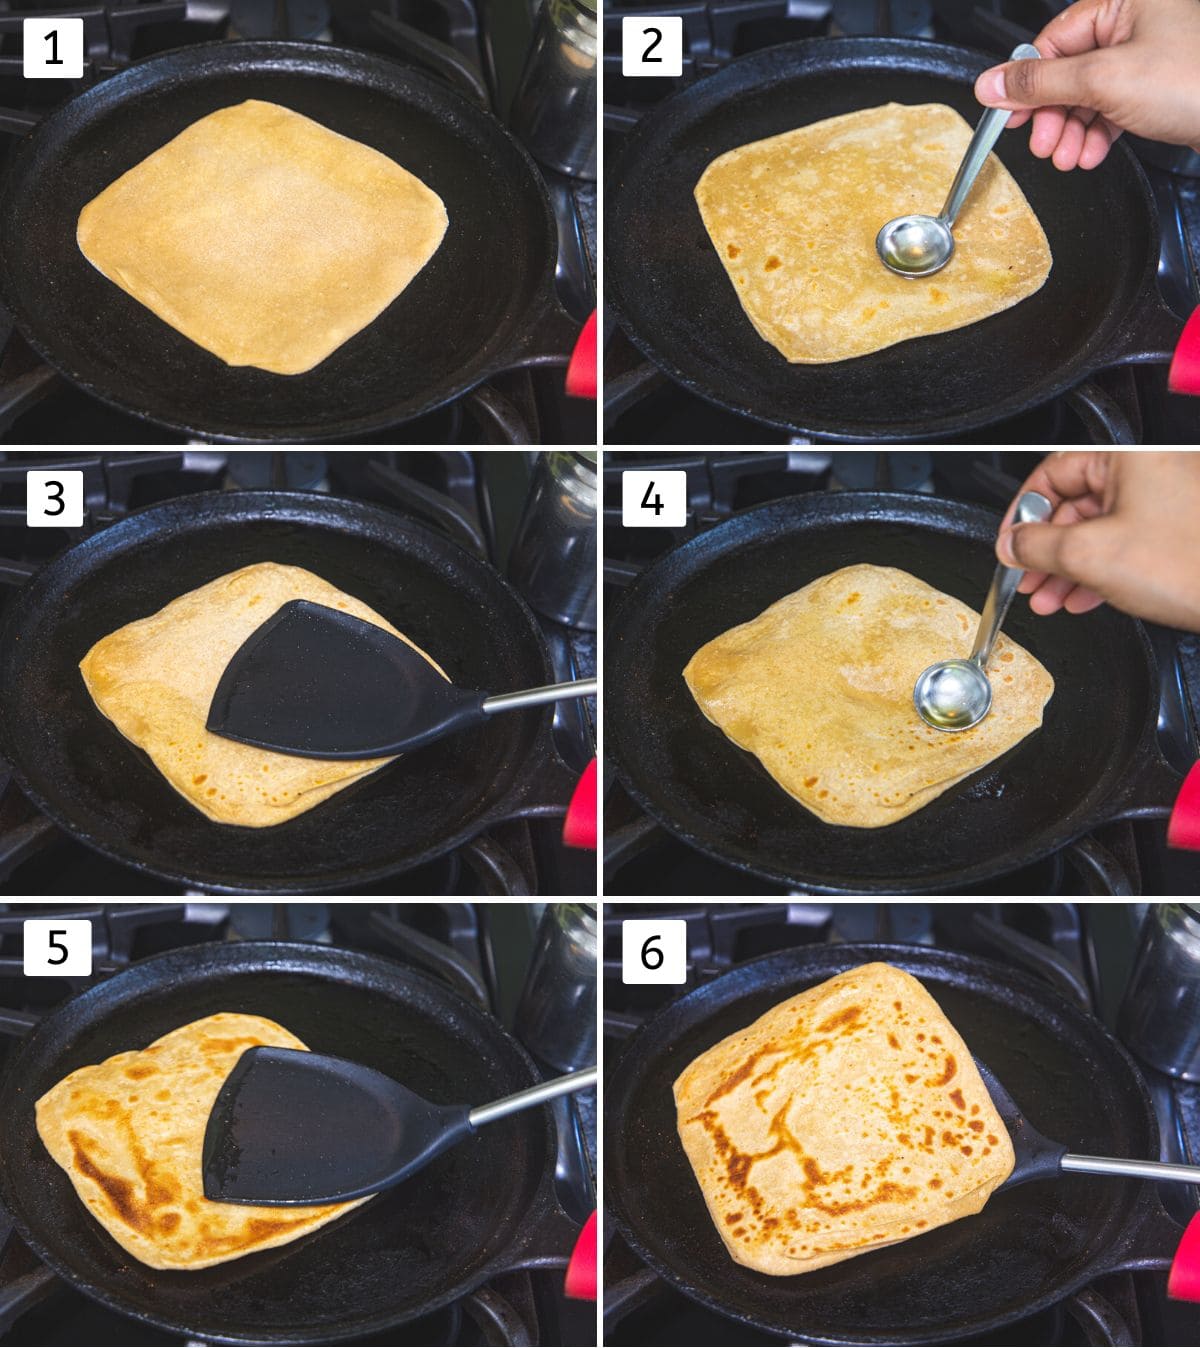
1) Heat the tawa (skillet) on medium-high heat. Once the tawa is hot place a rolled plain paratha on it and within 30 seconds you’ll notice the bubbles on top and there will a few brown spots on the bottom side.
2) Flip it and apply around 1-2 teaspoons of oil all over the surface.
3) Once the bottom side has a few brown spots, flip and cook oiled-side down by pressing lightly using a spatula.
4) Apply around 1-2 teaspoons of oil on the surface.
5) Flip and cook another side similarly by pressing lightly.
6) You’ll get golden brown spots and crisp edges on both sides.
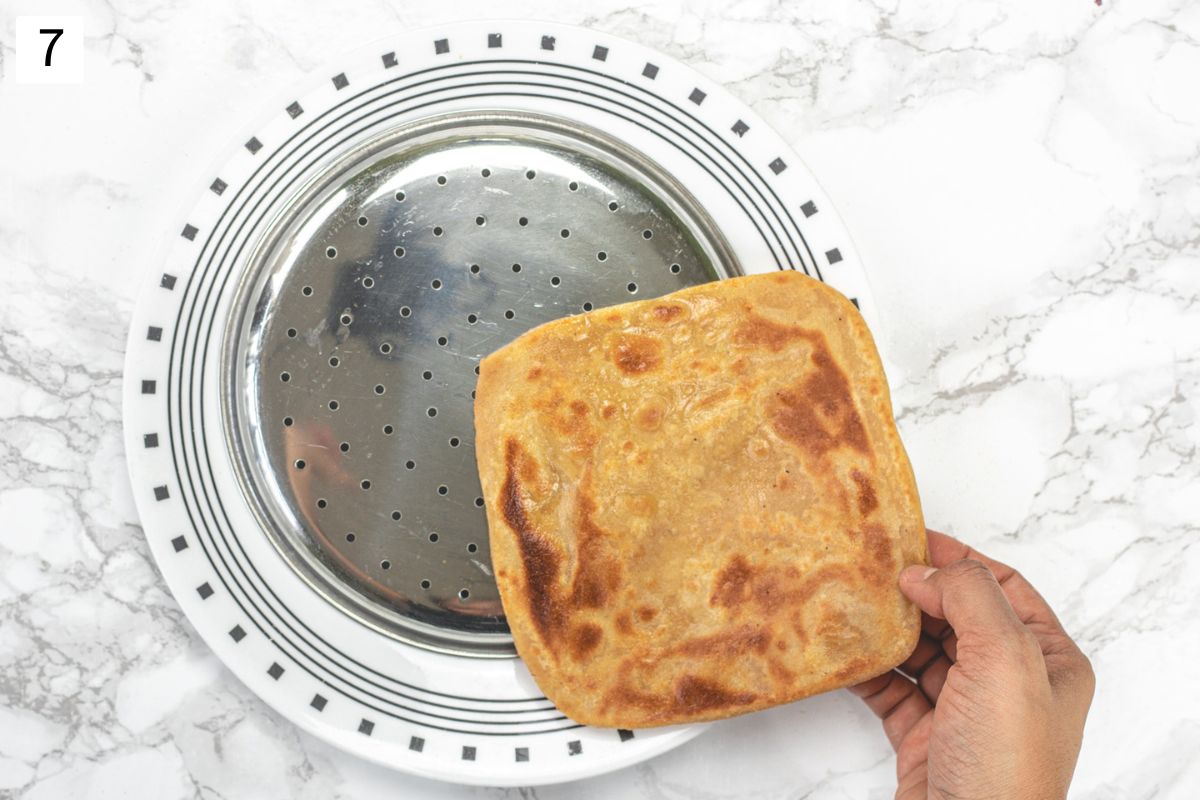
7) Remove the cooked tawa paratha from the skillet and place it on a plate with holes (or on a glass). So the air circulates and the paratha doesn’t get soggy from the bottom.
Repeat the paratha rolling and cooking process until done. Similarly, you can fry triangle paratha as well.
💭Expert Tips To Make BEST Paratha
Plain Paratha Dough Tips:
- If kneading the dough by hand then add little water at a time and keep kneading the dough. If you dump all the water at once, you’ll get a sticky mess.
- How to knead once the dough comes together? Stretch the dough, use the palm of your hand, fold, and repeat until you get a medium soft, pliable dough.
- The paratha dough has to be smooth and medium soft (not loose and sticky, not stiff and hard).
- If the dough is sticky, add some more flour.
- If the dough is stiff, add 1 tablespoon of more water at a time and knead.
- Massaging and kneading the dough with a few drops of oil is important so you can roll the paratha easily with smooth edges.
- Kneading the dough until it gets smooth (whether by hand or using a stand mixer) is necessary. So gluten is formed.
- Resting the dough for at least 15 minutes is a must to get the softer inner texture of paratha.
Rolling Tips:
- Place a napkin underneath the rolling board (chakla) so it doesn't move while rolling the paratha.
- Roll the dough with soft hands by applying gentle, equal pressure using a rolling pin.
- Apply just enough amount of oil between the layers. If added too much oil then it will ooze out while rolling. If used less oil then you won’t get soft layers and paratha becomes dense. So you’ll know the exact amount after you do one or two.
- Don’t use too much dry flour while rolling, otherwise cooked paratha comes out dry and soaks up too much oil. You’ll need to dust two times only, the first time to begin with and the second time dust the folded dough once only.
- Just in case you have used more dry flour for a dusting purpose, then always dust off the excess once rolling is done.
Cooking Paratha Tips:
- Be generous in drizzling oil while cooking tawa paratha otherwise, you’ll end up with chewy and dense paratha. Oil is needed to get a flaky texture.
- Do not press too much using a spatula otherwise, paratha turns hard and chewy. Be gentle and use very light pressure to help paratha cook evenly.
🥣 Storage Instructions
Paratha tastes best when served fresh and hot/warm.
However, you can store leftover paratha in an insulated container or an airtight container for a day or overnight. Leftovers can be eaten for breakfast by reheating on the tawa slightly.
Packing paratha for lunch-box?
- Place cooked paratha on a perforated plate (a plate with holes) or a bowl or glass. So the air can circulate and doesn’t make paratha soggy.
- Keep staking the paratha on top until done.
- Partially cover the stack of paratha with another plate and let it cool down for 15 minutes.
- Then place a piece of paper towel in the bottom of the container and place the paratha on that and close the container.
Reheating Paratha: It should not be reheated in a microwave otherwise it will turn chewy and tough. It tastes good at room temperature or reheat slightly on the tawa until warmed up.
Storing the paratha dough:
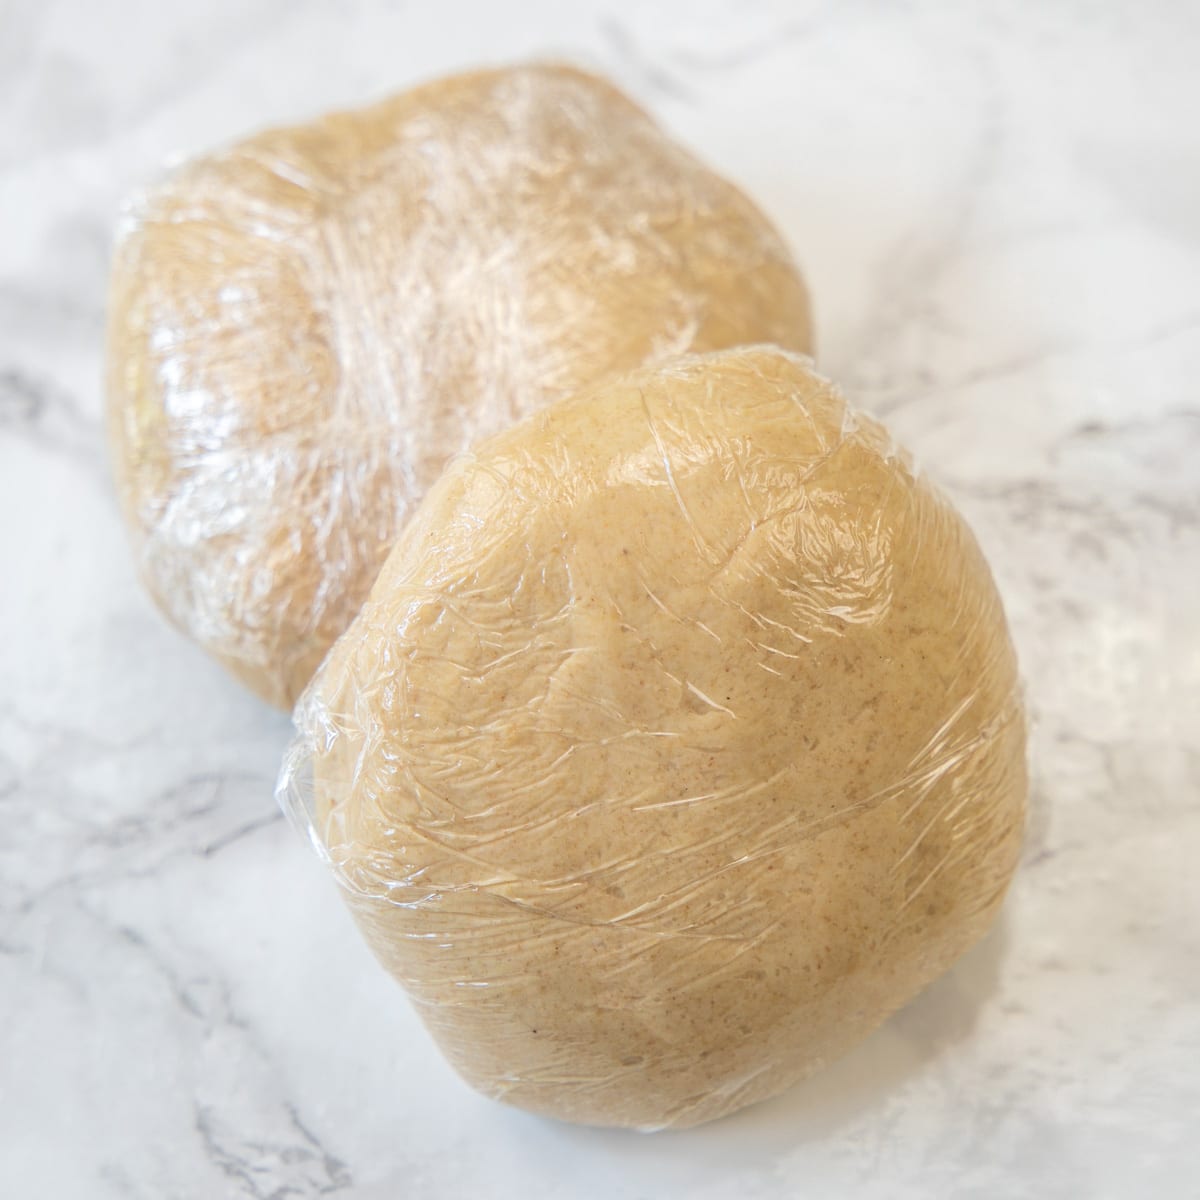
- Wrap the dough in plastic wrap and store it in the refrigerator for up to 24 hours only. If I have to make the plain paratha in the morning to pack in the lunch then I would knead the dough the night before and store it in the refrigerator. In the morning, bring the dough to room temperature before making parathas.
- In the freezer, the plastic-wrapped dough can be stored for up to 3 months. I usually knead a big batch using a kitchen aid stand mixer. Divide into portions and freeze to use for the next 2 weeks.
- To thaw, keep it on the counter for an hour or keep it in the refrigerator for a few hours until it is defrosted.
🍽 What To Serve With Plain Paratha?
- Breakfast: A warm paratha with a cup of chai (tea) is the best breakfast. Or paratha can be served with mango pickle or yogurt or chutney as breakfast.
- Meal: Paratha can be served with gravy dish (such as dum aloo, chana masala, mixed veg curry, paneer makhani, palak paneer, etc) or lentil dishes (such as dal makhani, dal fry, whole masoor dal, etc).
- Make a wrap: Spread chutney, fill with any leftover sabzi, add some salad (onion, cucumber, carrot), sprinkle chaat masala, and roll (just like frankie or kathi roll).
Check Out Other Indian Bread Recipes
Did you try this plain tawa paratha recipe? I’d love to hear about it! Leave a review in the comment section below.
Recipe Card
Paratha Recipe (Plain Tawa Paratha)
Ingredients
- 2 cups Whole wheat flour (Chapati atta)
- 2 teaspoons Oil to add in the dough
- ½ teaspoon Salt
- ¾ cup + 2 tablespoons Water more or less
- 1 teaspoon Oil to coat the dough
- Oil 1 teaspoon for folding one paratha, 1 tablespoon for cooking one paratha
Instructions
Kneading The Dough:
- In a stand mixer bowl, add water and oil. Add chapati atta and salt.
- Attach the dough hook attachment. Start the mixer on low speed and knead the dough. Once you feel the dough is starting to come together then increase the speed a little bit but still on low speed (no.2 or 4). Keep kneading until it forms a dough. You may need to stop the mixer and check if it needs more water or if it's sticky then you may need a sprinkle of more flour. Adjust as needed and continue kneading.
- To knead the dough by hand, add flour and salt in a large bowl and mix. Add oil and mix by rubbing between fingers. Then add little water at a time and continue kneading using the bottom palm of your hand until you get the smooth dough.
- Add a teaspoon of oil over the dough. Spread it over the dough ball and smooth it out. The dough should be smooth and medium soft (not too soft like roti, but not too hard like kachori or mathri).
- Cover it with a plate or a towel and let it rest for 10-15 minutes.
Rolling The Paratha (Square):
- After the resting time, knead the dough again 2-3 times to smooth it out. Then divide into 8 equal portions. Work with one portion at a time, make a smooth ball, and flatten it between your palms to make a disc.
- Dust both sides of the disc into dry flour and place it on a rolling board (or surface).
- Roll into a 6-inch diameter circle. Drizzle and spread the oil on the rolled surface evenly.
- Fold the ⅓ portion halfway and fold the other ⅓ portion on top of the first fold (it will overlap).
- Again apply oil on the surface. Repeat the same ⅓ portion folding from one side and the second fold by overlapping. It will look like a square.
- Keep the square dough on a plate and repeat the same for the rest of the dough balls.
- Dust the square dough in dry flour from both sides.
- Roll by applying even pressure on all the sides and keep the square shape intact. You can lift and turn the paratha at 90 degrees angle to roll at even thickness from all sides.
Rolling The Paratha (Triangle):
- Roll into a 6-inch diameter circle. Drizzle and spread the oil on the rolled surface evenly.
- Fold the rolled circle into half by making a half-moon shape.
- Spread oil on the half-moon surface. Fold it in half again and it gives a triangle shape.
- Dust both sides of the triangle shape with dry flour. Roll by pulling all three corners and make sure the rolled paratha has even thickness from all sides.
Cooking Paratha On Tawa:
- Heat the tawa (skillet) on medium-high heat. Once the tawa is hot place a rolled plain paratha on it and within 30 seconds you’ll notice the bubbles on top and there will a few brown spots on the bottom side.
- Flip it and apply around 1-2 teaspoons of oil all over the surface.
- Once the bottom side has a few brown spots, flip and cook oiled-side down by pressing lightly using a spatula.
- Apply around 1-2 teaspoons of oil on the surface. Flip and cook another side similarly by pressing lightly.
- You’ll get golden brown spots and crisp edges on both sides.
- Remove the cooked tawa paratha from the skillet and place it on a plate with holes (or on a glass). So the air circulates and paratha doesn’t get soggy from the bottom.
- Repeat the paratha rolling and cooking process until done. Similarly, you can fry triangle paratha as well.

kaveri
These were my childhood favorites....Mom always used to make chappathis this way for our lunch box.....I haven't made them in a long time...Looks really yum
Treat and Trick
Perfectly done and love the shape!