Gujiya Recipe (Mawa Gujia)
Holi or Diwali festival is incomplete without this mawa gujiya recipe. I am sharing the step by step homemade gujiya recipe, so you can follow the pics and make it without fail.
What Is Gujiya?
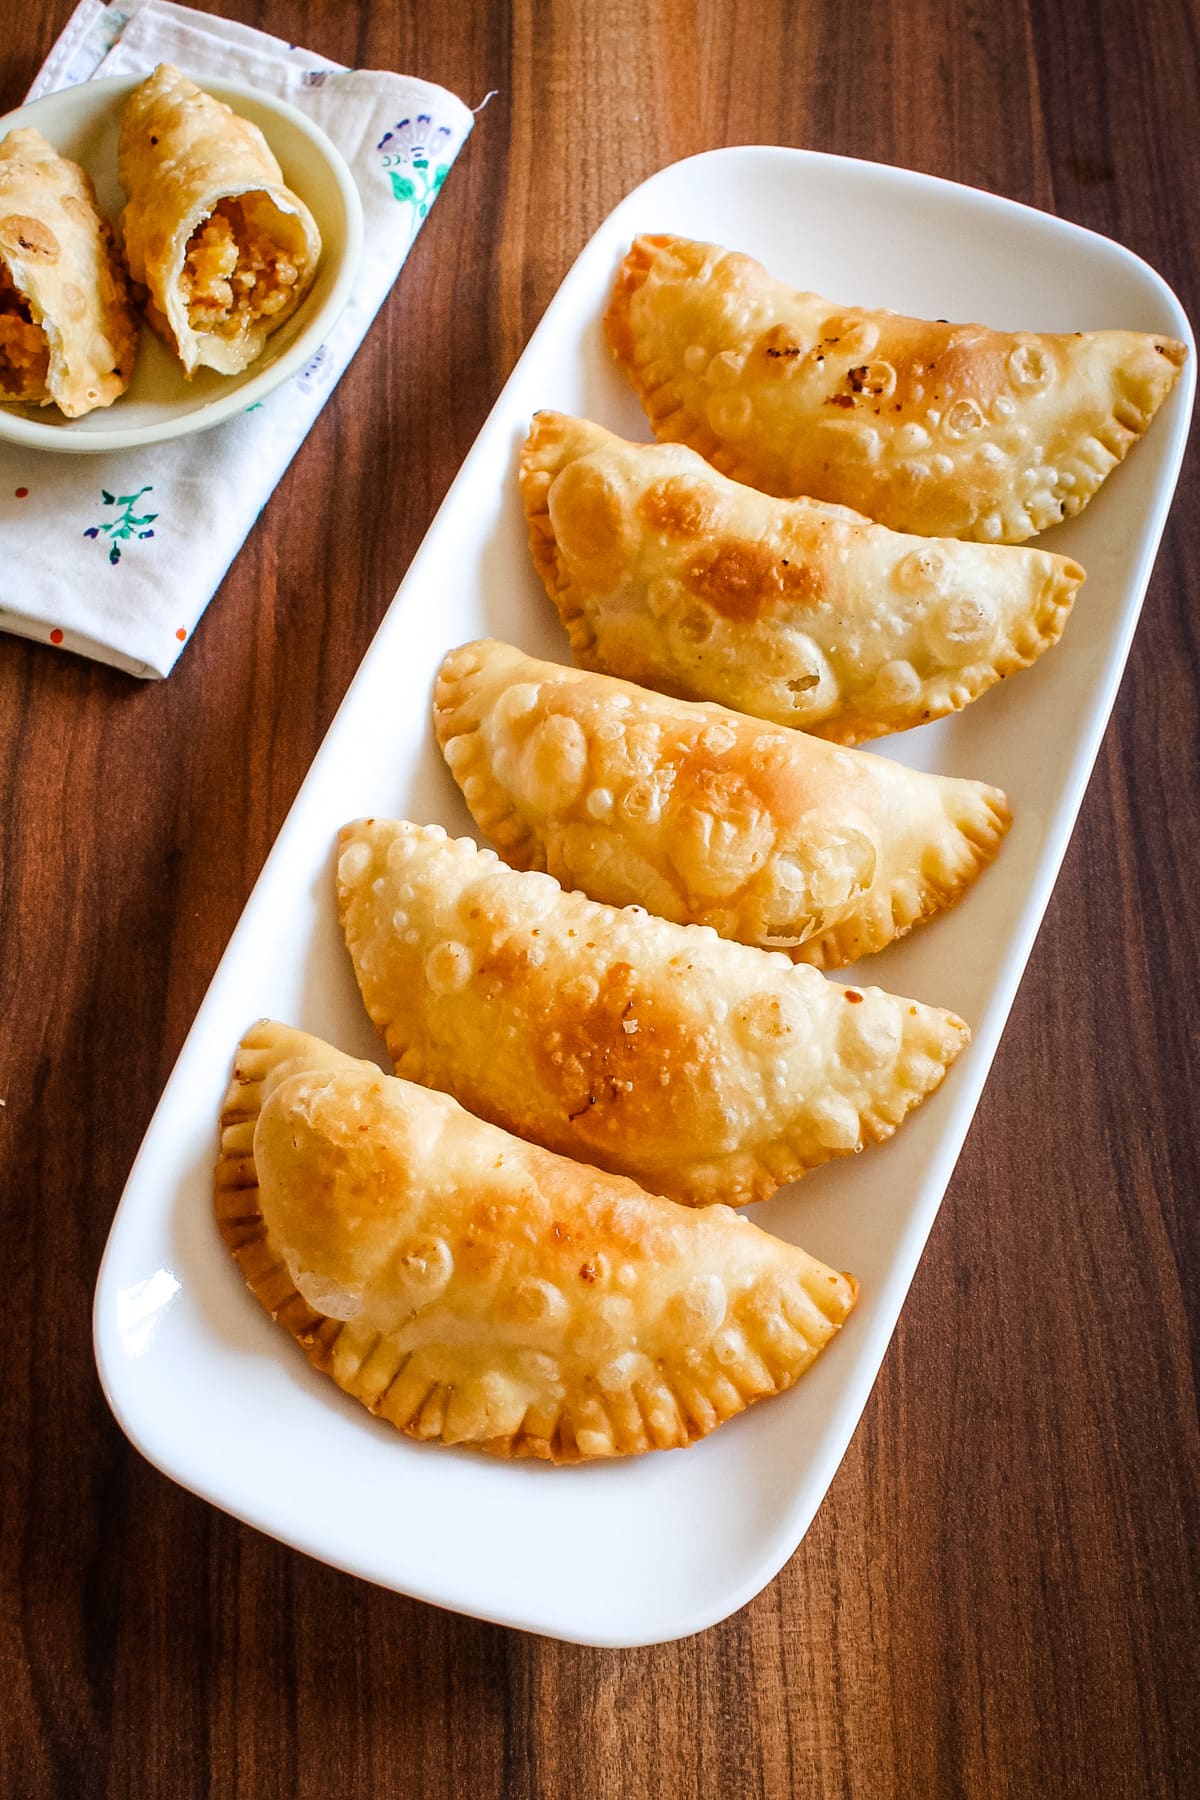
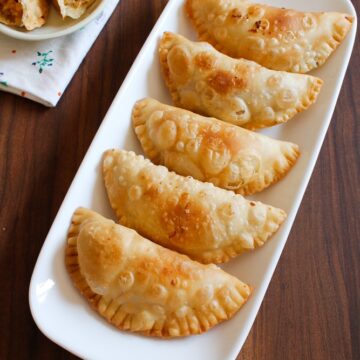
Gujiya (Gujia) is a traditional sweet, deep-fried, half-moon shaped dumpling. The outer layer is crispy yet flaky in texture and made from all purpose flour. The stuffing is very rich, sweet in taste and made from mawa (khoya), sugar, nuts and it is .
Different Regional Names
Different regions of India have their own name and version of making mawa gujiya. Some have different methods/ingredients for stuffing. But the basic method, shape, size are almost the same
- Ghughra in Gujarat (stuffing made from semolina, dry coconut, nuts)
- Karanji in Maharashtra (stuffing made from coconut, milk, poppy seeds)
- Nevris in Goa (stuffing made from coconut, jaggery)
- Kajjikayalu in Andhra Pradesh (stuffing made from dry coconut, semolina)
There is another version of making gujiya from the region of Rajasthan. Once they are fried, then it is dipped into the sugar syrup and garnished with chopped nuts.
The authentic gujiya has a stuffing of sweet mawa or khoya. Hence it is known as Mawa gujiya as well.
Ingredients Notes
Here is the pic of the ingredients used in making mawa gujiya recipe. 3 Ingredients (flour, salt, ghee) plus water are required to make outer cover. The rest is required to make stuffing. And oil is needed for deep frying (not shown in the pic).
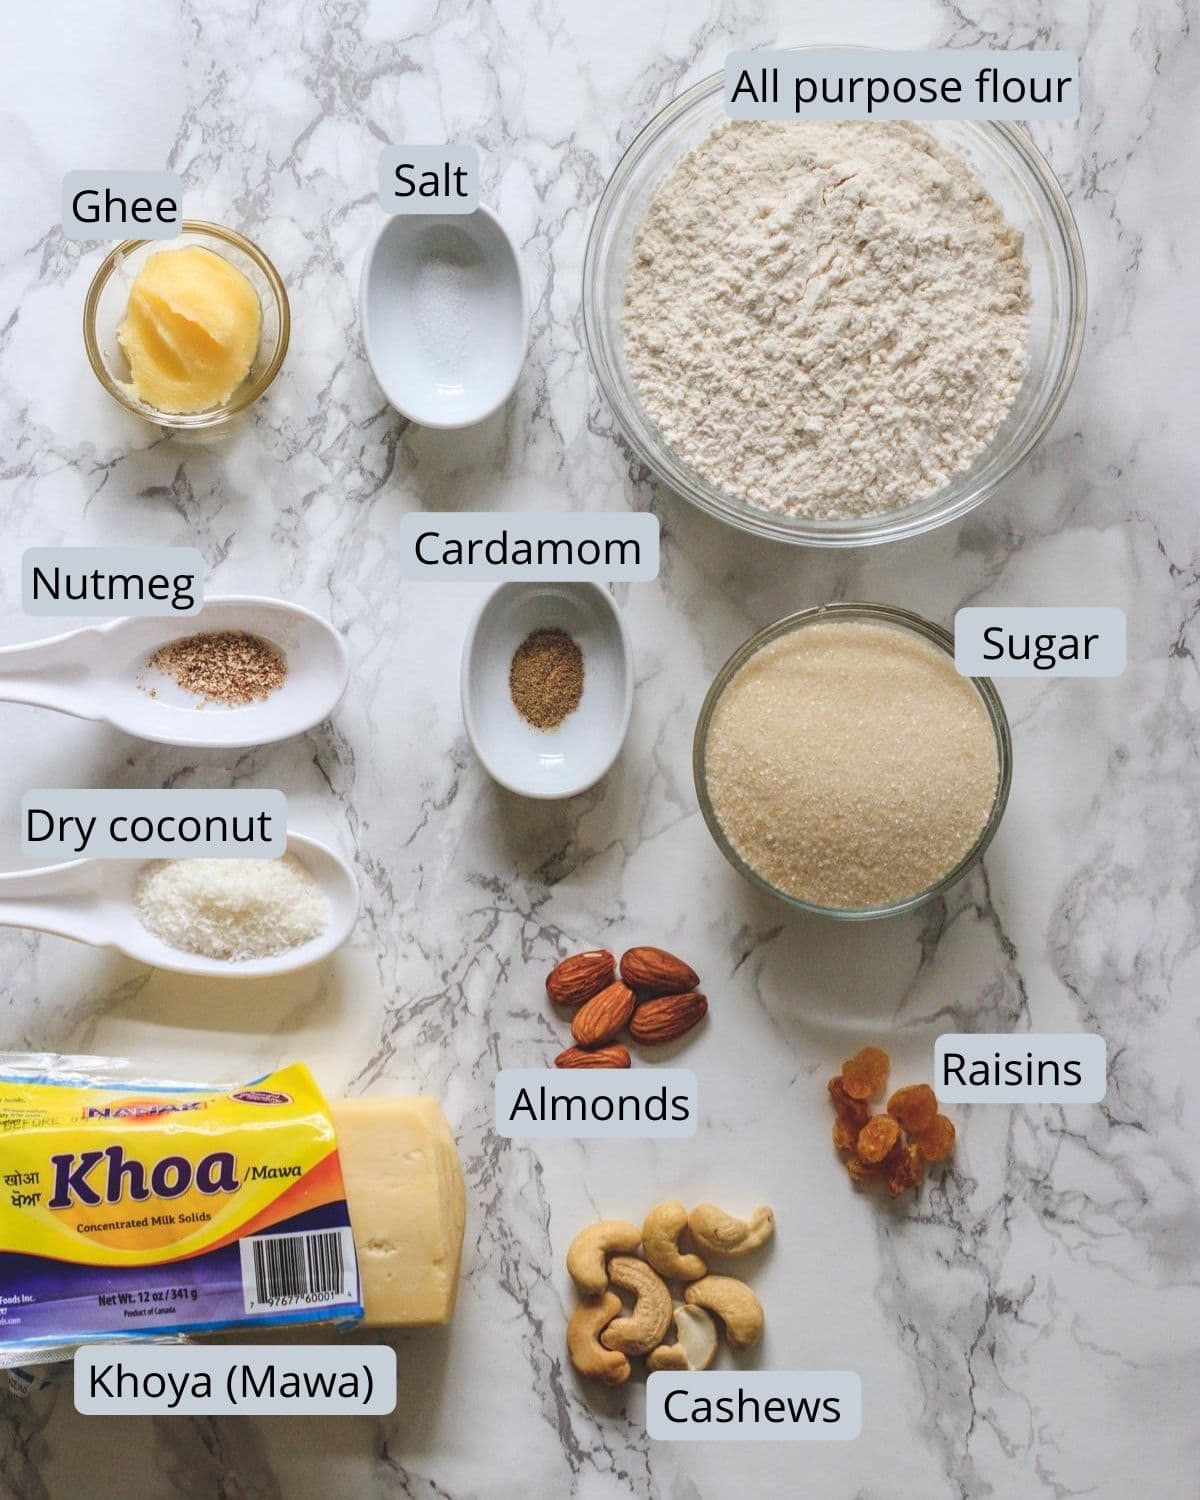
- Ghee: Do not reduce the amount of ghee while kneading the dough. The right proportion of ghee to flour is needed to get the perfect flaky, crispy texture of gujiya.
- Khoya (Mawa): I have used store-bought khoya which is available here in the USA in any Indian grocery store next to the dairy section.
- Dried fruits & nuts: I have used almonds, cashews and raisins. You can add finely chopped dates, figs or other nuts like pistachios, etc.
Step By Step Photo Instructions
Making Gujiya Stuffing:
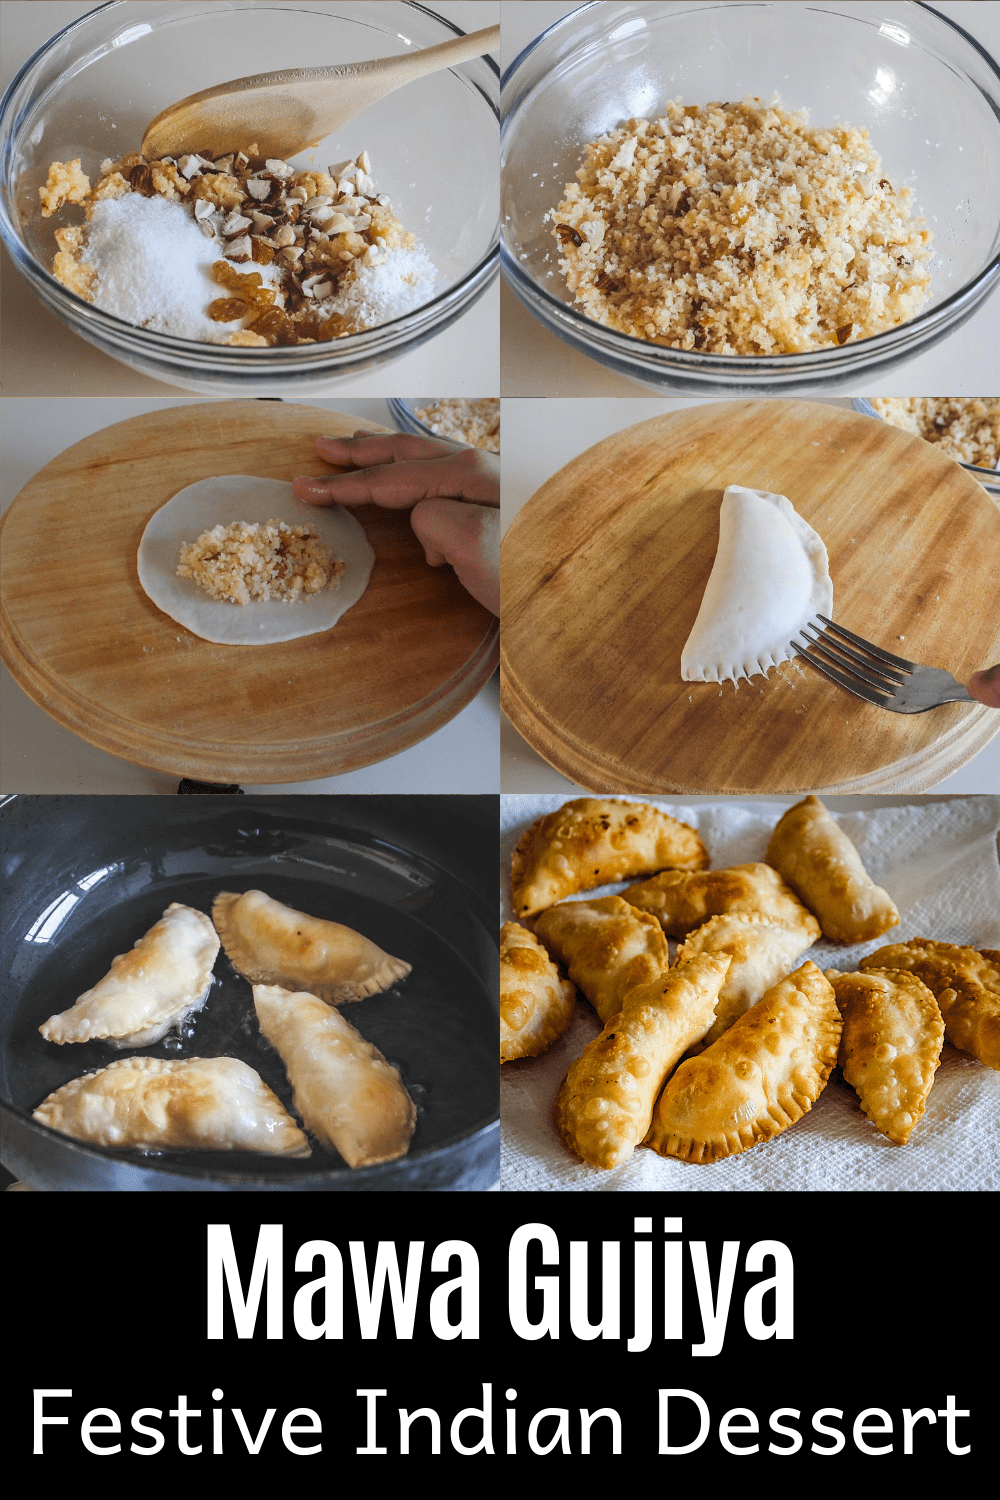
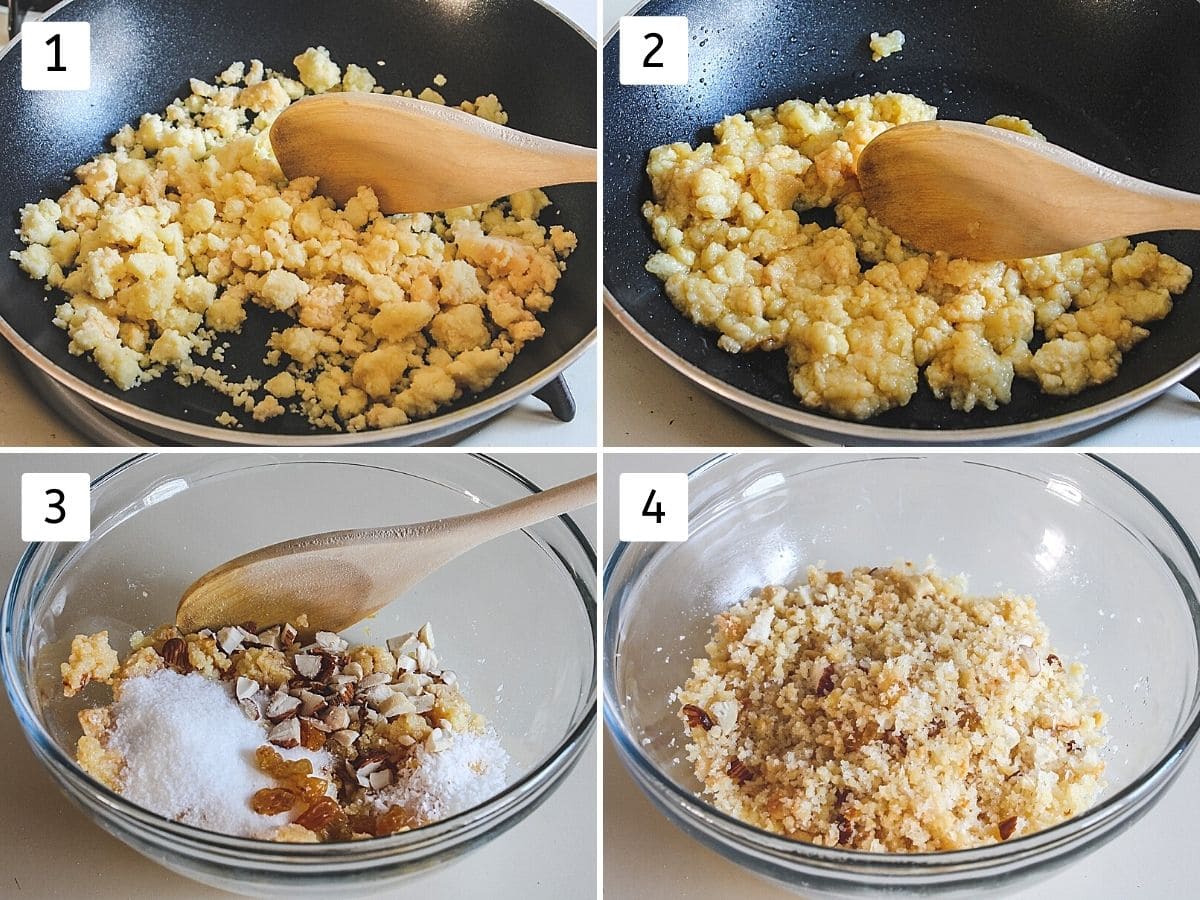
1) Heat the mawa in a pan on medium heat.
2) Keep stirring continuously, it will start to melt. Cook until it becomes light brown, turn off the stove. It took me about 3-4 minutes.
3) Remove it to a bowl and let it cool to touch (warm). Then add sugar, cardamom powder, nutmeg, cashews, almonds, and raisins. Please make sure that khoya is warm, not hot. If it is hot then the sugar will start to melt and stuffing will be a runny and paste-like consistency.
4) Mix it well.it is better to use your fingertip to break all the lumps and to mix thoroughly.
Making Dough:
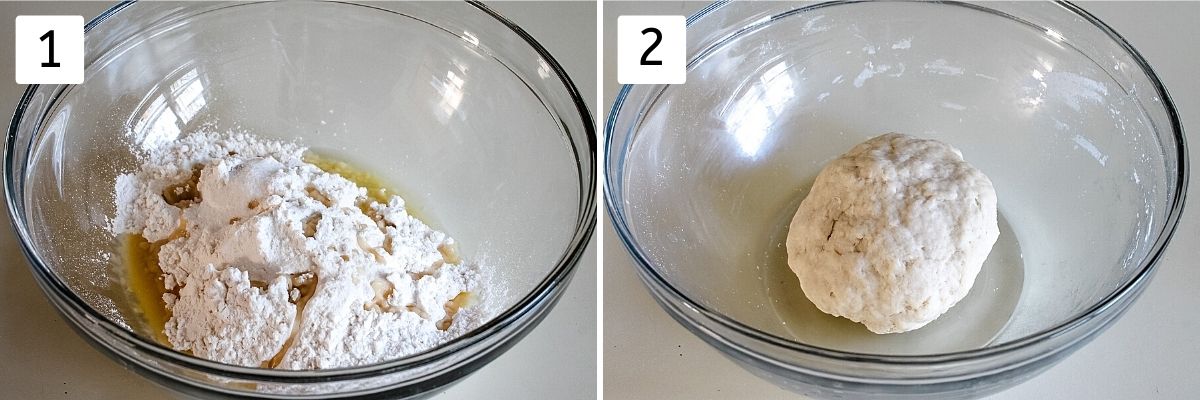
1) You can do this step while mawa is cooling in the above step to cut down the prep time. Take all purpose flour, salt and ghee in a bowl. Rub the mixture using your fingertips. It will be a breadcrumb-like texture.
2) Start adding little water at a time. Knead into a stiff and smooth dough. Cover it and let it rest for 15 minutes.
Shaping Gujiya:
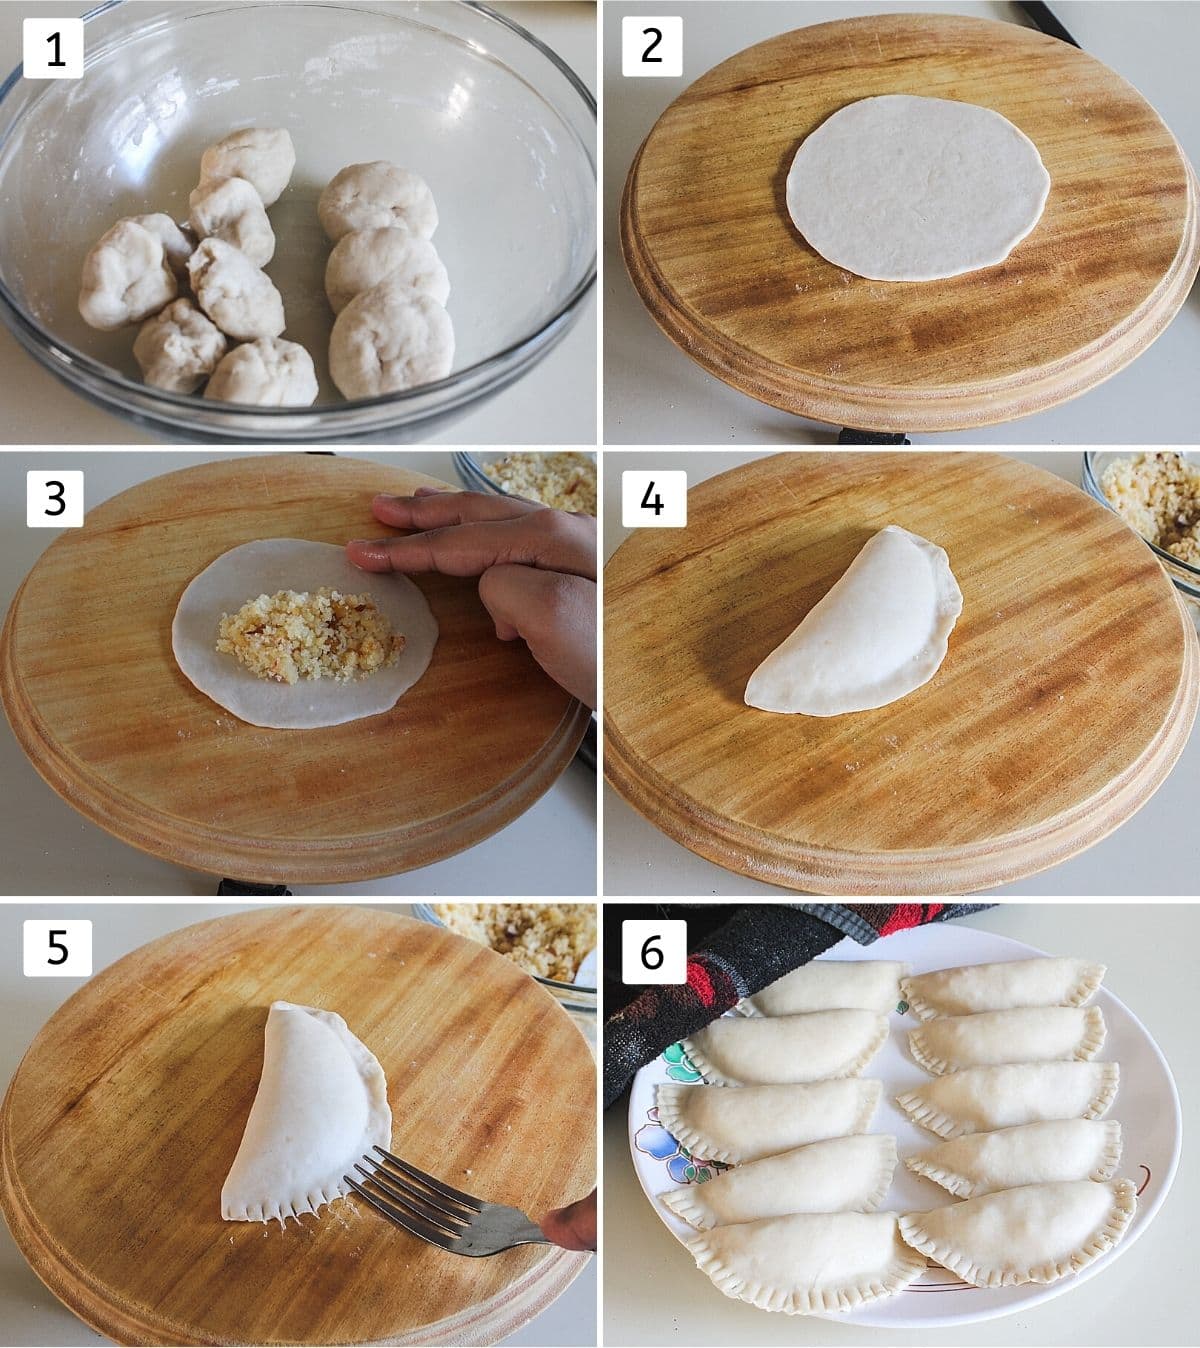
1) After the resting time of the dough, knead the dough once again to smooth out and divide it into 10 equal portions. Roll into a smooth ball and flatten it between your palms.
2) Work with one flatten disc at a time. Roll into a 4-inch diameter circle using the rolling pin and rolling board.
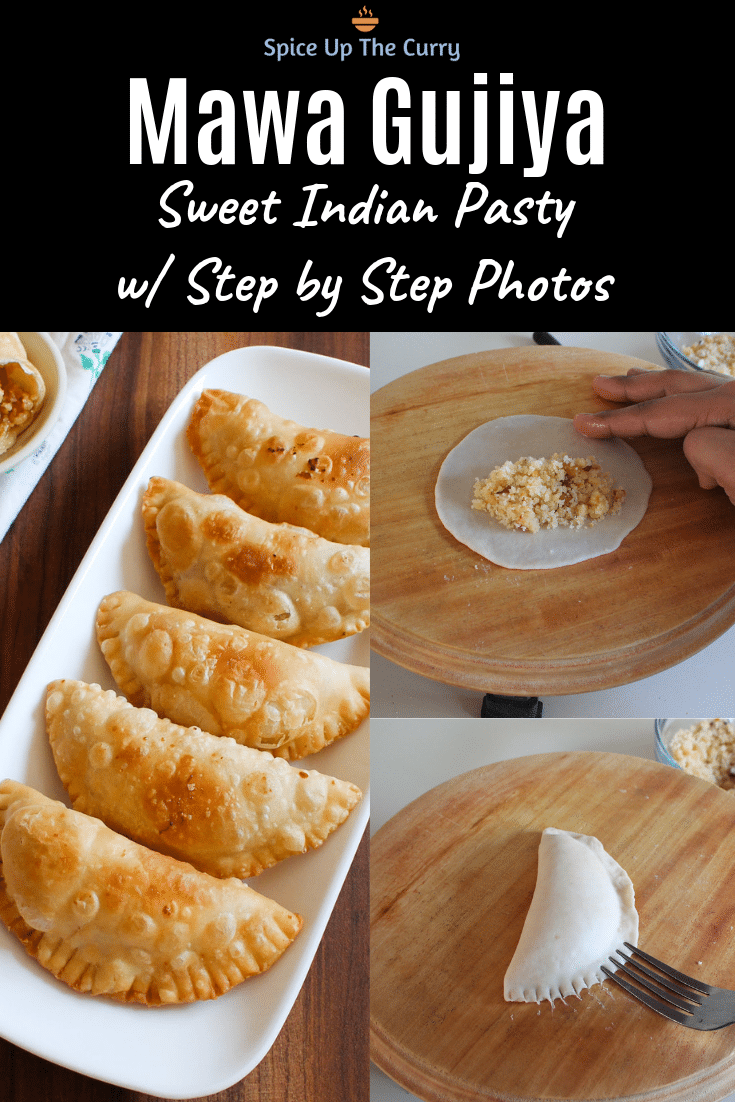
3) Put about a tablespoon stuffing in the center. Apply little water around the edges using your finger or you can use the pastry brush.
4) Fold it into a half-circle. Seal the edges by pressing it. If you have gujia mold then use that.
5) Now using a fork make the indentation around the edges. it will do two things, one makes a nice design and second it will make sure that it is sealed tightly. If it is not sealed properly then it will open up while frying and it will be a big mess. This design is for beginners, if you are expert and patient enough to make the design by hand then go ahead. I am not one of them.
6) Repeat the same for rest and keep them covered with a clean kitchen towel to prevent them from drying.
Frying Mawa Gujiya:
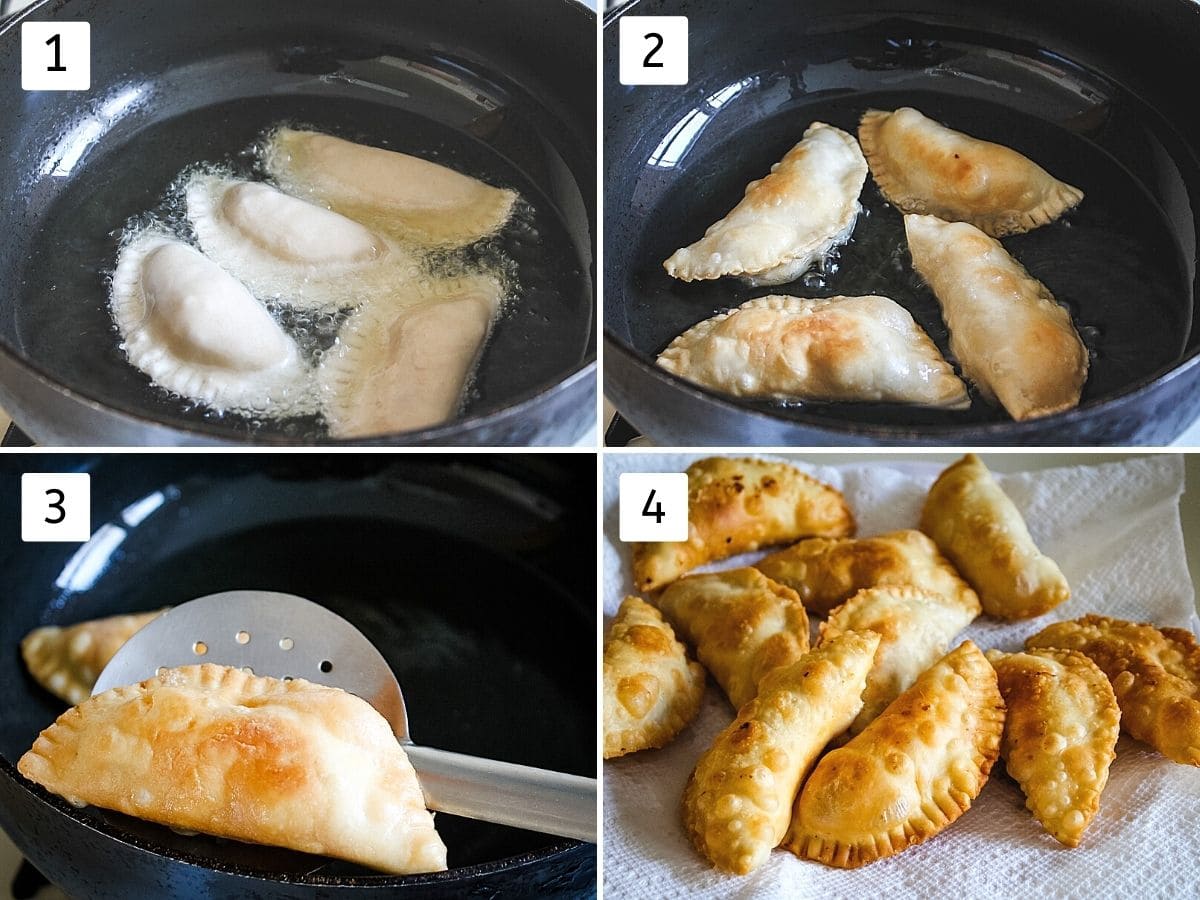
1) When about to finish shaping, heat the oil or ghee in a pan on medium heat for frying. I have used oil. Once it is hot enough, then fry few at a time.
2) Flip or move in between for even browning.
3) Once it is golden brown and crispy from all sides, use the slotted spoon to remove it.
4) Remove it to a paper towel-lined plate and let it cool completely before serving or storing them into the container. NOTE: This mawa gujiya does not store for more than 2 days because of the khoya.
💭 Expert Tips
- For the dough, flour and ghee proportion should be right. The addition of ghee or oil in the flour is known as ‘Moyen’ or ‘Moyan’. It makes the outer layer crispy and flaky. If you add less amount than mentioned, the crust will be hard and crispy (not flaky). If you add more amount than mentioned, the crust may break while frying.
- Do not over stuff the gujiya. Little less is ok, but too much stuffing will cause breaking up while frying.
- Gujia has to be sealed tightly, if not then it will open up during frying process. And filling will come out into the oil. Thus it will burn and stick to other gujiya’s surface. It will ruin the taste as well as look.
- Oil should be at the right temperature for frying gujiya. Check by dropping a little piece of dough, if it comes on top steadily then it is ready. If it comes on top too slowly or too fast then it is not good to fry.

Check Out Other Festive Desserts
Gujiya Recipe (Mawa Gujia)
US measuring cups are used (1 cup = 240 ml)
Ingredients
For Outer Cover:
- 1 cup All purpose flour (Maida)
- 1 tablespoon Ghee (Clarified Butter)
- a pinch Salt
- ¼ cup + 1 tablespoon Water
For Stuffing:
- ½ cup Khoya (Mawa)
- 4 Cashew nuts, chopped
- 4 Almonds, chopped
- 12-15 Raisins
- 1 tablespoon Desiccated coconut
- ¼ teaspoon Green cardamom seeds powder
- a pinch Freshly grated nutmeg
- 3 tablespoons Sugar, If your sugar has big granules then grind into a powder or use boora
- Oil, or Ghee, for frying
Instructions
Making Stuffing:
- Heat the mawa in a pan on medium heat. Keep stirring continuously, it will start to melt. Cook until it becomes light brown, turn off the stove. It took me about 3-4 minutes.
- Remove it to a bowl and let it cool to touch (warm). Then add sugar, cardamom powder, nutmeg, cashews, almonds, and raisins.
- Mix it well.it is better to use your fingertip to break all the lumps and to mix thoroughly.
Kneading The Dough:
- You can do this step while khoya is cooling in the above step to cut down the prep time. Take all purpose flour, salt and ghee in a bowl. Rub the mixture using your fingertips. It will be a breadcrumb-like texture.
- Start adding little water at a time. Knead into a stiff and smooth dough. Cover it and let it rest for 15 minutes.
- After the resting time of the dough, knead the dough once again to smooth out and divide it into 10 equal portions. Roll into a smooth ball and flatten it between your palms.
Shaping Gujiya:
- Work with one flatten disc at a time. Roll into a 4-inch diameter circle using the rolling pin and rolling board.
- Put about a tablespoon stuffing in the center. Apply little water around the edges using your finger or you can use the pastry brush.
- Fold it into a half-circle. Seal the edges by pressing it. If you have gujia mold then use that.
- Now using a fork make the indentation around the edges. it will do two things, one makes a nice design and second it will make sure that it is sealed tightly. If it is not sealed properly then it will open up while frying and it will be a big mess.
- Repeat the same for rest and keep them covered with a clean kitchen towel to prevent them from drying.
Frying Gujiya:
- When about to finish shaping, heat the oil or ghee in a pan on medium heat for frying. I have used oil.
- Once it is hot enough, then fry few at a time, flip or move in between for even browning.
- Once it is golden brown and crispy from all sides, use the slotted spoon to remove it.
- Remove it to a paper towel-lined plate and let it cool completely before serving or storing them into the container.
Notes
- For the dough, flour and ghee proportion should be right. It makes the outer layer crispy and flaky. If you add less amount than mentioned, the crust will be hard and crispy (not flaky). If you add more amount than mentioned, the crust may break while frying.
- Do not over stuff. Little less is ok, but too much stuffing will cause breaking up in the oil.
- It has to be sealed tightly, if not then it will open up during frying. And stuffing will come out into the oil. Thus it will burn and stick to other gujiya’s surface. It will ruin the taste as well as look.
- Oil should be at the right temperature. Check by dropping a little piece of dough, if it comes on top steadily then it is ready. If it comes on top too slowly or too fast then it is not good to fry.
Hello , Thanks for the recipe . One question : My stuffing for the gujiya gets burnt while deep frying , any tips please ? Thanks
Did you seal gujiya properly?
Looks like gujiya may have opened up slightly while frying, oil got inside and burnt the stuffing.