Dahi Vada
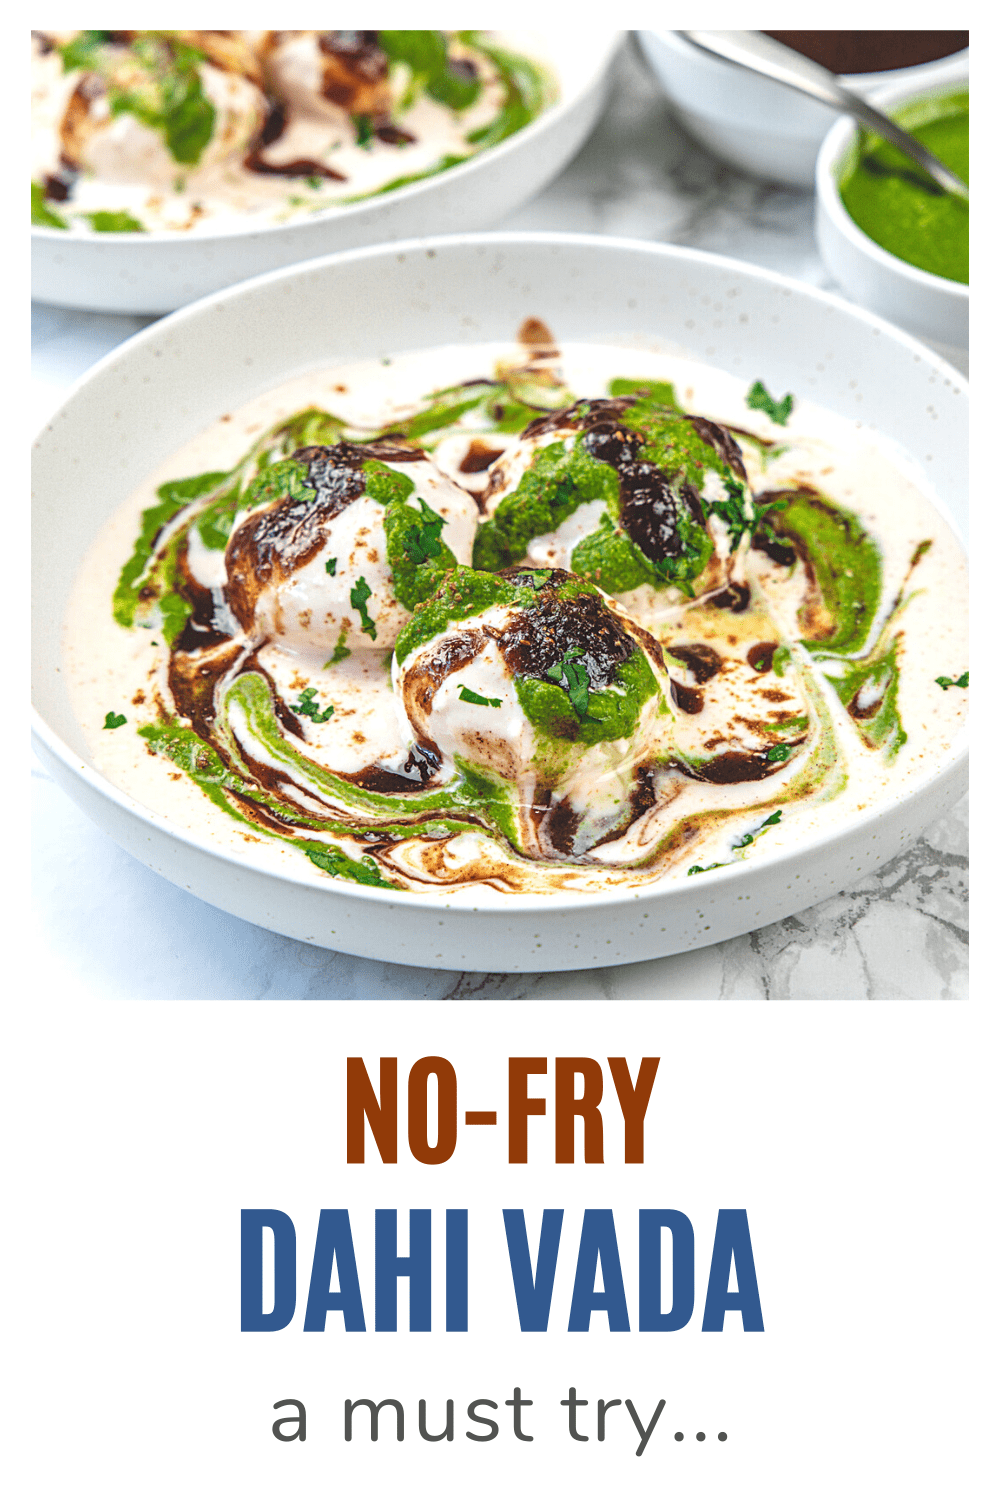
This dahi vada recipe is much better than the one you get from street vendors in India. The vada always comes out super soft, melt-in-your-mouth kind. Here you’ll learn all the tips and tricks to make them perfect every time.
Two methods are shared here: (1) traditional version (deep frying the vada) and (2) Non-fried version (pan-fried using paniyaram pan).
What is Dahi Vada?
For those who are not familiar with this popular North Indian street food:
- ‘Dahi’ means yogurt. ‘Vada’ means deep fried lentil fritters (made from urad dal – split, skinned black lentils).
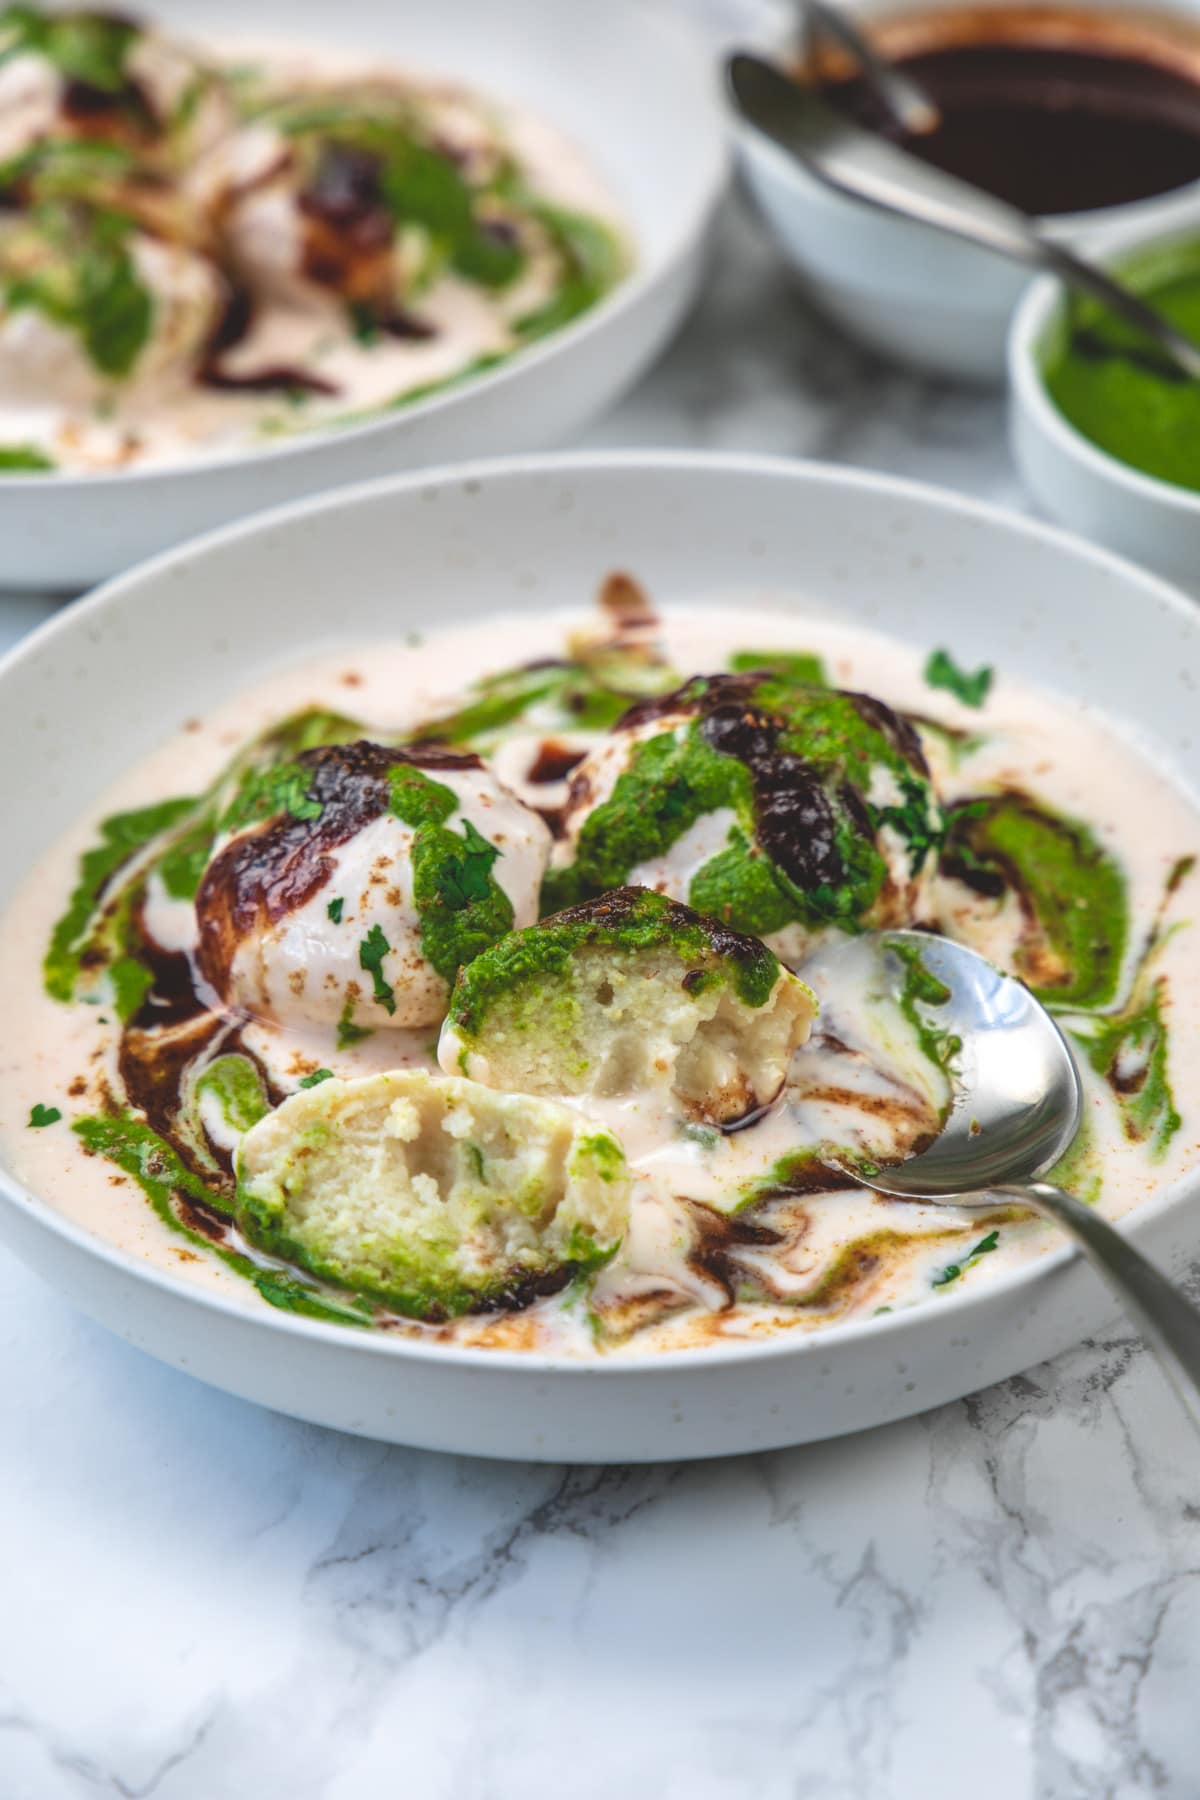
- These fluffy vada are soaked in the water to make it soft and melt-in-your-mouth kind. Then the water is squeezed out.
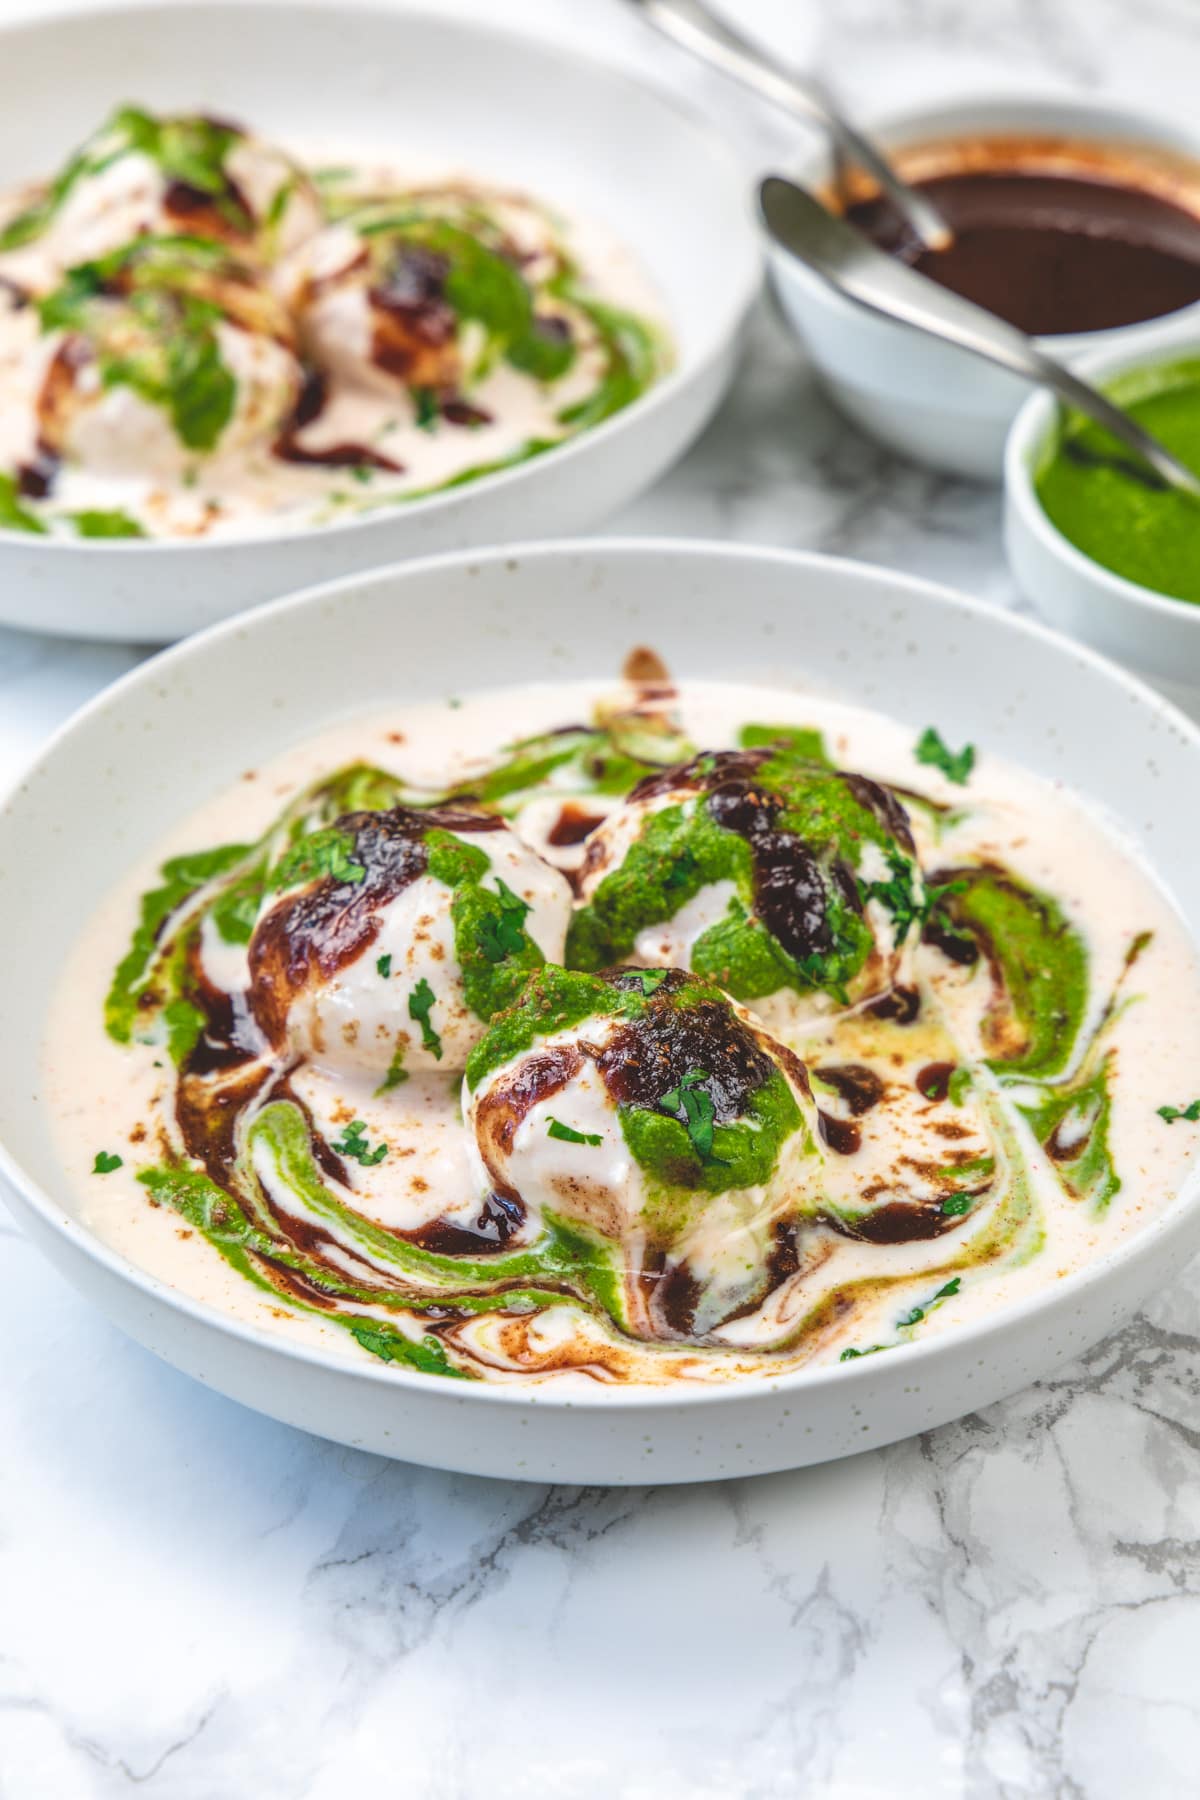
- These soaked vadas are topped with chilled yogurt and two chutneys (green cilantro chutney and sweet-sour tamarind date chutney).
- Dahi vada is garnished with roasted cumin powder, red chili powder and freshly chopped cilantro.
Dahi Vada Vs Dahi Bhalla
Dahi vada and dahi bhalla are almost similar but not the same. There are few differences.
- Dahi vada made from urad dal only. Dahi bhalla is made from a mixture of urad dal and moong dal.
- When serving dahi bhalla few more elements are added. Meaning vada are topped with yogurt and chutneys same as dahi vada. Plus, a few crispy papadi (and sometimes boiled potatoes and chickpeas) are also added. So it is also known as dahi bhalle papdi chaat in Delhi.
Traditional Deep-Fried Vs Non-Fried Method
Here I have shared both methods in step-by-step photos.
The non-fried vada are made in paniyaram (appam) pan. When you do the taste test of fried vada vs shallow fried vada right after they are fried (or shallow fried), you’ll notice the texture and taste difference.
The non-fried ones are fluffy, spongy but dry (for the obvious reason – lack of fat/oil) and not snackable as it is. While you can munch on fried ones as soon as they come out from the oil.
Once you soak the non-fried ones in the water and serve with yogurt and chutneys, no one will notice the texture difference.
Yes, non-fried dahi vada are soft, fluffy and melt-in-your-mouth kind just like the fried ones (but only after soaking).
Those who are watching calories or cutting their oil intake for some health reasons should try this non-fried dahi vada recipe.
🧾 Ingredient Notes
Here is the pic of the ingredients used in making dahi vada recipe. You’ll need 7 ingredients plus two chutneys.
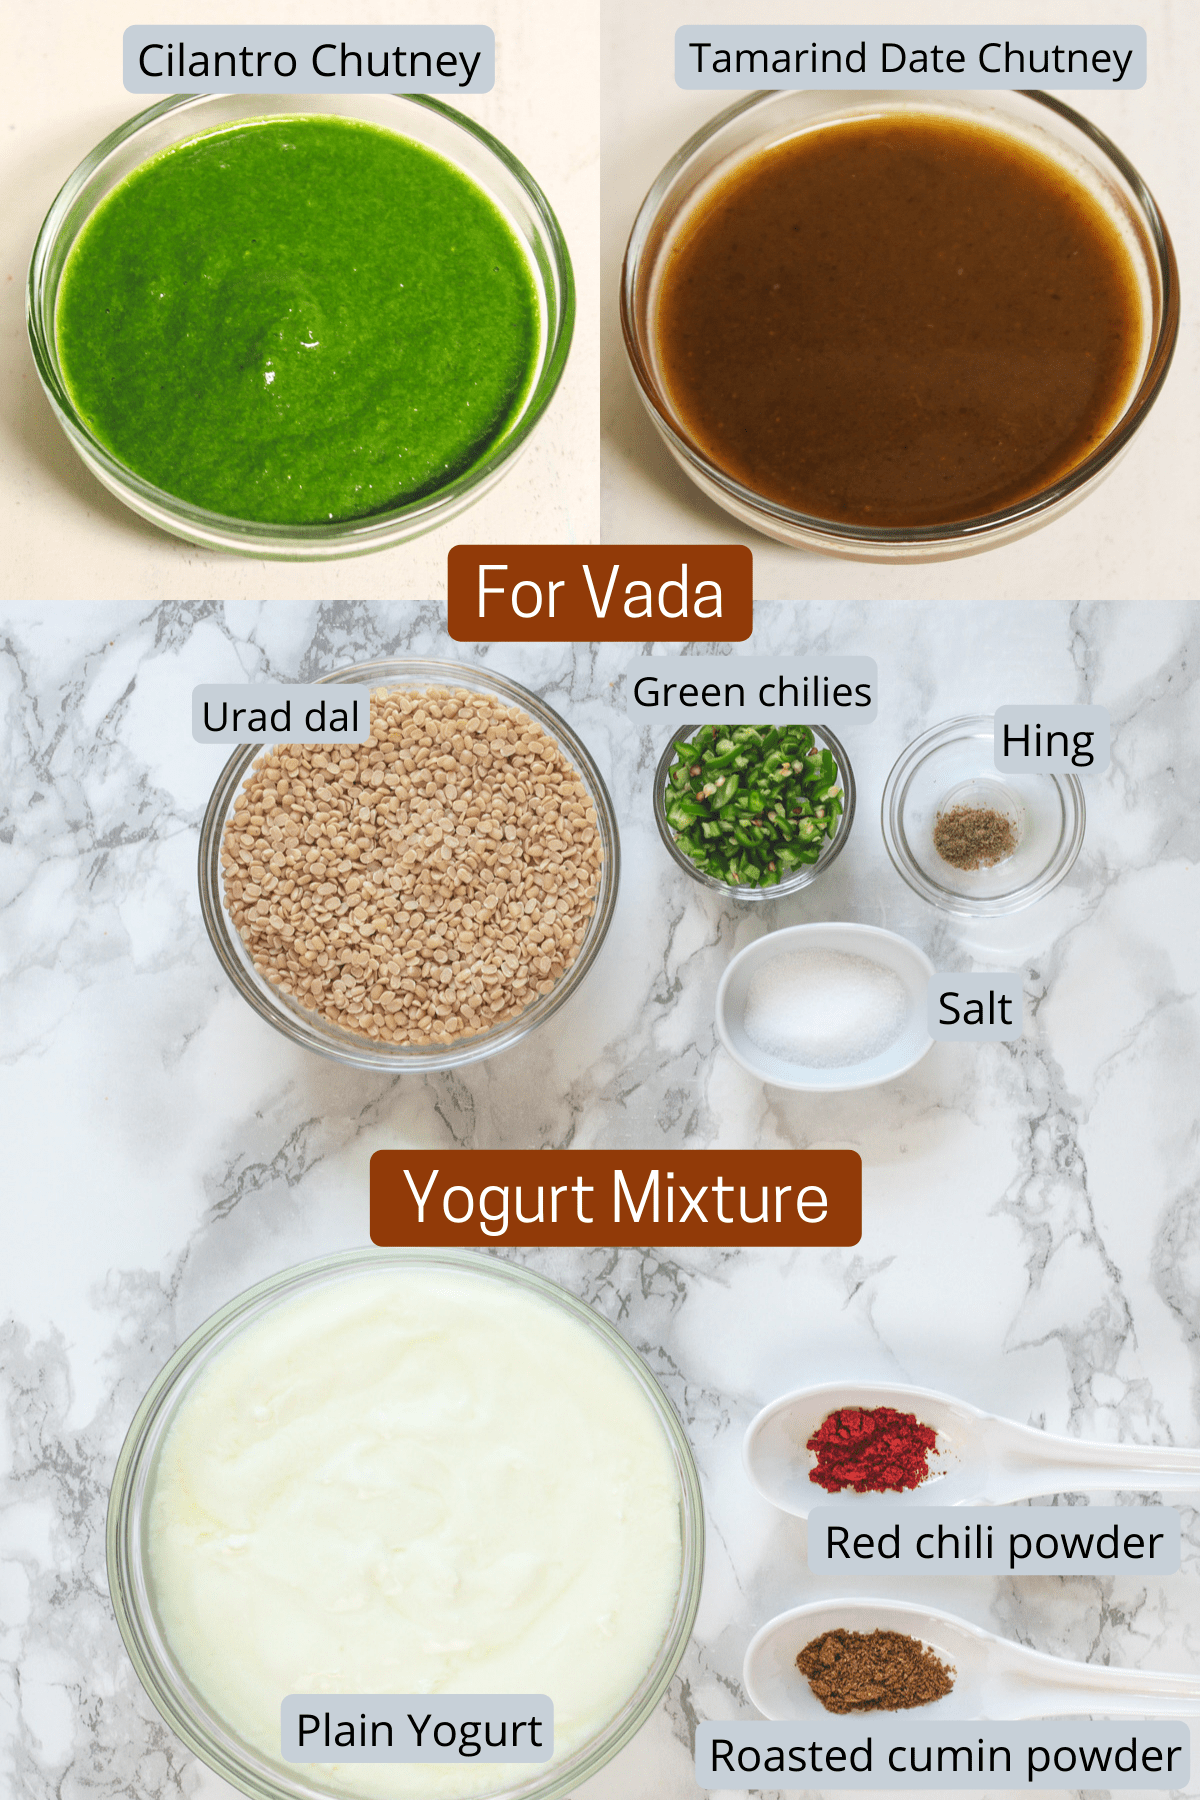
- 2 Chutneys: You can make them ahead of time and store them in the refrigerator. If short on time, you can use store-bought chutneys. These two are easily available in Indian grocery stores.
- Urad dal: Traditionally dahi vada is made with urad dal only. But just like dahi bhalla, you can use the combination of urad dal and moong dal. Or you can use just moong dal to make vada.
- Green chilies: I like to bite into the tiny pieces of green chilies in my vada, it gives a nice flavor. Hence I have added finely chopped chilies into the batter. If you don’t like to bite into chilies then you can add to the grinder.
- Hing: It is added for digestion. Whenever a dish is made with lentils, it is a good idea to use hing in the recipe. To make this dahi vada gluten-free, skip the hing or use the natural hing (check the ingredients).
- Yogurt: For the best taste, use full-fat whole milk yogurt. Use the chilled yogurt and keep it refrigerated till the time of serving. Make sure it is not sour.
👩🍳 How To Make Dahi Vada Batter? (Stepwise)
Preparations (At least a day before):
Make or buy two chutneys: (1) Cilantro chutney (2) Tamarind date chutney. I recommend you can make it a day or two before and store it in the refrigerator. It tastes better when you drizzle chilled chutneys instead of room-temperature ones.
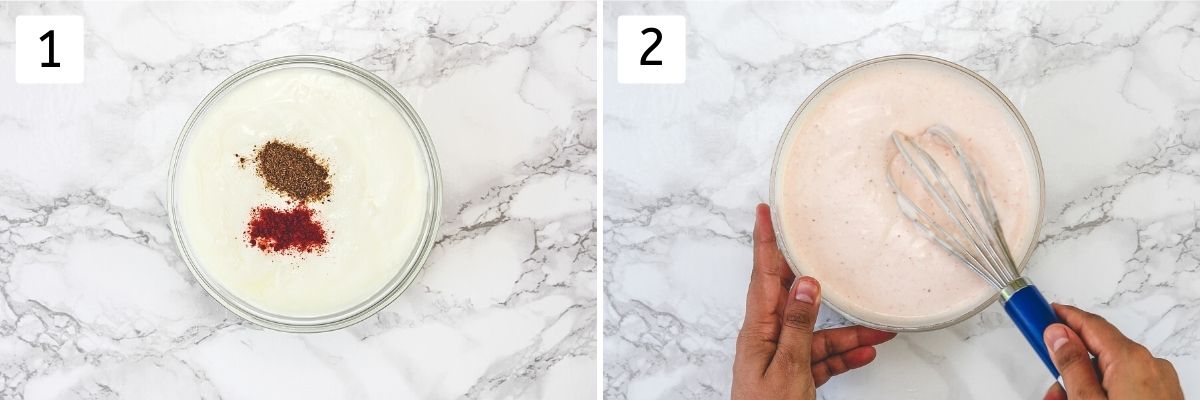
1) If making homemade yogurt then you have to plan ahead of time. Setting the yogurt takes around 8 or more hours, plus chilling time in the refrigerator. Take chilled yogurt in a bowl. Add salt, red chili powder and roasted cumin powder.
2) Whisk everything together until yogurt becomes smooth and runny. If your yogurt is too thick then you may need to add some water to make pourable consistency.
Making Dahi Vada Batter:
1) Wash the urad dal under running cold water until water runs clear. Or rinse them in a bowl 2-3 times until the water is not cloudy anymore.
2) Soak the dal in enough water for 4-5 hours. Lentils will get bigger in size. Drain the water completely.
3) Add the dal in the blender along with fresh water. Start with less amount of water and add more gradually as needed. Make a smooth yet thick paste-like batter.
4) Remove the batter to a large bowl. Use the silicone spatula to take out all the batter from the blender. Add salt, hing and chopped chilies.
5) Mix and beat the batter vigorously for around 5 minutes or until it becomes light and fluffy. This step is important to make soft and fluffy vadas.
6) You can notice the texture difference of batter before (pic-4) and after beating (pic-6).
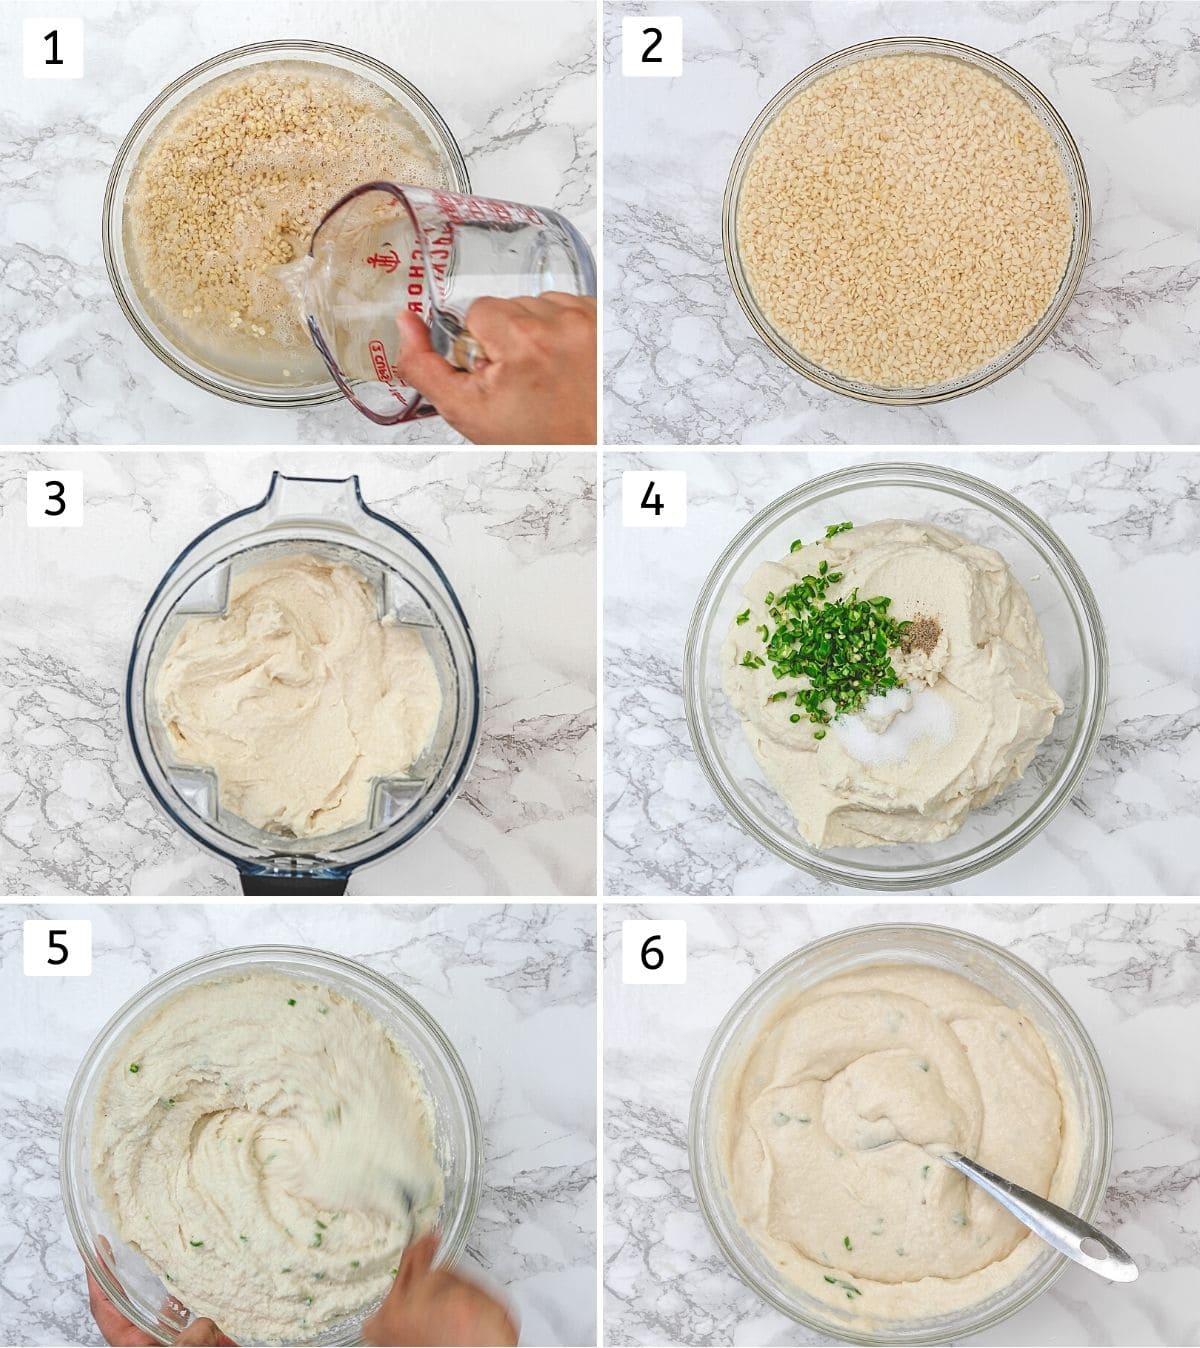
7) Check the consistency Take water in a bowl or cup. Add a small portion of the batter into the water.
8) It should float on the surface (meaning it is aerated well and it is light and fluffy). If it sinks to the bottom then you may need to beat it for some more time to make it light.
👩🍳 No-Fry Dahi Vada (Stepwise Pics)
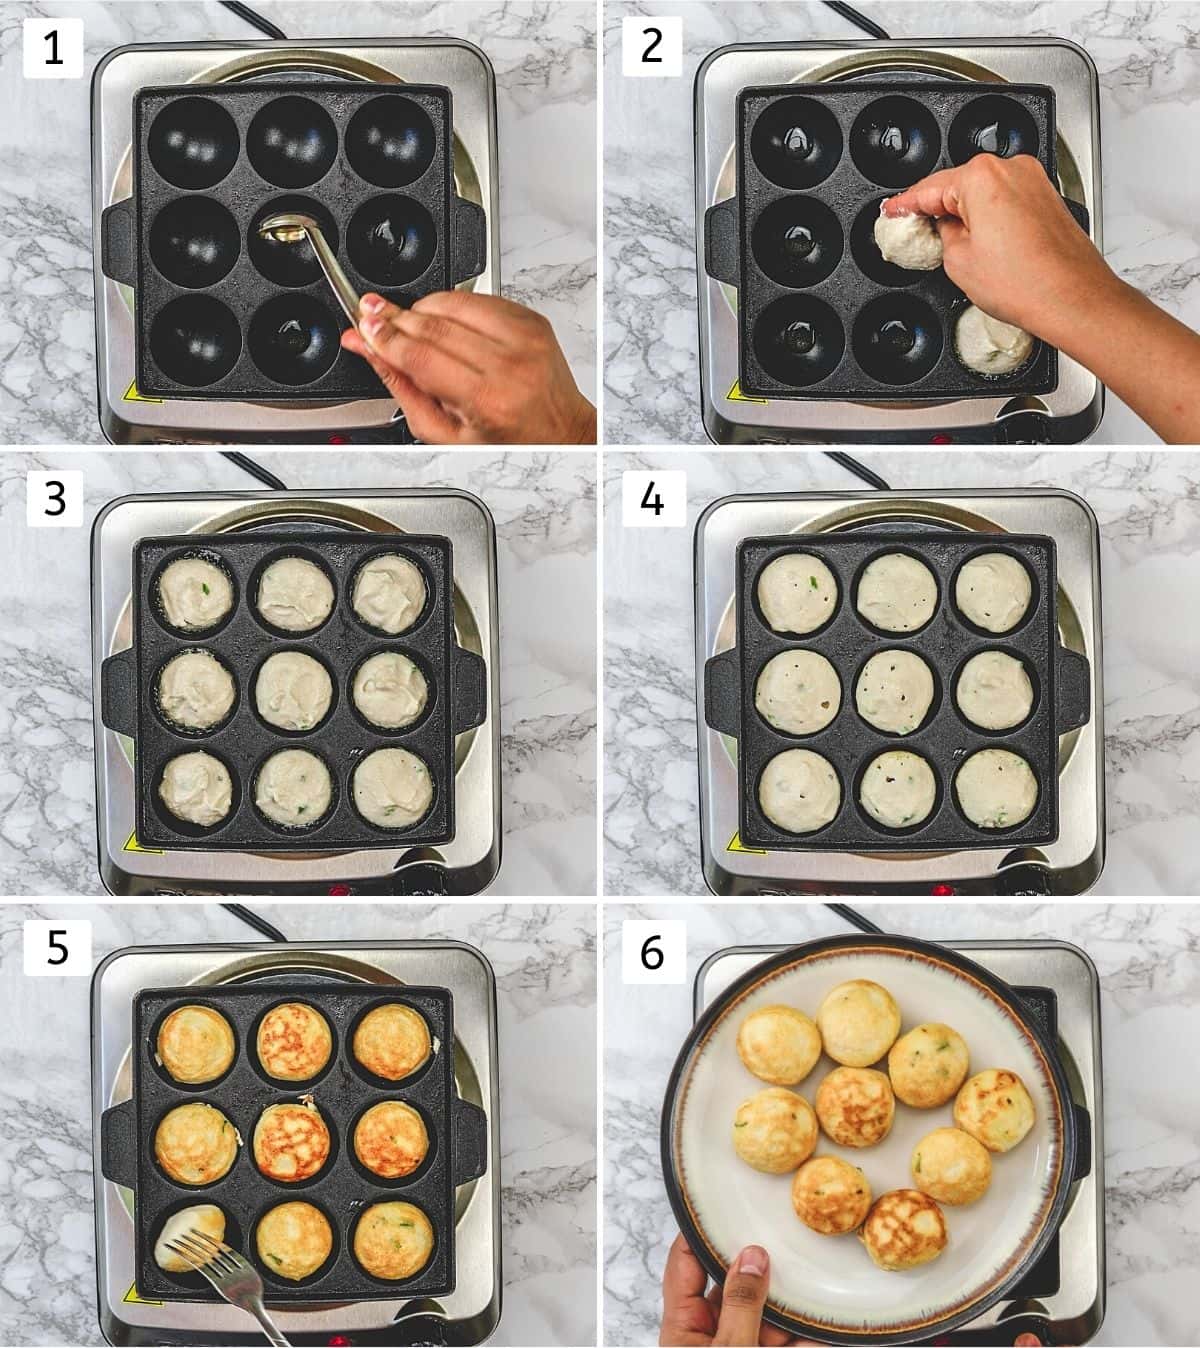
1) Heath paniyaram pan on medium heat. Add around ½ teaspoon of oil in each section and let it get hot.
2) Once hot add the batter into the sections. Take some batter onto your four fingers and slide it into the section using your thumb.
3) Each section should be just ¾ full.
4) Let it fry for few minutes. You’ll notice the tiny air-pockets are forming and vada gets bigger in size. (compare the pics 3 & 4).
5) Once they get golden brown from the bottom, flip them using a fork or skewer and cook another side.
6) Once done remove it to a plate and repeat the same for the rest.
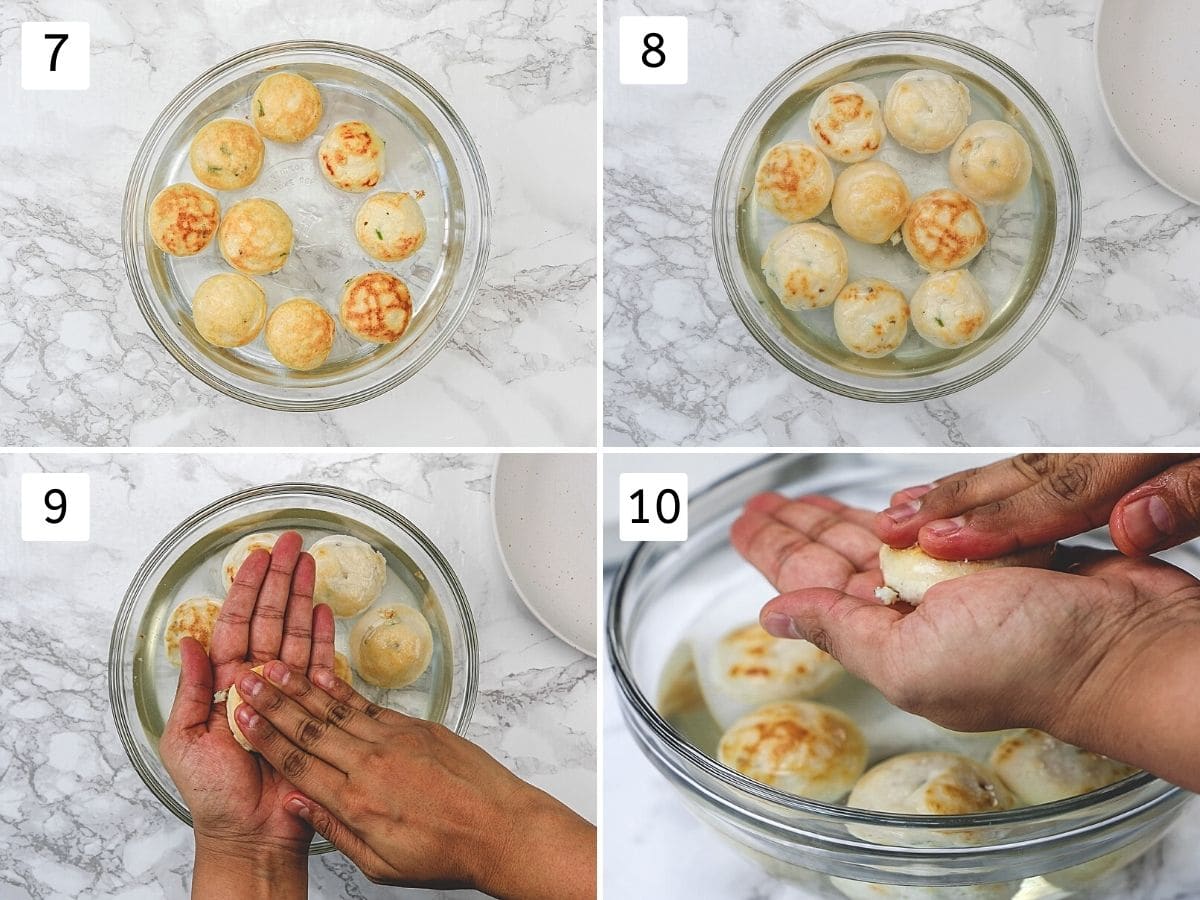
7) Take room temperature water in a large bowl. And add all the vada into it. Add the hot vadas to the water as soon as they come out from the pan.
8) Let it soak for 30-40 minutes and they will get bigger in the size (Compare the pics 7 & 8).
9) After the soaking time, take one vada onto your palm and squeeze out the excess water by pressing with the fingers of another hand. Repeat the same for rest.
10) Press very gently (yet remove all the water) and vada will get back to its original shape. Make sure not to press too hard the vada changes its shape and becomes flat.
👩🍳 Traditional Deep-Frying Method (Stepwise Pics)
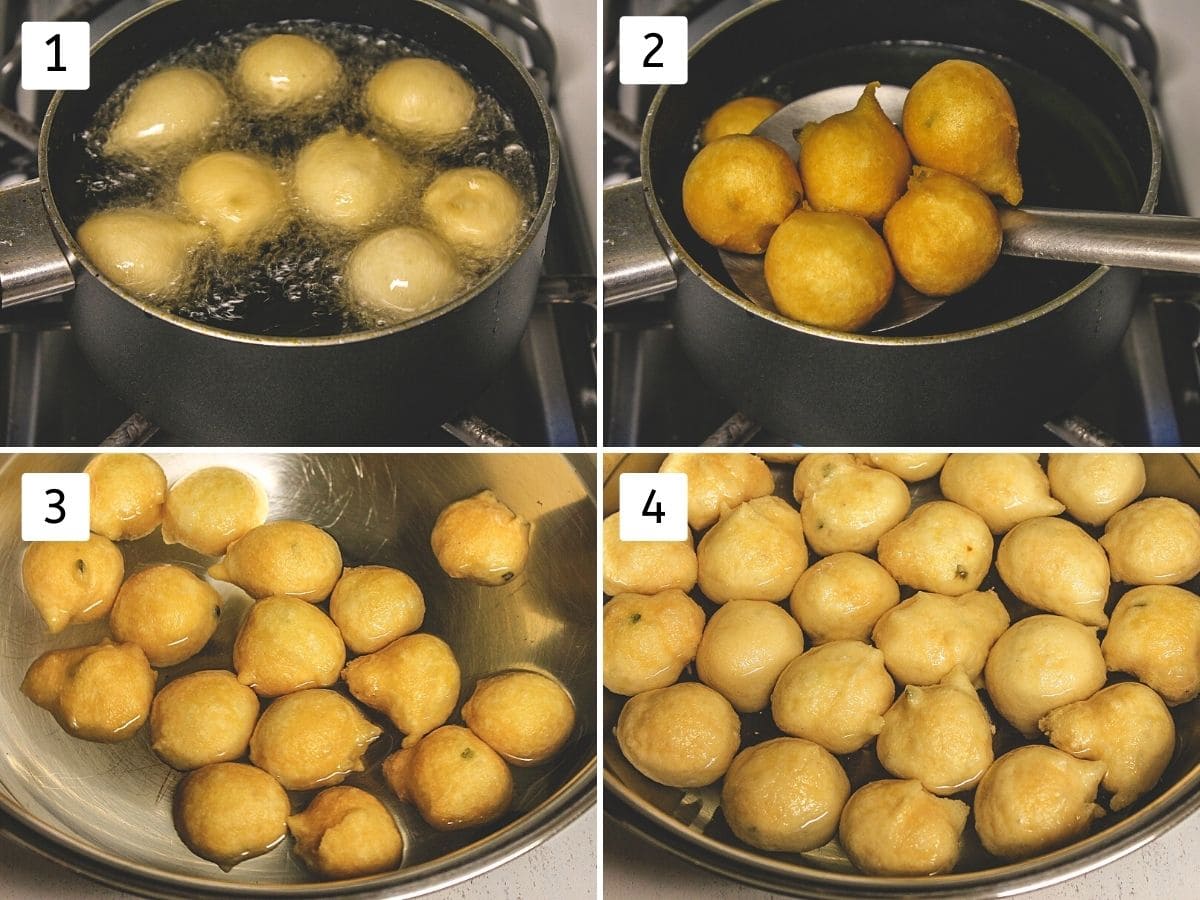
1) Heat the oil in a pan or kadai for deep frying on medium heat. Once hot drop around 2 tablespoons of batter carefully into the oil using hand or by using two spoons.
2) Fry them until they are light golden brown from all sides. Remove them to a paper-towel lined plate.
3) Immediately add the warm vada into the water and soak for 30-40 minutes.
4) Similarly, they will get bigger in the size. Squeeze out the water by gently pressing.
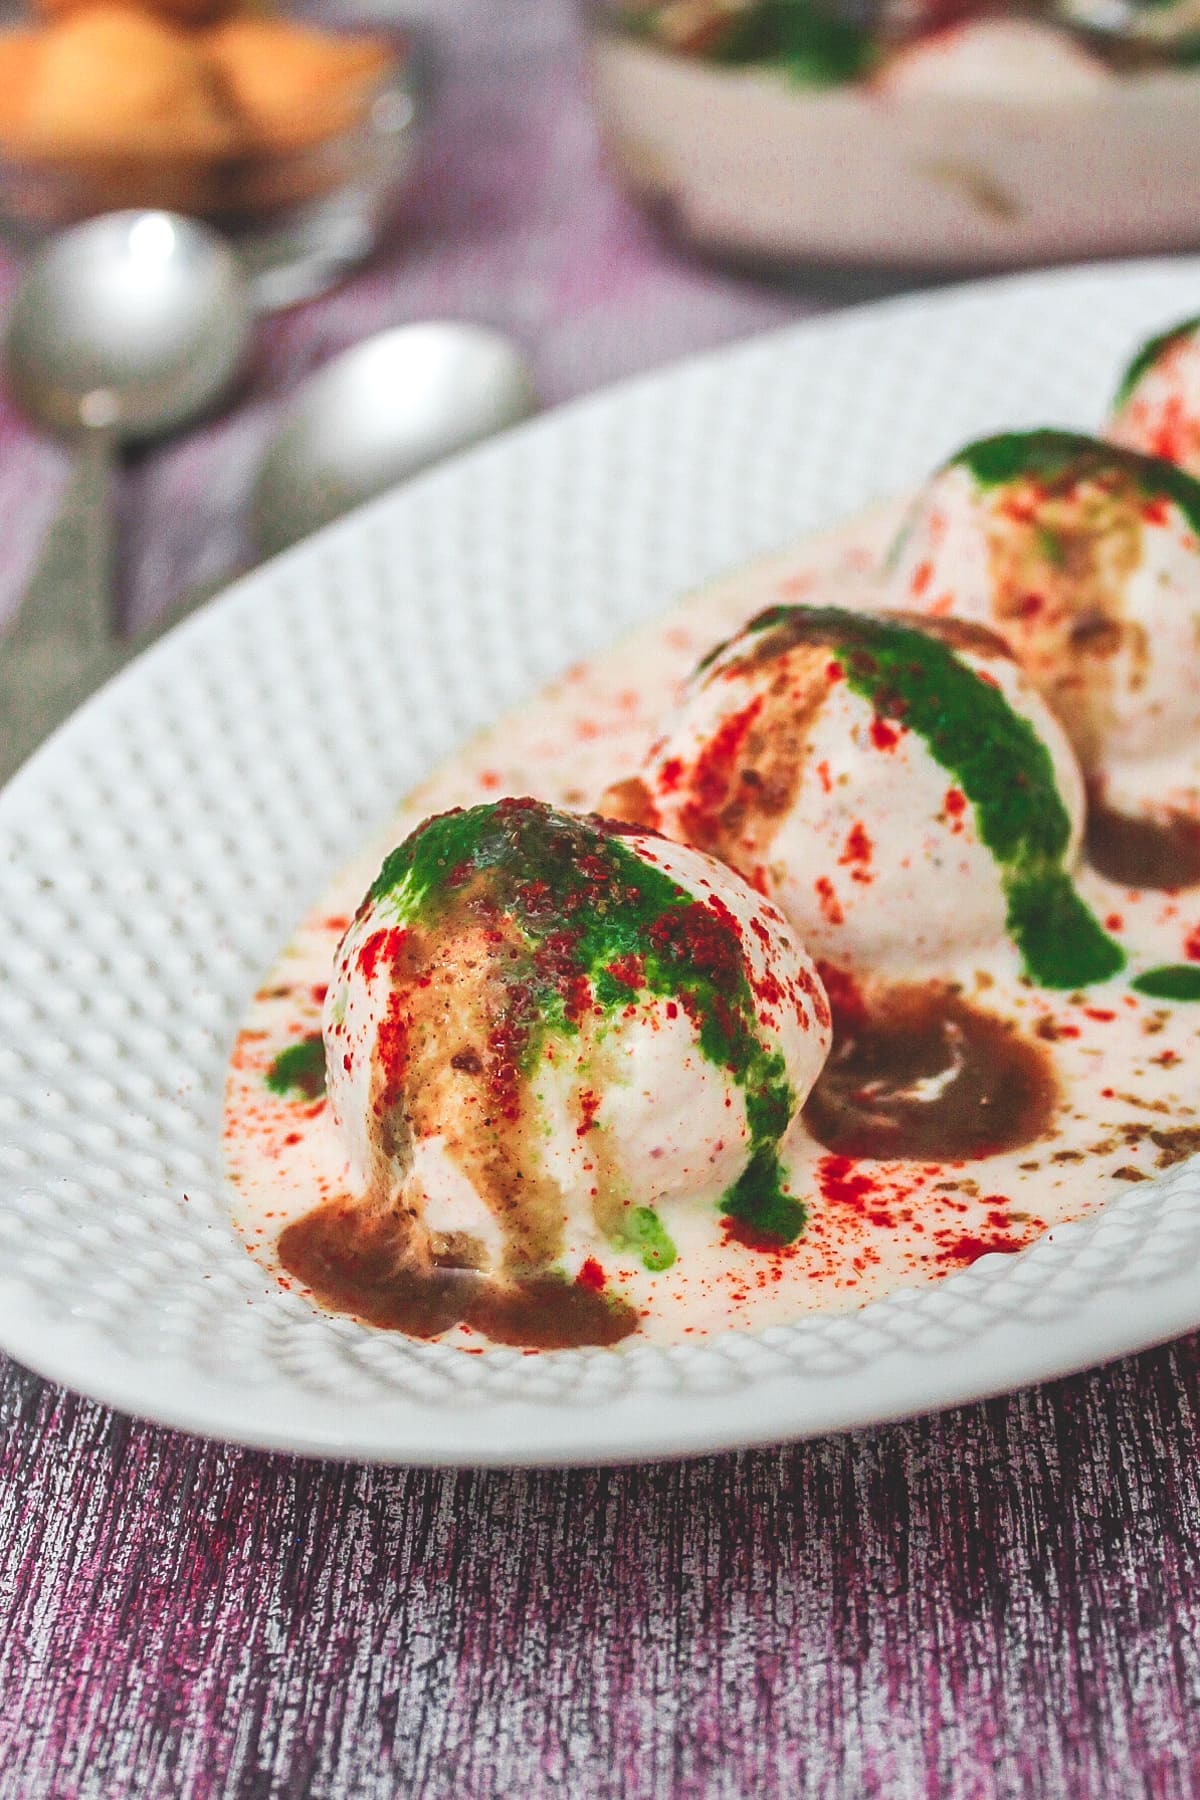
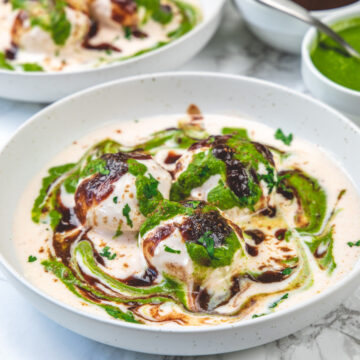
👩🍳 Assemble Dahi Vada Plate
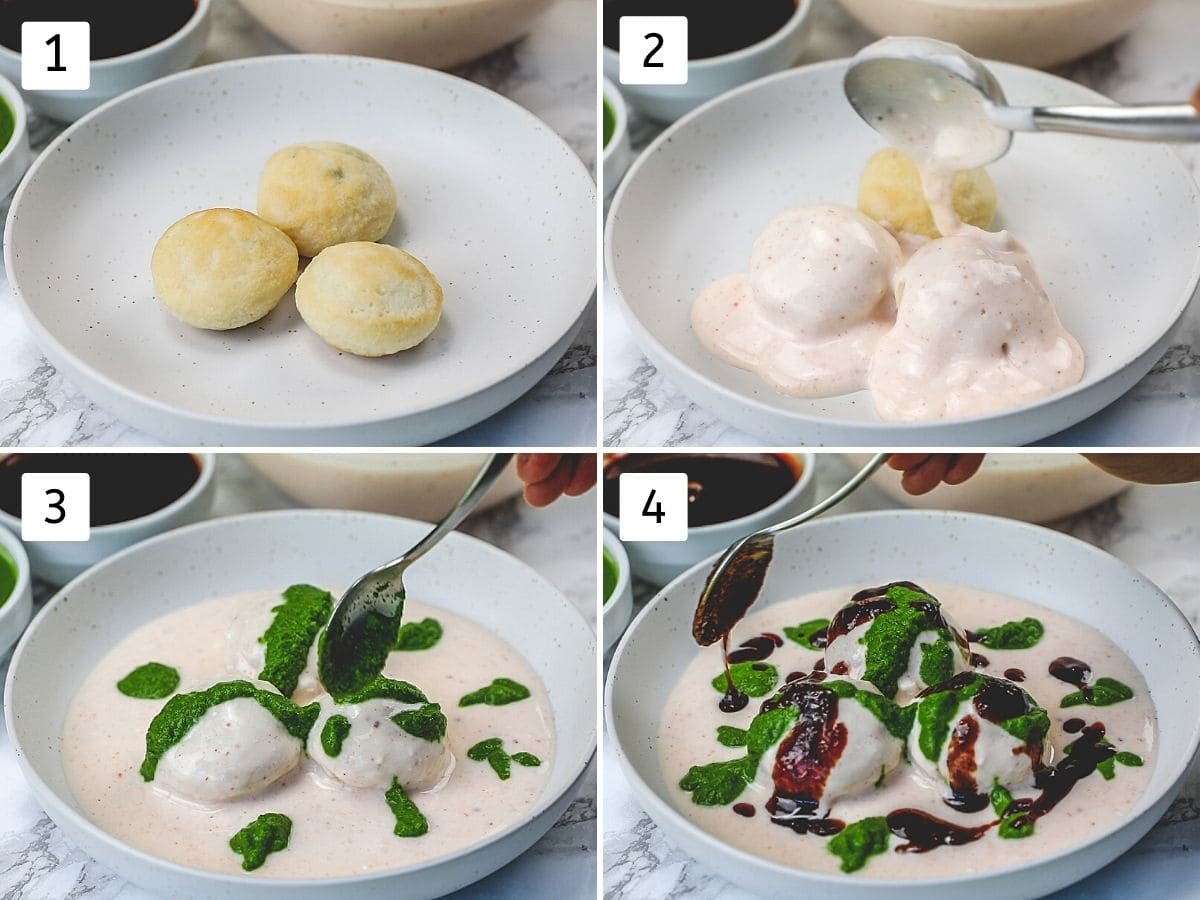
1) Place water-squeezed vada into the plate.
2) Add yogurt (all the vada should be covered with yogurt plus a ladleful or two extra).
3) Drizzle the cilantro chutney on top.
4) Drizzle tamarind date chutney.
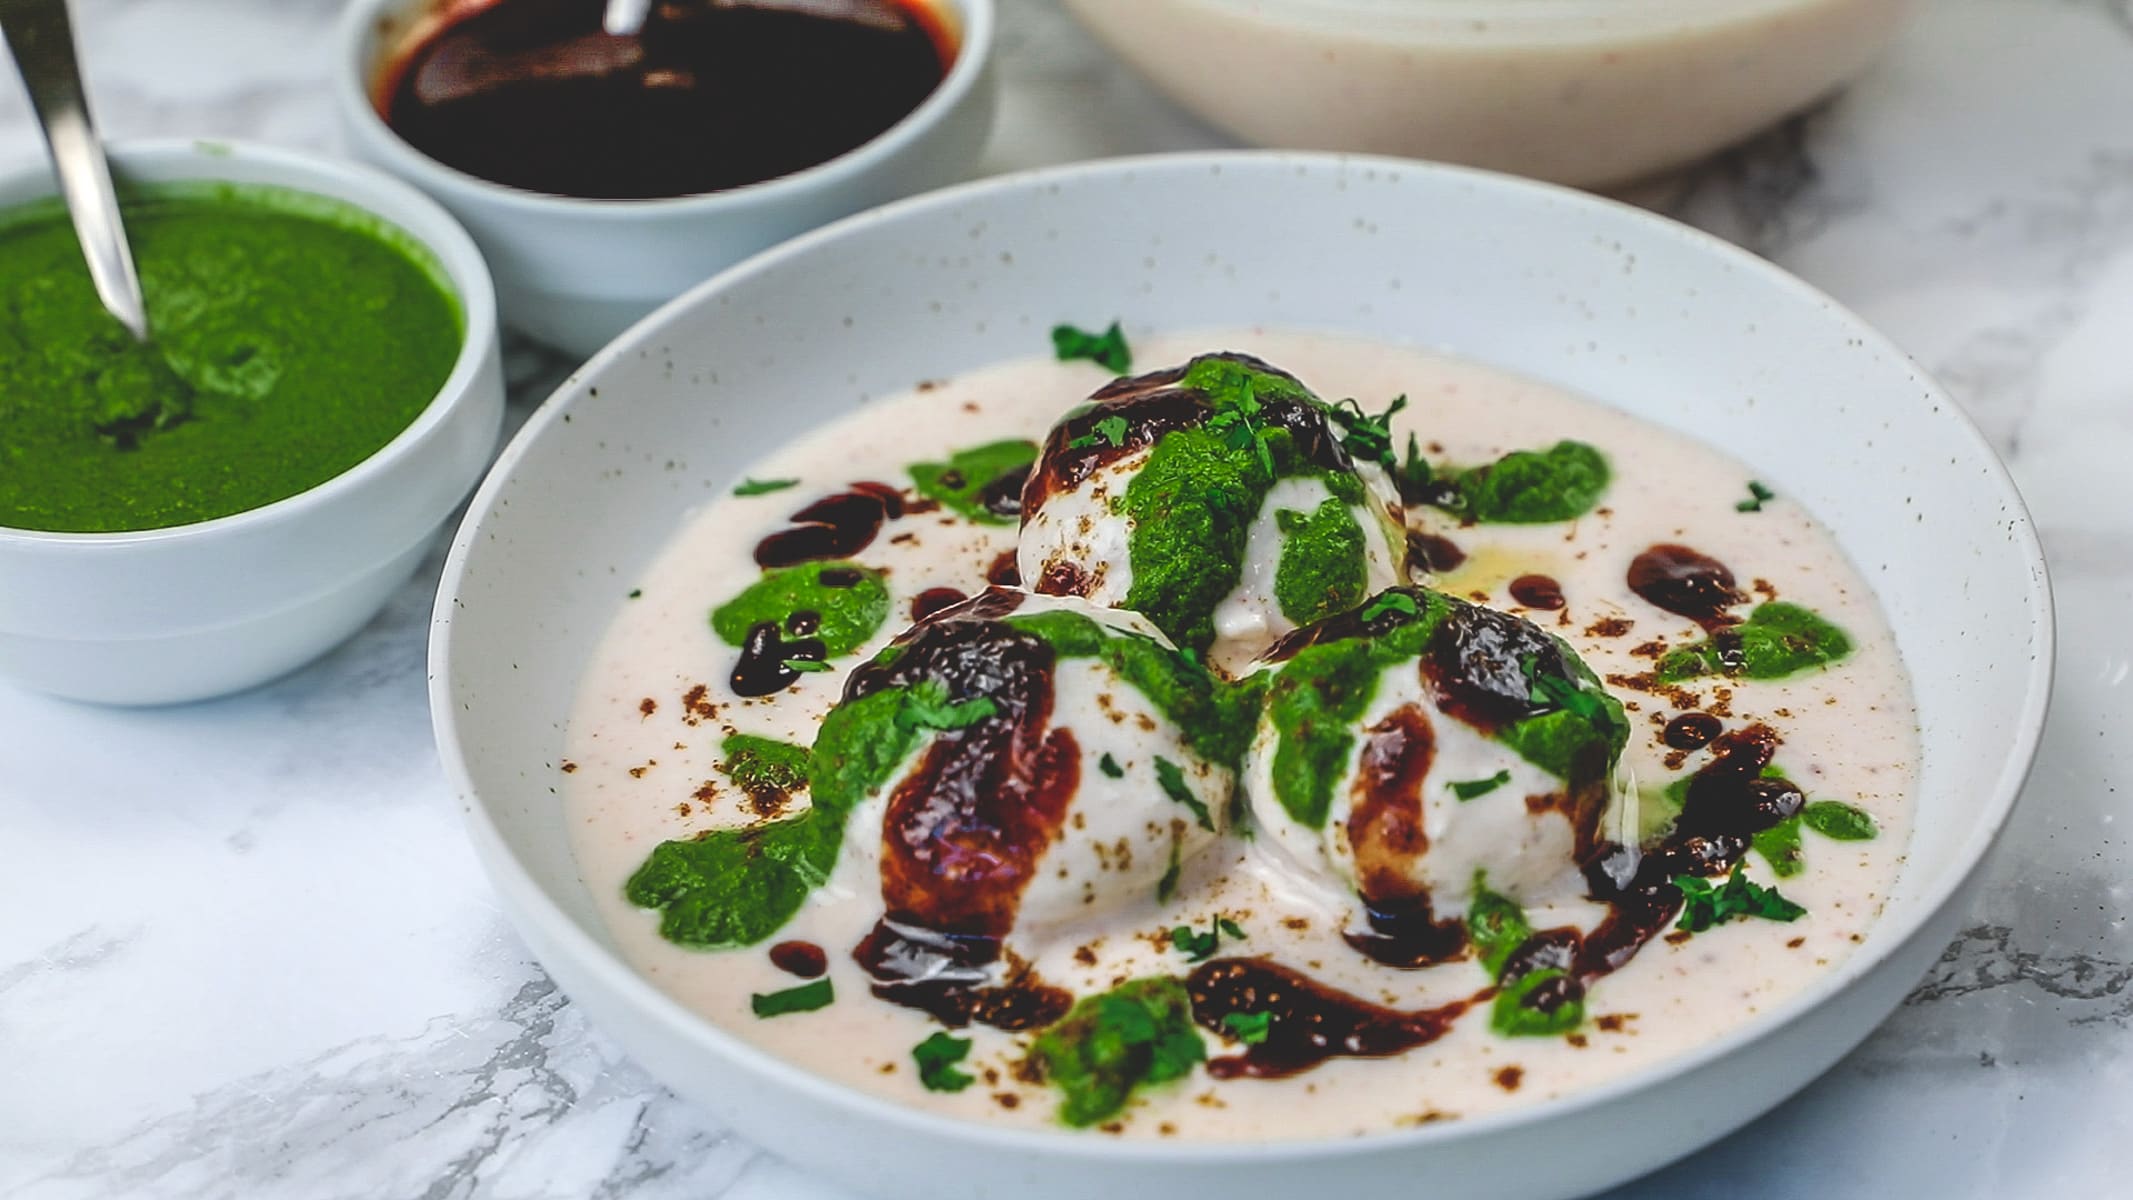
Garnish & Serve:
- Sprinkle chili powder and roasted cumin powder.
- Also, add some chopped cilantro.
- Few people like to add some sev and pomegranate arils on top.
- At my in-laws’ house, they add some masala peanuts (same as we use in Dabeli recipe).
💭 Expert Tips For Soft Dahi Vada
- Soak the urad dal for at least 4-5 hours. The soaking step will make the dal softer and will grind into the smooth batter. If soaked for less than 4 hours then the batter may remain grainy. You can continue soaking for more than 5 hours (e.g. overnight) which is completely fine.
- The water amount may vary. If using old/stale urad dal then you may need little extra water vs using a fresh batch of lentils.
- Always start will a lesser amount of water and add more needed while grinding to avoid getting runny batter. If the batter is runny then vada will turn out flat and will soak up more oil while frying.
- The batter consistency has to be thick paste-like and smooth (not grainy).
- Check the smoothness of the batter: rub the batter between your thumb and forefinger, you should feel the smooth texture.
- Aerate the batter by beating it vigorously for around 5 minutes and do the water test as shown above. This is the important step to get the soft and fluffy dahi vada.
- If using an Indian-style grinder (e.g. preethi brand) then the grinder itself helps to aerate the batter a little bit. So you may need to beat it for less time.
- If using a high-power blender (e.g. Vitamix, Ninja, Blendtec) then you’ll need to beat it for more time to achieve fluffy, airy batter.
- Deep fry the vada on medium heat. If fried on high heat then the middle stays raw and the outer layer gets darker quickly. If fried on low heat then vada will absorb too much oil.
- Soak the hot vada immediately into the water. It helps to absorb the water better and reaches through the center. This makes soft and moist vada.
🥣 Storage Instructions
In the refrigerator:
- The batter can be stored in the refrigerator for a day.
- Soaked/squeezed dahi vada stays good for 1-2 days only in the refrigerator.
- Assembled dahi vada stays good for 2 days.
- Fried vada (not soaked) can be stored for 4-5 days. On the day of serving, remove the vada from the fridge and bring it to room temperature. Then soak in the lukewarm water for 30-40 minutes. Make sure the water is warm (not room temperature) for soaking.
In the freezer:
- Fried (or no-fried) vada can be frozen for up to 3 months.
- Arrange them on a baking tray, cover them with plastic wrap and freeze. Once frozen transfer them to a freezer-safe ziplock bag and store them.
- Defrost the vada and bring it to room temperature and soak them in lukewarm water for 30-40 minutes. Squeeze out the water, assemble and serve.
🧑🤝🧑 Making Dahi Vada For A Crowd Or Party
Dahi vada recipe is the perfect recipe for a crowd or get-to-gather. You can easily double or triple the recipe as needed and sure you can make them a day before.
- Use the large aluminum foil pans or glass pyrex casserole dish depending on your serving size.
- Arrange soaked/squeezed vada into the tray. Drizzle yogurt and garnishes.
- Cover the tray and keep it in the refrigerator till the time of serving.
- You can prepare this tray a day or two before.
- Serve two bowls of chutneys along with the ready tray. Let the guests help themselves with the amount of chutneys they like.
Troubleshoot
The batter becomes runny: Add some semolina (sooji/rava) or rice flour and mix. If the batter is too watery then don’t use all sooji otherwise vada becomes dense. In that case, use half sooji and half rice flour.
Vada burst in the oil while deep-frying: The batter has more moisture (water content) meaning your batter is runny. Fix the runny batter as mentioned above.
Vada are raw and dense from the center: You haven’t beat (aerate) the batter properly. Beat it well and do the water test. The batter should float in a cup of water. Plus, fry them on medium heat. If fried on high heat then it may stay raw from the center.
Check Out Other Street Food Recipes
PS Tried this dahi vada recipe? Please leave a star rating in the recipe card below and/or a review in the comment section. I always appreciate your feedback! Plus, Subscribe to my newsletter and follow along on Pinterest, Instagram, and Facebook for all the latest updates.
Dahi Vada Recipe {No-Fry Or Deep-Fried}
US measuring cups are used (1 cup = 240 ml)
Ingredients
For Vada:
- 1 cup Urad dal (split, skinless black gram)
- ½ cup Water, for grinding
- 1 Green chili, finely chopped
- Salt , to taste
- ⅛ teaspoon Hing (Asafoetida)
- Oil, for frying
For Yogurt Mixture:
- 3 cups Plain yogurt, (dahi)
- 1 teaspoon Roasted cumin powder
- 1 teaspoon Red chili powder
- Salt , to taste
Toppings:
- ½-1 cup Cilantro chutney, or as needed
- ½ cup Meethi chutney (Tamarind date chutney), or as needed
- 1 teaspoon Red chili powder, to sprinkle on top
- 1 teaspoon Roasted cumin powder, to sprinkle on top
- 2 tablespoons Cilantro or coriander leaves, finely chopped
- 2-3 tablespoons Pomegranate arils, optional
Instructions
Preparations (At least a day before):
- Make or buy two chutneys. I recommend you can make it a day or two before and store it in the refrigerator.
- Take chilled yogurt in a bowl. Add salt, red chili powder and roasted cumin powder. Whisk everything together until yogurt becomes smooth and runny. If your yogurt is too thick then you may need to add some water to make pourable consistency.
Making Vada Batter:
- Wash the urad dal under running cold water until water runs clear. Or rinse them in a bowl 2-3 times until the water is not cloudy anymore.
- Soak the dal in enough water for 4-5 hours. Lentils will get bigger in size. Drain the water completely.
- Add the dal to the blender along with fresh water. Start with less amount of water and add more gradually as needed. Make a smooth yet thick paste-like batter. Remove the batter to a large bowl.
- Add salt, hing and chopped chilies. Mix and beat the batter vigorously for around 5 minutes or until it becomes light and fluffy. This step is important to make soft and fluffy vadas.
- Check the consistency: Take water in a bowl or cup. Add a small portion of the batter into the water. It should float on the surface (meaning it is aerated well and it is light and fluffy). If it sinks to the bottom then you may need to beat it for some more time to make it light.
Non-Fry Dahi Vada:
- Heath paniyaram pan on medium heat. Add around ½ teaspoon of oil to each section and let it get hot.
- Once hot add the batter into the sections. Take some batter onto your four fingers and slide it into the section using your thumb. Each section should be just ¾ full.
- Let it fry for few minutes. You’ll notice the tiny air-pockets are forming and vada gets bigger in size.
- Once they get golden brown from the bottom, flip them using a fork or skewer and cook another side. Once done remove it to a plate and repeat the same for the rest.
- Take room temperature water in a large bowl. And add all the vada into it.
- Let it soak for 30-40 minutes and they will get bigger in the size
- After the soaking time, take one vada onto your palm and squeeze out the excess water by pressing with the fingers of another hand. Repeat the same for rest. Press very gently (yet remove all the water) and vada will get back to its original shape. Make sure not to press too hard the vada changes its shape and becomes flat.
Traditional Frying Method:
- Heat the oil in a pan or kadai for deep frying on medium heat. Once hot drop around 2 tablespoons of batter carefully into the oil using hand or by using two spoons.
- Fry them until they are light golden brown from all sides. Remove them to a paper-towel lined plate.
- Immediately add the warm vada into the water and soak for 30-40 minutes.
- Similarly, they will get bigger in the size. Squeeze out the water by gently pressing.
Assemble Dahi Vada Plate:
- Place water-squeezed vada into the plate.
- Add yogurt (all the vada should be covered with yogurt plus a ladleful or two extra).
- Drizzle the cilantro chutney and tamarind date chutney. Garnish with spices, cilantro & Serve.
Video
Notes
- Soak the urad dal for at least 4-5 hours. The soaking step will make the dal softer and will grind into the smooth batter. If soaked for less than 4 hours then the batter may remain grainy. You can continue soaking for more than 5 hours (e.g. overnight) which is completely fine.
- The water amount may vary. If using old/stale urad dal then you may need little extra water vs using a fresh batch of lentils.
- Always start will a lesser amount of water and add more needed while grinding to avoid getting runny batter. If the batter is runny then vada will turn out flat and will soak up more oil while frying.
- Fix the runny batter by adding some semolina or rice flour.
- The batter consistency has to be thick paste-like and smooth (not grainy).
- Check the smoothness of the batter: rub the batter between your thumb and forefinger, you should feel the smooth texture.
- Aerate the batter by beating it vigorously for around 5 minutes and do the water test as shown above. This is the important step to get the soft and fluffy dahi vada.
- If using an Indian-style grinder (e.g. preethi brand) then the grinder itself helps to aerate the batter a little bit. So you may need to beat it for less time.
- If using a high-power blender (e.g. Vitamix, Ninja, Blendtec) then you’ll need to beat it for more time to achieve fluffy, airy batter.
- Deep fry the vada on medium heat. If fried on high heat then the middle stays raw and the outer layer gets darker quickly. If fried on low heat then vada will absorb too much oil.
- Soak the hot vada immediately into the water. It helps to absorb the water better and reaches through the center. This makes soft and moist vada.
- In the refrigerator, the batter can be stored for a day, fried vada can be stored for 4-5 days, soaked/squeezed vada can be stored for 1-2 days, assembled dahi vada can be stored for 2 days.
- Freeze the fried (no-fried) vada for up to 3 months. Thaw and bring it to room temperature and soak in lukewarm water for 30-40 minutes, squeeze out the water, assemble and serve.
Mam,
Can you please what is the alternative for baking Thanks
It has to be deep fried.
The baking option is not the good idea here