
Methi Gota

Methi Gota — the most beloved Gujarati tea-time snack — are soft, spongy, and fluffy from inside with a lightly crisp outside, made with fresh fenugreek leaves (methi) and besan (chickpea flour). One bite and you’ll understand why there’s always a crowd at every farsan shop in Gujarat the moment it starts raining!

One reader Bhavna commented “This recipe is awesome, my entire family loved it. I can have a feel of Gujarati methi na gota in USA.Thanks for posting this recipe. ⭐⭐⭐⭐⭐ “
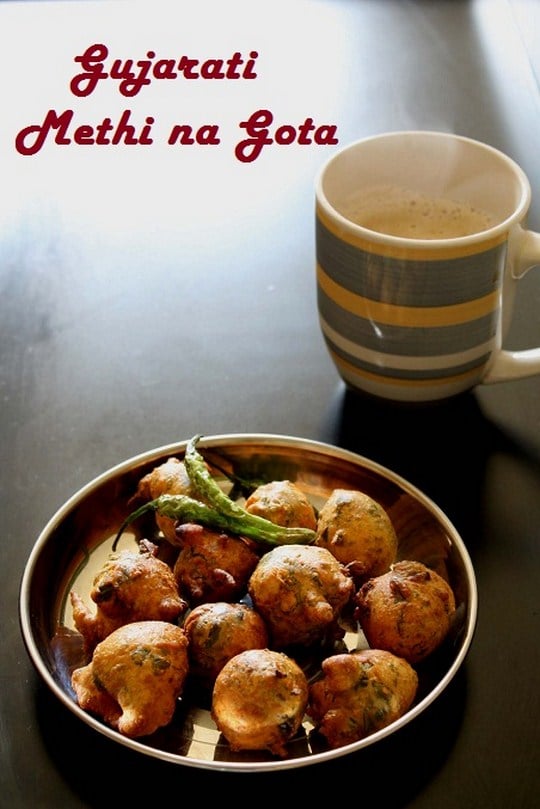
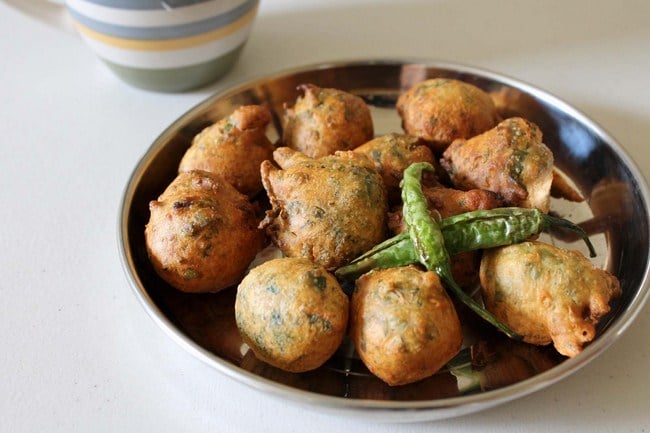
Methi Gota served with fried chili and cup of tea in the back.

What is Methi Gota?

Methi gota is a traditional Gujarati deep-fried snack (fritter) made from besan (gram flour/chickpea flour) and fresh fenugreek leaves (methi), seasoned with whole spices and green chilies. It is one of the most iconic snacks in Gujarati cuisine — sold at every farsan shop across Gujarat and made in homes during the winter and monsoon seasons.

Breaking the name down: methi = fenugreek leaves, gota = fritters or pakoda. So methi gota literally means fenugreek leaf fritters. They are also called methi na gota, methi pakora, or methi na bhajiya depending on which part of Gujarat you are from.

What makes methi gota different from regular pakoda? This is a question I get asked a lot! Regular pakoda (Punjabi-style) has a thicker, drier batter and a crunchier texture throughout. Methi gota uses a thinner, more hydrated batter — and the technique of mixing wet ingredients first before adding the flour — which creates that signature soft, spongy, almost airy interior. The outside is lightly crisp, but the inside is nothing like a typical pakoda. Think of it as the pakoda family’s softest, fluffiest cousin.

What makes methi gota different from dakor na gota? Dakor na gota is another famous Gujarati gota variety, named after the town of Dakor (a famous pilgrimage site in Gujarat). Dakor gota is made with coarse chickpea flour, dairy (sometimes), and sugar, giving it a more dense, slightly sweet, and grainy texture. Methi gota is specifically made with fresh fenugreek leaves, is lighter in texture, and has a savory, slightly bitter flavor from the methi. The two are related but quite different in taste and texture.

About This Recipe

There is something special about biting into a hot methi na gota on a cold winter day or a rainy monsoon afternoon, with a cup of masala chai in one hand and a fried green chili on the side. That is exactly the kind of joy this recipe brings.

I first shared this recipe back in 2013 — in the early days of this blog. Over the years, this has become one of the most made recipes from this site, and the comments from readers across India and abroad genuinely make my day every time.

My key technique — wet ingredients first, flour last: Most home cooks mix dry ingredients first and then add water to make the batter. But I do it the other way around — water and oil first, then spices, then methi, and besan last. This method prevents the flour from forming dense lumps from the start and gives you a batter that stays lighter and more aerated. The result? Methi na gota that are noticeably fluffier than what you get from the usual method. Try it once and you’ll see the difference!

This methi gota recipe is:

  • Soft and spongy inside, lightly crisp outside
  • Made with the wet-first technique for extra fluffiness
  • Uses simple pantry spices — nothing hard to find
  • Naturally vegan and can be made gluten-free (see FAQ)
  • A perfect monsoon and winter snack
  • Ready in 35 minutes

⭐ Why You’ll Love This Recipe

  • The wet-first batter method gives you noticeably fluffier, softer gota than the standard method
  • Only one bowl needed — minimal cleanup
  • No fancy equipment — just a kadai and two spoons
  • Made with fresh methi, which gives a flavor that dried methi simply cannot replicate
  • Naturally vegan
  • Perfect for chai time, guests, or a rainy evening at home
  • The recipe scales easily — double or triple for a larger batch

Ingredient Notes

Complete list of ingredients and amounts is written in the recipe card below.

  • Besan (gram flour / chickpea flour): The base of the batter. Use fine besan, not coarse. If you have a choice at the store, pick the finer variety — it gives a smoother batter and a lighter texture.
  • Make sure your besan is fresh and fragrant. Old, stale besan can give the gota a slightly musty taste and is harder to make lump-free.
  • Fresh fenugreek leaves / Methi (½ cup, measured after plucking): This is the star ingredient. Always use fresh methi — kasuri methi (dried) is a completely different flavor and cannot give the same taste or the characteristic slight bitterness that is the whole point of methi gota.
  • Important prep: Pluck only the leaves, discard the thick stems. Measure ½ cup of plucked leaves, then wash very well, squeeze out all the water thoroughly, and then chop finely. Squeezing out water is important — excess water thins the batter too much.
  • Hing (asafoetida): Please do not skip this. Besan is heavy and can cause bloating. Hing is essential for easy digestion when eating besan-based snacks. It also adds a savory depth of flavor that you would miss if you left it out.
  • Ajwain (carom seeds): Same reason as hing — ajwain is a natural digestive that works especially well with chickpea flour preparations. It also adds a distinctive aromatic flavor that is very characteristic of traditional gota. Do not skip.
  • Black peppercorns (lightly crushed): Crush roughly — you want small pieces, not powder. The little bursts of pepper heat you get when biting into a piece of peppercorn is part of what makes the gota special.
  • Coriander seeds (lightly crushed): Same — crush coarsely in a mortar and pestle. The rough, textured coriander pieces add a citrusy, earthy pop of flavor throughout.
  • Green chilies (finely chopped): Green chili is the only real heat source in this recipe. I use 4 medium-sized chilies for a good kick. Reduce to 2 if you prefer less spice, or increase to 6 if you like it quite hot. This is completely up to you.
  • Baking soda: Just a pinch — this is what gives the gota its lightness. Do not use more than a small pinch or the gota will taste slightly metallic. The baking soda reacts with the water and fat to create tiny air bubbles in the batter that expand when they hit the hot oil, giving you that fluffy interior.
  • Sugar: A small amount of sugar balances the bitterness of the fenugreek leaves. It is not there to make the gota sweet — you won’t taste it — it just rounds out the flavor. Don’t skip it.
  • Oil (1 tbsp in batter): The tablespoon of oil in the batter adds richness and helps the gota stay soft inside as they fry.
  • Oil (for frying): Use any neutral oil with a high smoke point for deep frying — sunflower, canola, or refined peanut oil all work well.

Tried this recipe? A star rating ⭐️ and a quick comment below help others (and me!) know how it went.

Methi Gota Recipe (Gujarati Methi Pakora)
5 from 7 votes
Methi Na Gota - Gujarati methi pakora Recipe
Methi Gota — the most beloved Gujarati tea-time snack — are soft, spongy, and fluffy from inside with a lightly crisp outside. One bite and you'll understand why there's always a crowd at every farsan shop in Gujarat the moment it starts raining!
Kanan
Prep Time 20 minutes
Cook Time 15 minutes
Total Time 35 minutes
Serving Size 3 (18-20 small gota)

US measuring cups are used (1 cup = 240 ml)

Ingredients

  • 1 tablespoon Oil, + more for deep frying
  • cup Water
  • a pinch Baking soda
  • Salt to taste
  • 1 teaspoon Sugar
  • ¼ teaspoon Hing (Asafoetida)
  • 8-10 Black peppercorns, lightly crushed in mortar and pestle
  • 1 teaspoon Coriander seeds (sabut dhaniya), lightly crushed in mortar and pestle
  • ½ teaspoon Ajwain (Carom seeds)
  • 4 Green chilies, chopped finely
  • ½ cup Fenugreek leaves (Methi leaves), plucked, measured, washed and chopped
  • 1 cup Besan (gram flour)

Instructions

  • Mix wet ingredients & spices: In a bowl, take water. Add 1 tablespoon of oil, baking soda, salt, sugar, hing (asafoetida), crushed peppercorns and coriander seeds, ajwain (carom seeds), and finely chopped green chilies. Mix everything together very well.
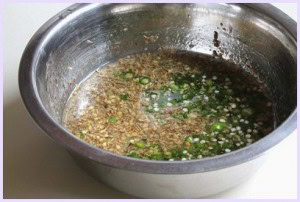
    Water, oil and spices mixed in a bowl for mathi gota batter.
  • Add in Methi leaves: Add the washed, squeezed, and chopped fenugreek leaves. Mix well to combine.
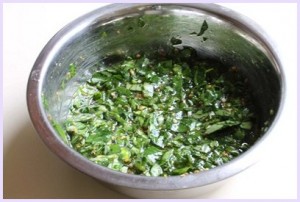
    Mixing methi leaves with wet mixture.
  • Add Besan: Now add the besan (chickpea flour). Mix thoroughly, making sure there are no lumps. The batter should be thick — not runny, not stiff.
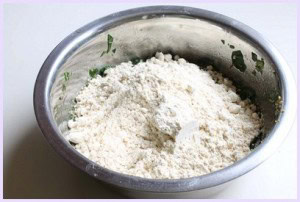
    Adding besan to wet mixture for methi gota.
  • Batter consistency: The batter should be thick — not runny, not stiff.
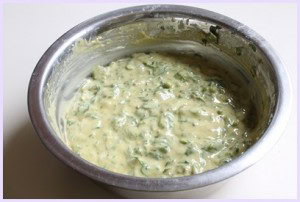
    Methi gota batter in a steel bowl.
  • Prep for deep frying: Heat oil in a kadai or deep pan on medium heat for deep frying.
    To test if the oil is ready, drop a tiny bit of batter in. It should rise to the surface within 2–3 seconds. If it sinks and takes a long time to come up, the oil is not hot enough. If it browns immediately, the oil is too hot — lower the flame.
  • Deep fry methi na gota: Once the oil is at the right temperature, drop small-medium portions of batter into the oil using your hand or two spoons.
    – Do not make them too big — they puff up significantly while frying and will get much larger.
    – Do not touch or move the gota for the first 40 seconds. This is very important — moving them too early causes them to break apart in the oil. After 40 seconds, gently move them around using a slotted spoon and continue frying on medium heat, turning them to ensure even golden browning from all sides. This takes about 4–5 minutes per batch.
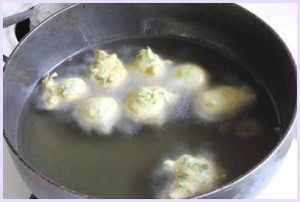
    Frying methi na gota in hot oil.
  • Ready: Remove and drain on a paper towel-lined plate. Repeat for the remaining batter. Serve immediately while hot!
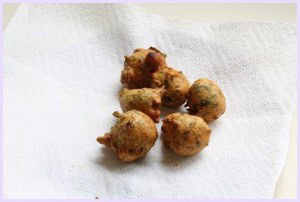
    Deep fried methi gota in a paper towel lined plate.

Notes

  • Let the oil come back to temperature between batches. After each batch, the oil temperature drops slightly. Wait 30–60 seconds before dropping the next batch so the oil is back at the right temperature. If you add batter to cool oil, the gota turn out greasy and heavy.
  • Gota will puff up significantly. Keep the size of each piece small-medium when you drop them in the oil. They look small going in and come out much bigger!
  • How to make fried green chili (the traditional side): Wash and completely dry the whole green chilies. Make a slit down the side of each one. Deep fry in hot oil for just a few seconds until the skin blisters and starts to change color. Remove immediately — they cook very fast. Sprinkle a little salt over them.

Nutrition

Calories: 394kcal (20%) | Carbohydrates: 32g (11%) | Protein: 11g (22%) | Fat: 25g (38%) | Saturated Fat: 4g (20%) | Polyunsaturated Fat: 8g | Monounsaturated Fat: 11g | Sodium: 616mg (26%) | Potassium: 352mg (10%) | Fiber: 7g (28%) | Sugar: 8g (9%) | Vitamin A: 18IU | Vitamin C: 7mg (8%) | Calcium: 182mg (18%) | Iron: 3mg (17%)

💡 Expert Tips for the Fluffiest Methi Gota

  • Always fry on medium heat — never high. This is the most important rule. High heat browns the outside very quickly while leaving the inside undercooked and raw-tasting. Raw besan is unpleasant. Medium heat allows the gota to cook through completely while developing a golden color gradually.
  • The wet-first method is the key to fluffiness. Add water and oil first, then spices, then methi, and besan last. This is the opposite of how most people make it, but it gives you a noticeably lighter batter with fewer lumps and fluffier gota.
  • Do not make the batter too thin. If the batter is too runny, the gota absorb more oil and come out heavy and greasy. The batter should be thick enough to hold its shape roughly when you scoop it, but still soft enough to drop easily.
  • Don’t skip squeezing the methi. Excess water from the washed methi leaves will thin your batter. Squeeze it well with both hands — really wring it out.
  • Let the oil come back to temperature between batches. After each batch, the oil temperature drops slightly. Wait 30–60 seconds before dropping the next batch so the oil is back at the right temperature. If you add batter to cool oil, the gota turn out greasy and heavy.
  • Gota will puff up significantly. Keep the size of each piece small-medium when you drop them in the oil. They look small going in and come out much bigger!

🍽️ How to Serve Methi Gota

  • The classic Gujarati way: Hot methi na gota with a fried green chili on the side and a cup of masala chai or adrak chai. The fried chili is eaten alongside with every bite.
  • With chutneys: Serve with mint-coriander chutney or tamarind-date chutney for dipping.
  • The farsan shop way: Serve hot gota dunked in a thick, tangy besan kadhi (aka fafda chutney). This is the most authentic and traditional way to eat them.
  • As part of a Gujarati thali: Methi na gota also work beautifully as a farsan (snack/appetizer) in a full Gujarati thali spread alongside dal, sabzi, roti/puri, and rice.

🧊 Storage

Methi gota are genuinely best eaten hot, straight from the kadai — they lose their magic quickly. Here is the honest truth about storing them:
  • At room temperature: As they cool, the outer crust softens. They are still edible for up to a few hours but not nearly as enjoyable as when fresh.
  • Next day: The texture changes significantly — the outside becomes soft and the spongy inside can feel slightly dense. I personally don’t prefer them beyond the first 30 minutes of frying, but they can be kept for up to 1 day.
  • Reheating: If you must reheat, an air fryer at 375°F for 3–4 minutes brings back some of the crispness. The microwave will just make them soft and steamy — not ideal.
  • The batter: This is the better option! Make the batter in advance and refrigerate for up to 4–5 hours. Fry fresh batches as needed. The batter holds much better than the fried gota.
Methi gota with green chilies and coffee in the back.

❓ Frequently Asked Questions

Methi gota is a traditional Gujarati deep-fried fritter made with besan (chickpea flour) and fresh fenugreek leaves (methi), seasoned with whole spices, green chilies, hing, and ajwain. It has a soft, spongy interior and a lightly crisp exterior. It is one of the most popular tea-time snacks in Gujarat, especially during winter and the monsoon season.

They refer to the same dish — methi gota is the Gujarati name, methi pakoda is the more pan-Indian name for the same snack. However, there is a texture difference from classic Punjabi-style pakoda: gota are softer, spongier, and use a thinner batter, while Punjabi pakoda typically have a thicker batter and a crunchier texture throughout.

Fresh methi is strongly preferred here — it gives the characteristic flavor, slight bitterness, and moisture that makes authentic gota taste the way they do. Kasuri methi has a different, more concentrated flavor and won’t give the same result. If you absolutely cannot find fresh methi, soak kasuri methi in warm water for 10–15 minutes, squeeze dry, and use — but do reduce the quantity as dried methi is much stronger in flavor. The color and texture will also be different.

The most common reasons are:

  1. Mixing dry ingredients first, then adding water — try the wet-first method instead as shared in the recipe card.
  2. Batter that is too thick — it should be thick but still pourable.
  3. Not using baking soda, which help with lift and texture.
  4. Frying on high heat, which doesn’t allow the inside to cook through and stay fluffy
  5. Excess water in the methi leaves — always squeeze thoroughly after washing. Excess water makes the batter thin.

This always happens from one of two things:

  1. Moving the gota too soon after dropping them (wait at least 40 seconds before touching them). The gota need that initial 40 seconds to set and form a crust before you move them.
  2. Batter that is too thin. Thin batter doesn’t form a ball, instead they disintegrate into the oil.

Oil that is not hot enough is the culprit. If the oil temperature is too low, the gota absorb oil before they can form a crust. Test the oil with a small drop of batter — it should rise to the surface within 2–3 seconds. Also avoid overcrowding the pan, which drops the oil temperature and leads to greasy results.

Yes — besan (chickpea flour) is naturally gluten-free, and all the other ingredients in this recipe are also gluten-free except Hing (asafoetida). So skip hing or buy gluten-free hing. If you are making them for someone with celiac disease, just double-check that your besan is certified gluten-free (some brands are processed in facilities that also handle wheat).

No, you cannot air fry methi gota. The batter is thin unlike pakora batter. The batter doesn’t hold round shape in air fryer basket and make a huge mess.

Like all deep-fried snacks, methi gota are an occasional treat rather than an everyday food. That said, besan is a good source of plant protein and fiber. Fenugreek leaves are rich in iron, calcium, and vitamins. And hing and ajwain, which are mandatory in this recipe, aid digestion specifically when eating besan. So while it’s a fried snack, it’s made from wholesome ingredients with built-in digestive support — which is the Indian way!

Use any neutral oil with a high smoke point sunflower oil, canola oil, or refined groundnut (peanut) oil are all great choices. Avoid olive oil or coconut oil for deep frying as their smoke points are too low and the flavor is not compatible.


Check Out More Gujarati and Methi Recipes

Did you try this recipe? I’d love to hear about it! Leave a review in the comment section below. If you’re sharing it on your Instagram then don’t forget to tag me @spice.up.the.curry

Follow me on all of the platforms below.

5 from 7 votes (1 rating without comment)

Leave a Reply

Your email address will not be published. Required fields are marked *

Recipe Rating


This site uses Akismet to reduce spam. Learn how your comment data is processed.

33 Comments