
Ukadiche Modak Recipe (Steamed Modak)

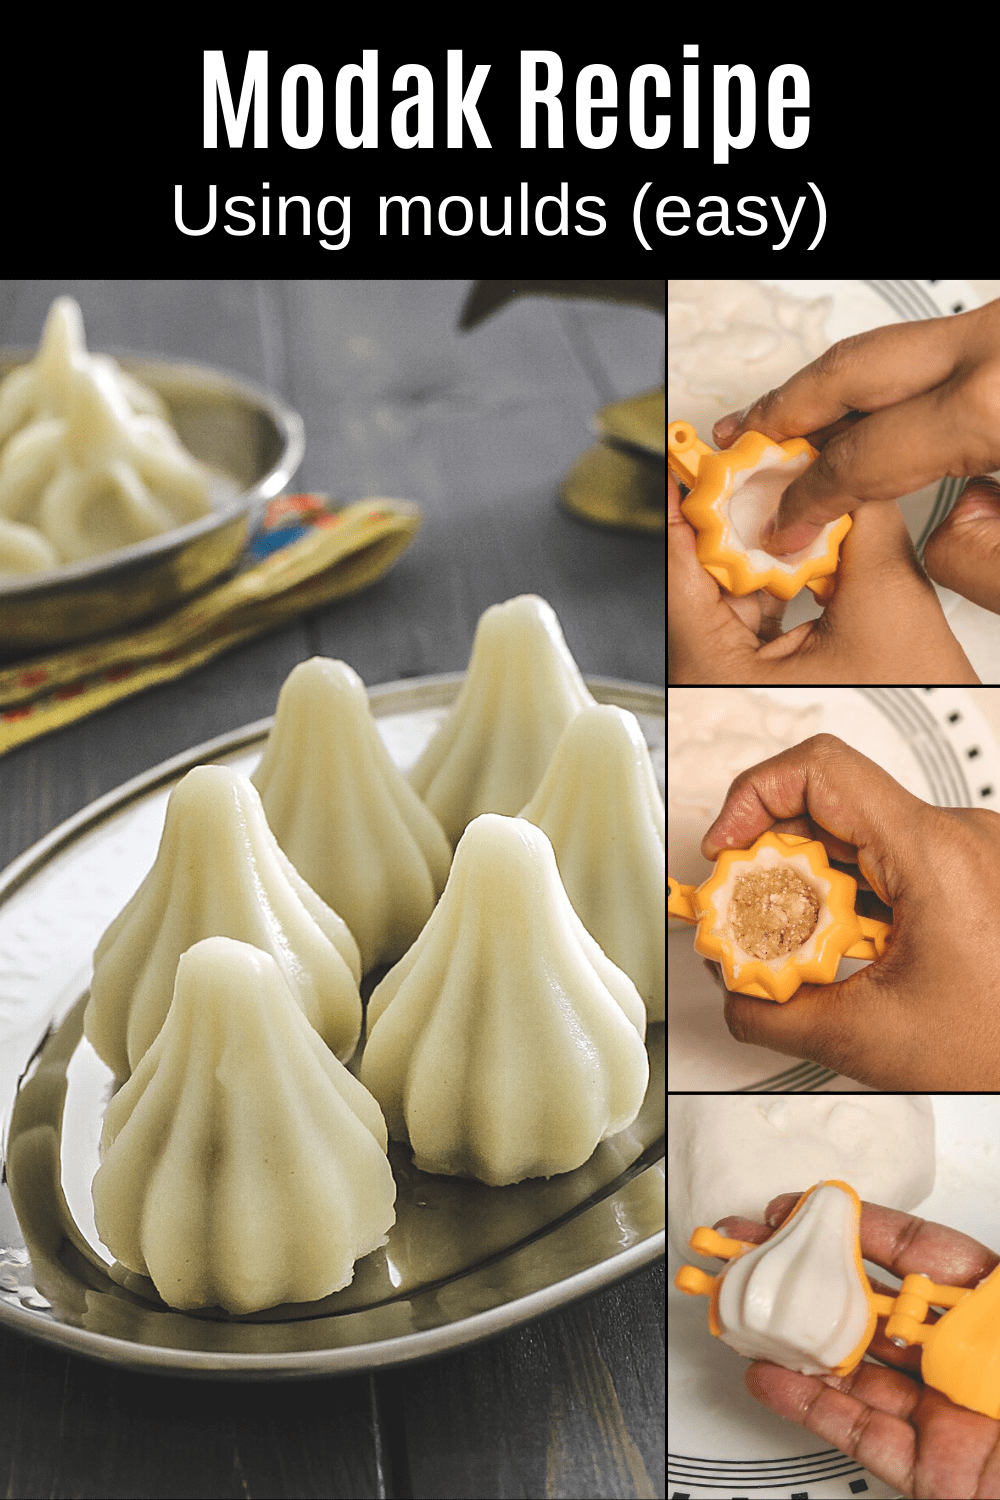
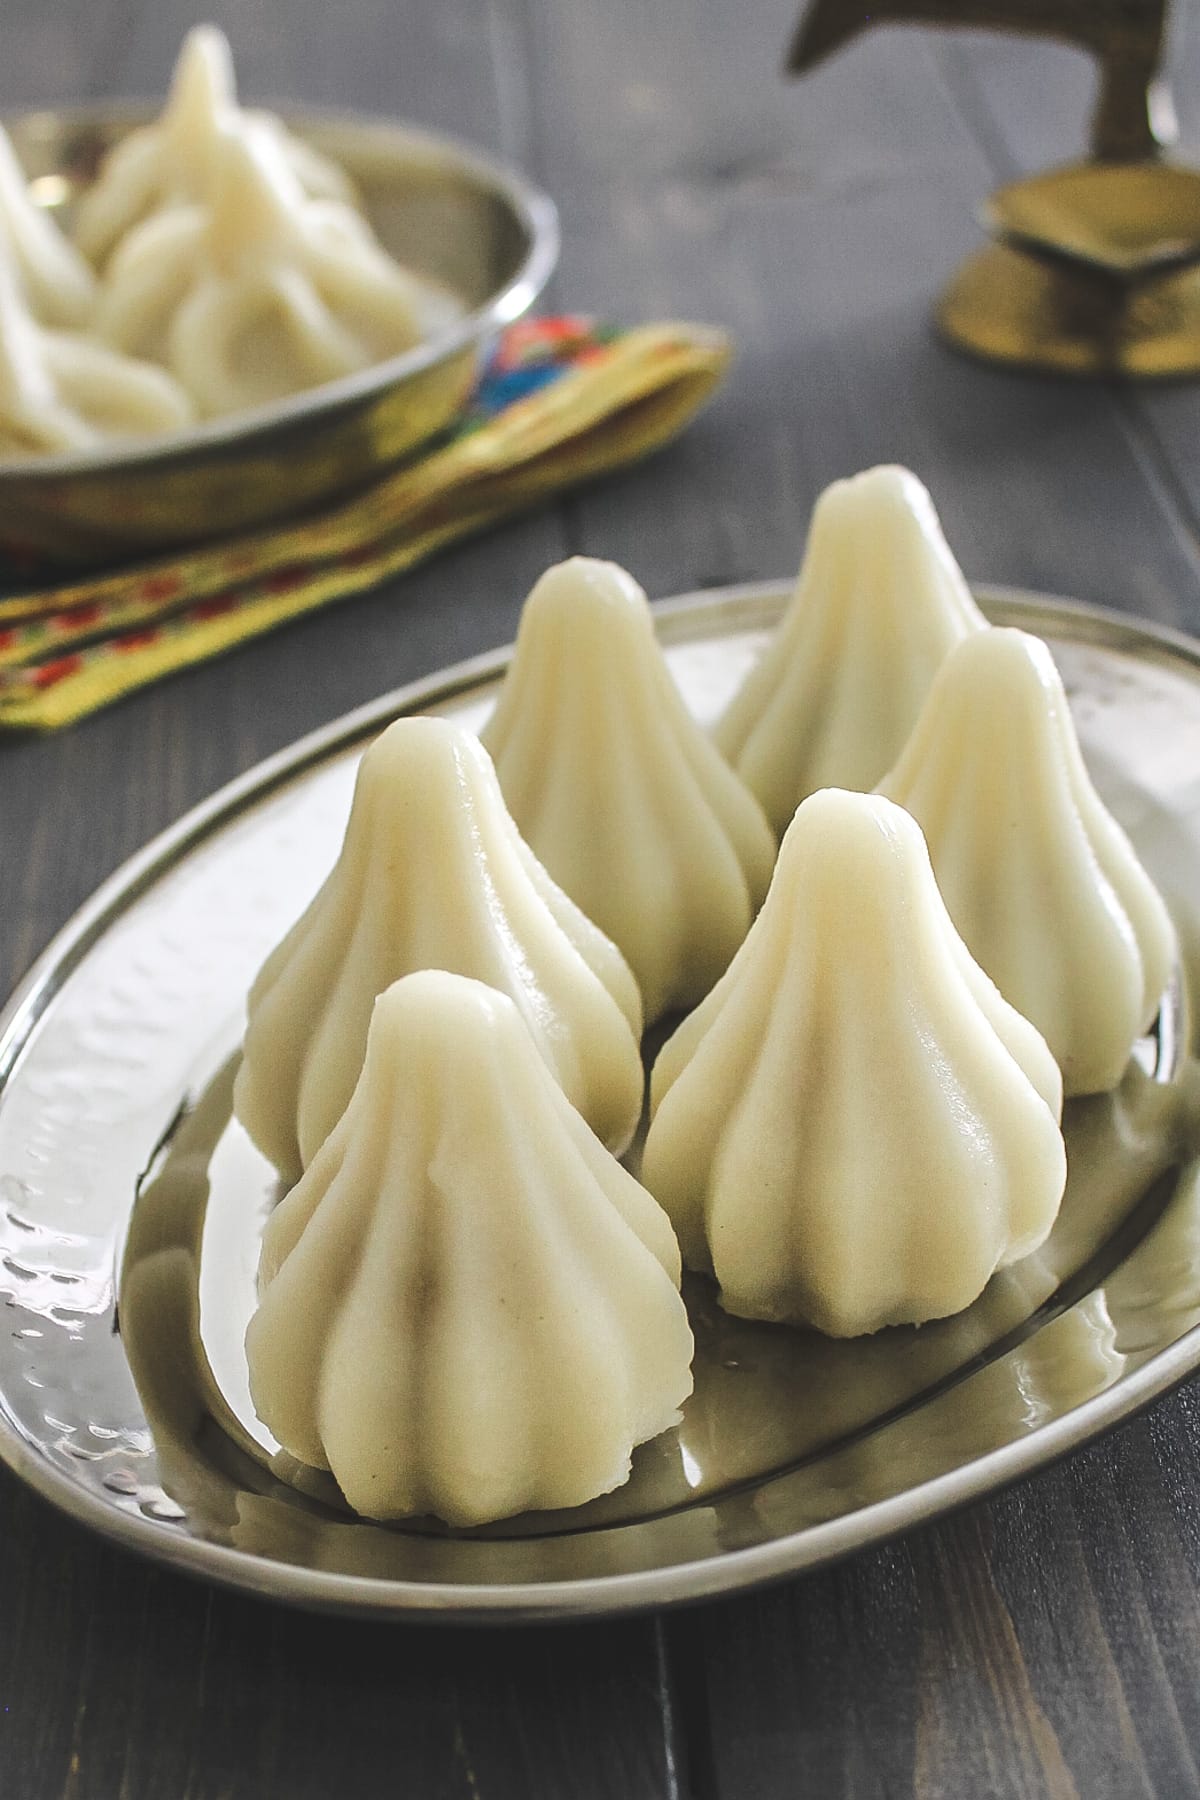
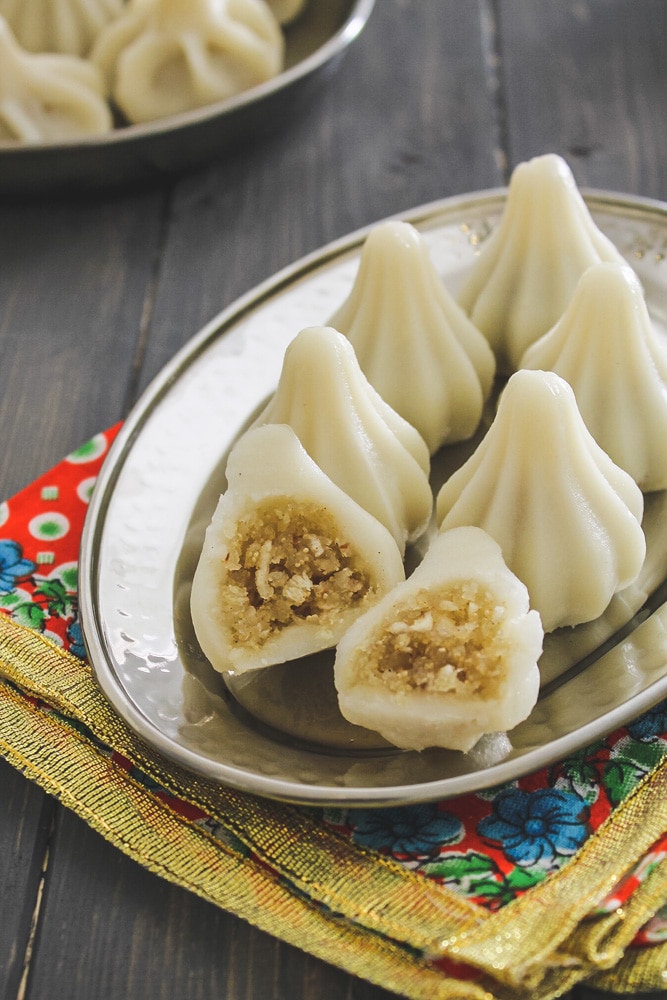
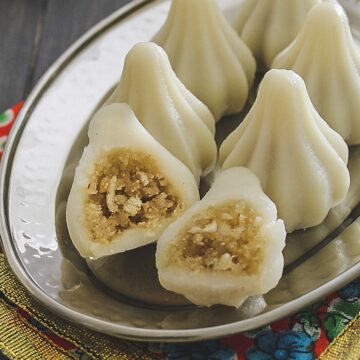
This ukadiche modak recipe makes the softest, most melt-in-your-mouth steamed modak — the kind with a silky rice flour outer layer and a chewy, golden coconut-jaggery filling fragrant with cardamom. Pure festive bliss, and absolutely worth the effort.
Flavor: Delicately sweet, coconutty, warmly spiced with cardamom
Texture: Soft, smooth outer layer — not sticky, not dry. Chewy, sweet filling inside.
Ganesh Chaturthi 2026 — Monday, 14 September 2026
What is Ukadiche Modak?
Modak is a traditional Indian sweet dumpling made with an outer rice flour dough and a coconut-jaggery filling. In Marathi, the steamed version is called Ukadiche Modak. The word ukadiche means “steamed,” while ukad refers to the steamed rice flour dough used for the outer covering.
Ukadiche Modak is made on the first day of Ganesh Chaturthi as an offering or prasad. People also make it on Sankasti Chaturthi and Angarika Chaturthi.
Lord Ganesha is also called modakapriya — one of his 108 names in the Ganesha Ashtothram — meaning “the one who loves modak.” This is why ukadiche modak is the most sacred and most important prasad offering during Ganesh Mahotsav. It is always made first, on the main Chaturthi day, before any other sweet.
The three main ingredients of ukadiche modak — rice, coconut, and jaggery — are all traditional, local produce of Maharashtra. The recipe has three stages: (1) make the modak filling, (2) make the outer rice flour dough, (3) shape and steam.
Ukadiche modak vs fried modak — what is the difference? There are two types of modak — steamed (ukadiche modak) and fried (talniche modak). Ukadiche modak has a soft, pillowy, melt-in-your-mouth texture — the outer layer is delicate and silky. Fried modak (talniche modak) has a flaky, crispy, pastry-like shell. Both use the same coconut-jaggery filling. Ukadiche modak is the traditional, primary offering for Ganesh Chaturthi puja; fried modak is a popular variation.
About This Recipe
I’ll be honest — the first time I shaped modak by hand, I made a mess. The dough cracked, the pleats looked uneven, and some split open during steaming. Like anything that requires technique, modak takes practice. The good news is that using a mould makes the whole process very forgiving — even a first-timer can produce beautiful looking modak with a mould.
There are two important things I’ve learned from making this recipe many times:
- The stuffing must be dry. If there is excess moisture in the coconut-jaggery filling, it makes the outer shell soggy during steaming — the modak becomes wet, sticky, and falls apart. Cook the stuffing until all the moisture has evaporated and the mixture holds together when pressed. This is the single most important step in the whole recipe.
- The dough must be kneaded while warm — not hot, not cold. If kneaded when too hot, it sticks and burns your hands. If left to cool completely before kneading, it becomes stiff and develops cracks. The sweet spot is warm-to-touch — like kneading roti dough that has just cooled enough to handle.
⭐ Why This Recipe Works
🧾 Ingredient For Ukadiche Modak Recipe
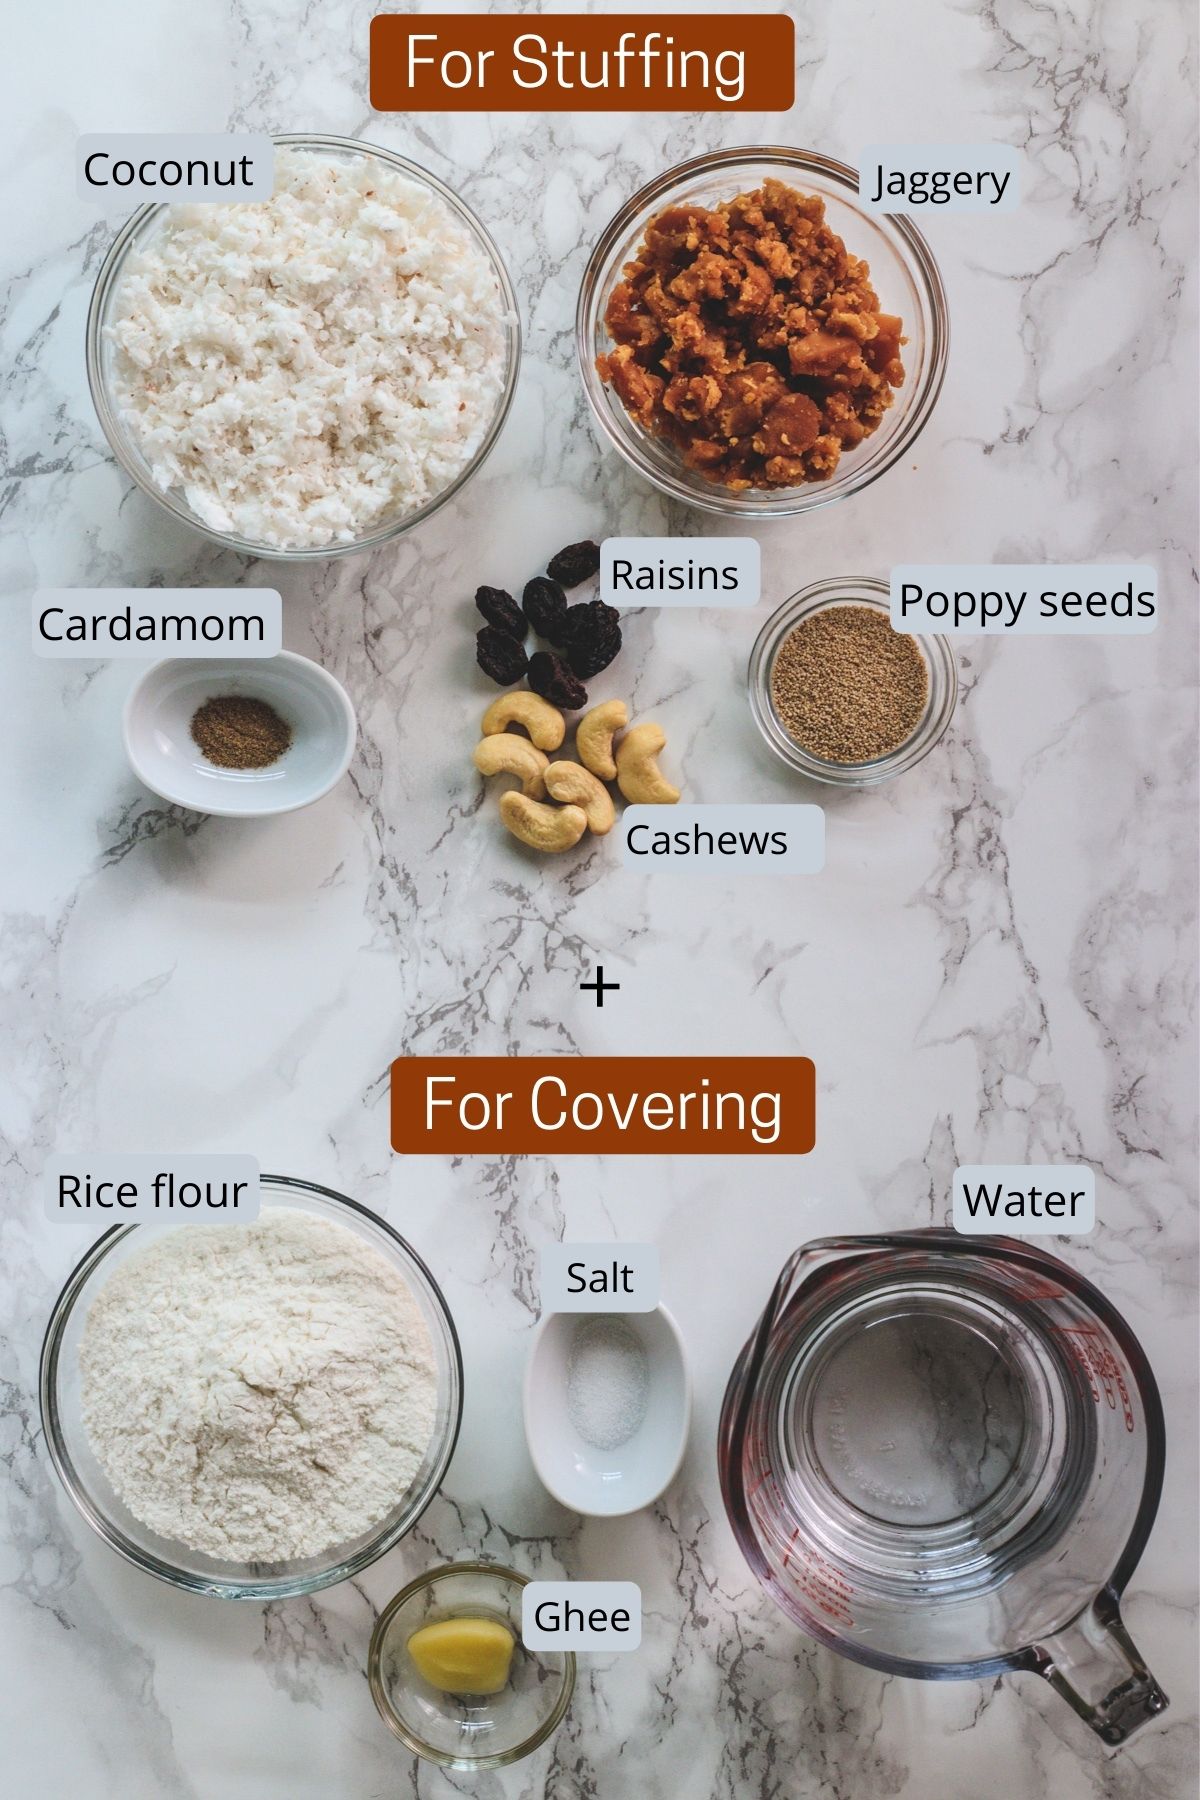
For the Modak Filling (Stuffing)
For the Outer Rice Flour Dough
The Modak Filling Recipe (Nariyal Gur Stuffing)
This section is for anyone searching specifically for the modak filling recipe — the sweet coconut-jaggery stuffing that goes inside.
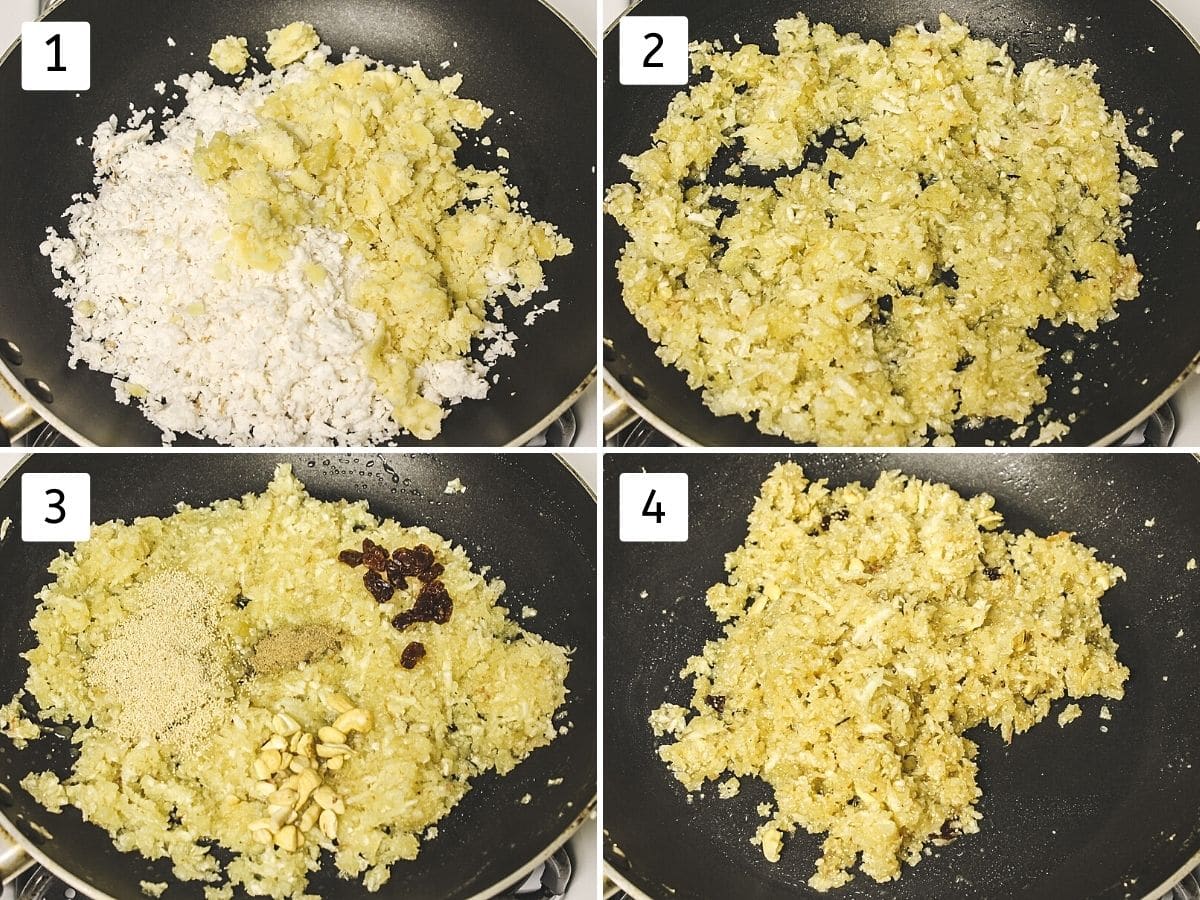
- Step 1 — Prep coconut and jaggery. Take the grated coconut and powdered/grated jaggery together in a heavy-bottomed pan on medium heat. As the pan heats up, the jaggery will begin to melt and the mixture will become loose and almost liquid-looking. This is normal — do not panic.
- Step 2 — Cook coconut and jaggery. Continue cooking, stirring frequently, until the mixture thickens and comes together. The moisture from both the coconut and the melted jaggery needs to evaporate. This takes approximately 6–8 minutes depending on how much moisture your coconut has.
– How do you know the filling is ready? The mixture should look thick, hold together when pressed with a spoon, and should not look wet or runny. When you press a small amount between your fingers, it should hold its shape without releasing any liquid. This is the correct consistency.
– Do not overcook — if you cook until the mixture looks completely dry and is pulling away from the pan dramatically, the jaggery has hardened and the filling will become chewy and difficult to eat after steaming.
- Step 3 — Add flavorings. Turn the heat to low. Add the cardamom powder, poppy seeds, chopped cashews, and raisins. Mix well and cook for 1 more minute. Turn off the stove.
- Step 4 — Cool completely. Transfer the stuffing to a plate and spread it out to cool. The filling must be completely cool before you use it. Hot filling placed inside the dough makes the outer shell soggy and causes the modak to collapse during shaping. Give it at least 20–25 minutes.
Make-ahead: The filling can be made 1–2 days in advance and stored in an airtight container in the refrigerator. Bring to room temperature before using.
Making the Outer Rice Flour Dough
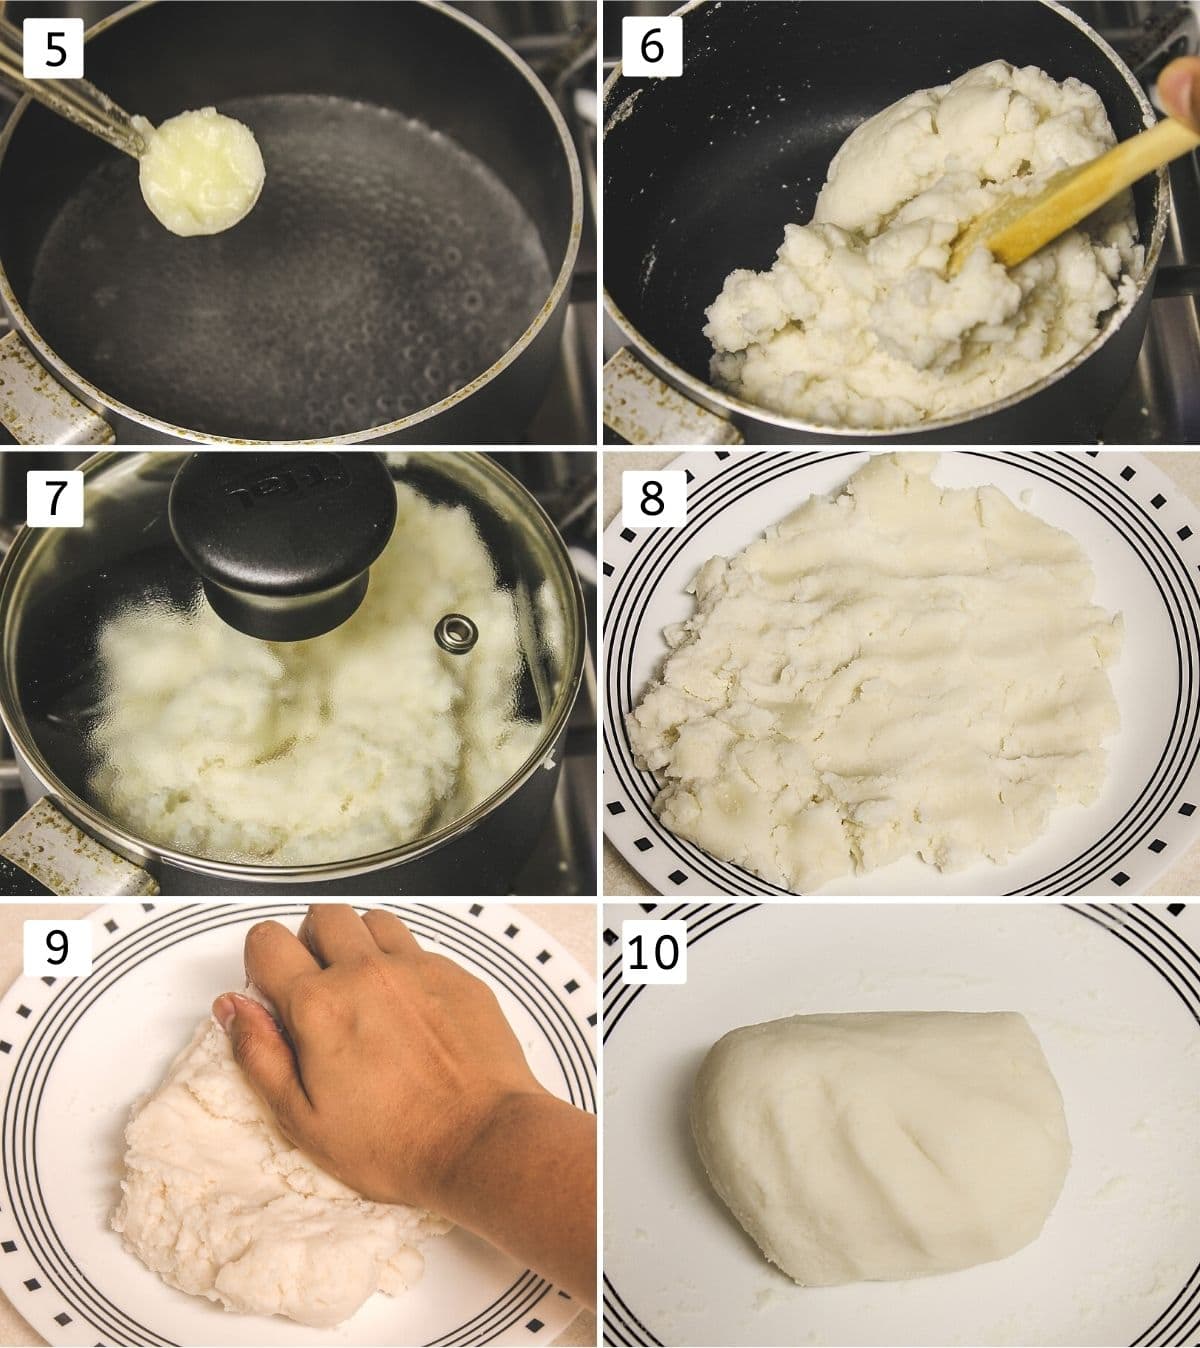
- Step 5 — Boil water with ghee. Measure 1¼ cups of water into a saucepan. Add the salt and ghee. Bring to a full, rolling boil over medium heat.
- Step 6 — Add rice flour. Once boiling, reduce heat to medium-low. Add the rice flour all at once and immediately stir vigorously with a wooden spoon or spatula. The flour will absorb the water rapidly and come together into a mass almost instantly. Keep stirring to incorporate all the flour — there should be no dry white patches remaining.
- Step 7 — Cover & Cook. Cover with a lid and cook for 2–3 minutes on the lowest heat, stirring once or twice during this time. This brief cooking ensures all the raw rice flour is hydrated.
- Step 8 — Work with it while warm. Remove the dough to a plate and let it cool until warm to the touch — not hot. This takes about 5–7 minutes.
- Step 9 — Knead while warm. Once warm enough to handle (apply water on your palms if it feels too hot), knead firmly for 2–3 minutes until the dough is completely smooth, soft, and pliable with no lumps. The dough should feel like a soft, smooth clay — it should not crack when you press or fold it, and it should not stick to your hands. A well-kneaded dough is the most important predictor of a crack-free modak.
TIP: If the dough feels stiff or is cracking while kneading, add water a teaspoon at a time and continue kneading. If it feels sticky, add a tiny bit more rice flour. - Step 10 — Cover. Keep the kneaded dough covered with a clean damp cloth at all times when you’re not actively working with it — the surface dries out quickly and causes cracking.
Shaping Method 1: Using a Modak Mould (Recommended for Beginners)
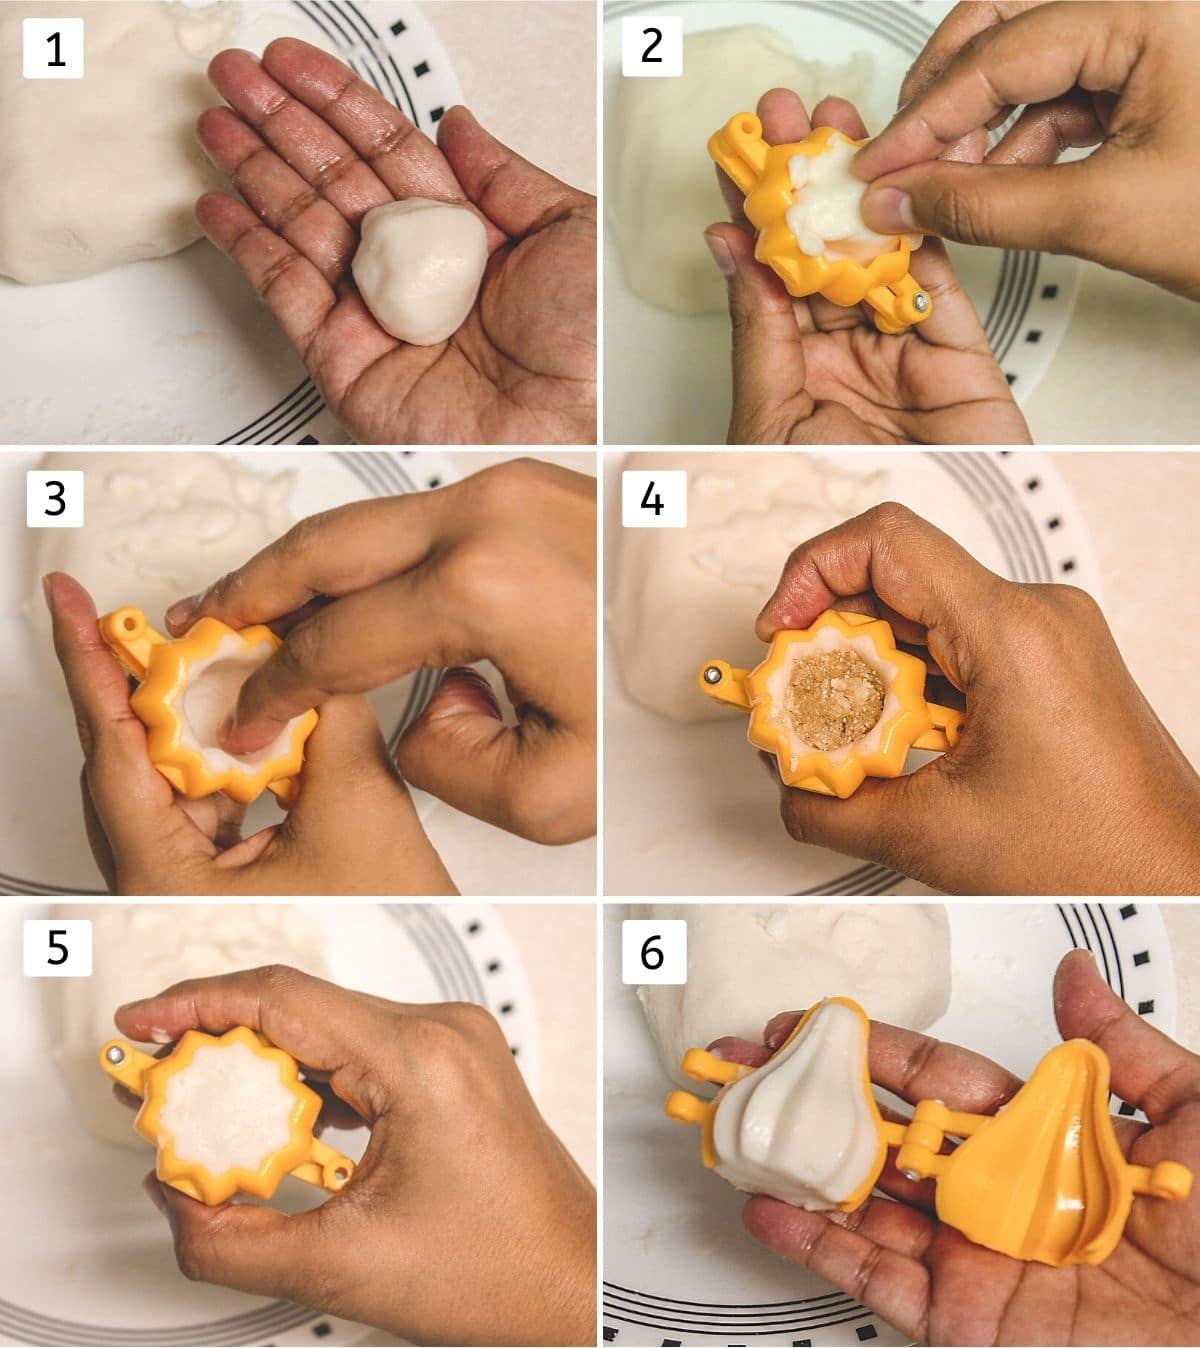
- Lightly grease the inside of the mould with ghee — this helps the shaped modak release cleanly.
- Pinch off a portion of dough — about the size of a large marble.
- Press and flatten it slightly with your fingers, then push it into the open mould, pressing it up the sides and into the ridges to make a uniform hollow shell. The shell should be of medium thickness — not too thick (tastes doughy) and not too thin (will crack and leak filling).
- Place 2–3 teaspoons of the cooled filling into the hollow shell. Don’t overfill — leave a small gap at the bottom edge.
- Take a small piece of dough, flatten it into a small disc, and use it to seal the open bottom of the mould completely.
- Open it and carefully unmould the shaped modak onto a plate. Place it sealed-side down. Cover with a clean kitchen towel while you shape the rest.
Shaping Method 2: By Hand (Traditional Pleated Method)
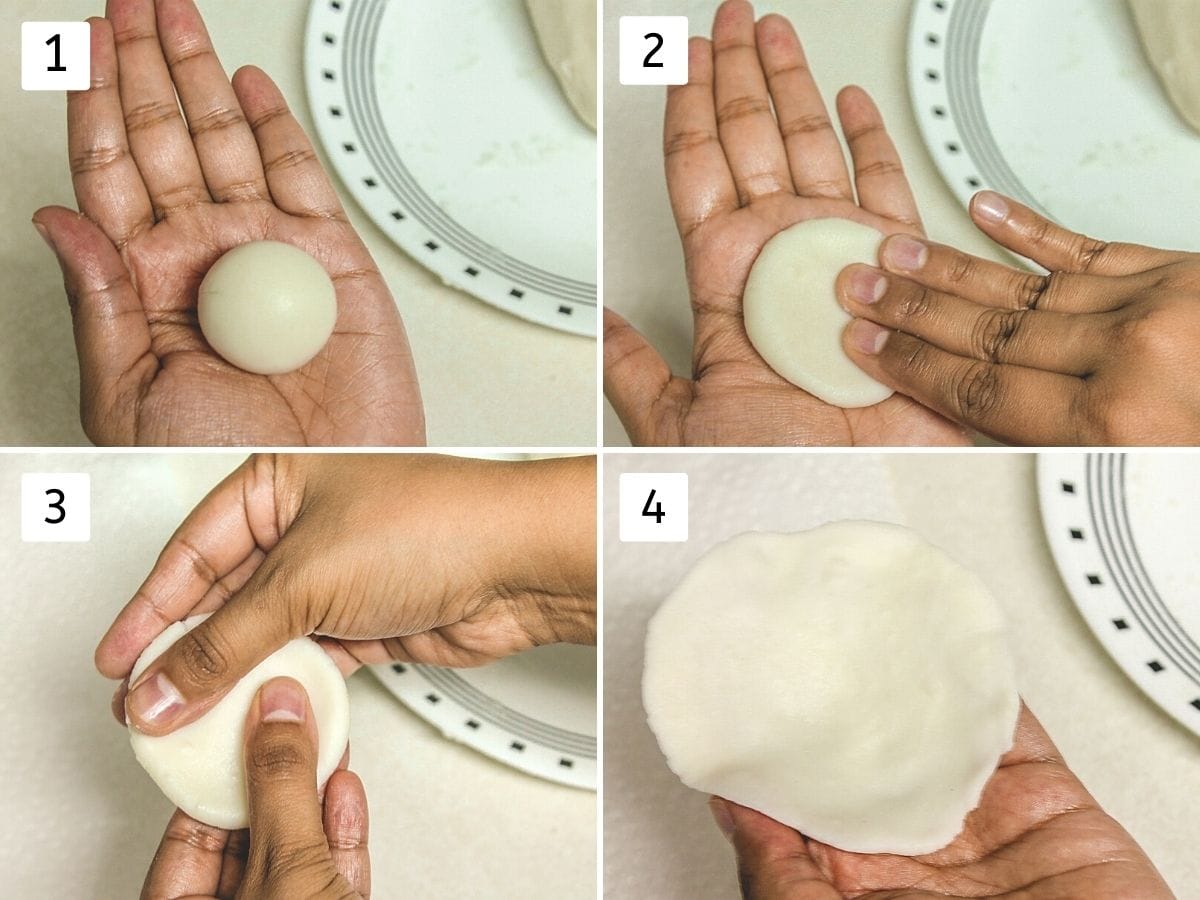
- Grease your hands lightly with ghee or dampen with water. Pinch off a dough ball slightly smaller than a golf ball.
- Place it in your palm. Gently press to make a disc.
- Using the thumb and fingers of your other hand, gently press and thin out the dough from the center outward, rotating as you go, until you have a disc approximately 3–4 inches across.
- The center should be slightly thicker than the edges — the center needs to hold the filling.
💡 Pro Tip: Keep a small bowl of water next to you while kneading and shaping. If the dough feels slightly dry or develops a surface crack while you’re working, dip your finger in the water and smooth it over the surface. Keeping your hands slightly moist prevents the dough from drying out as you work.
- Place 2–3 teaspoons of filling in the center of the disc.
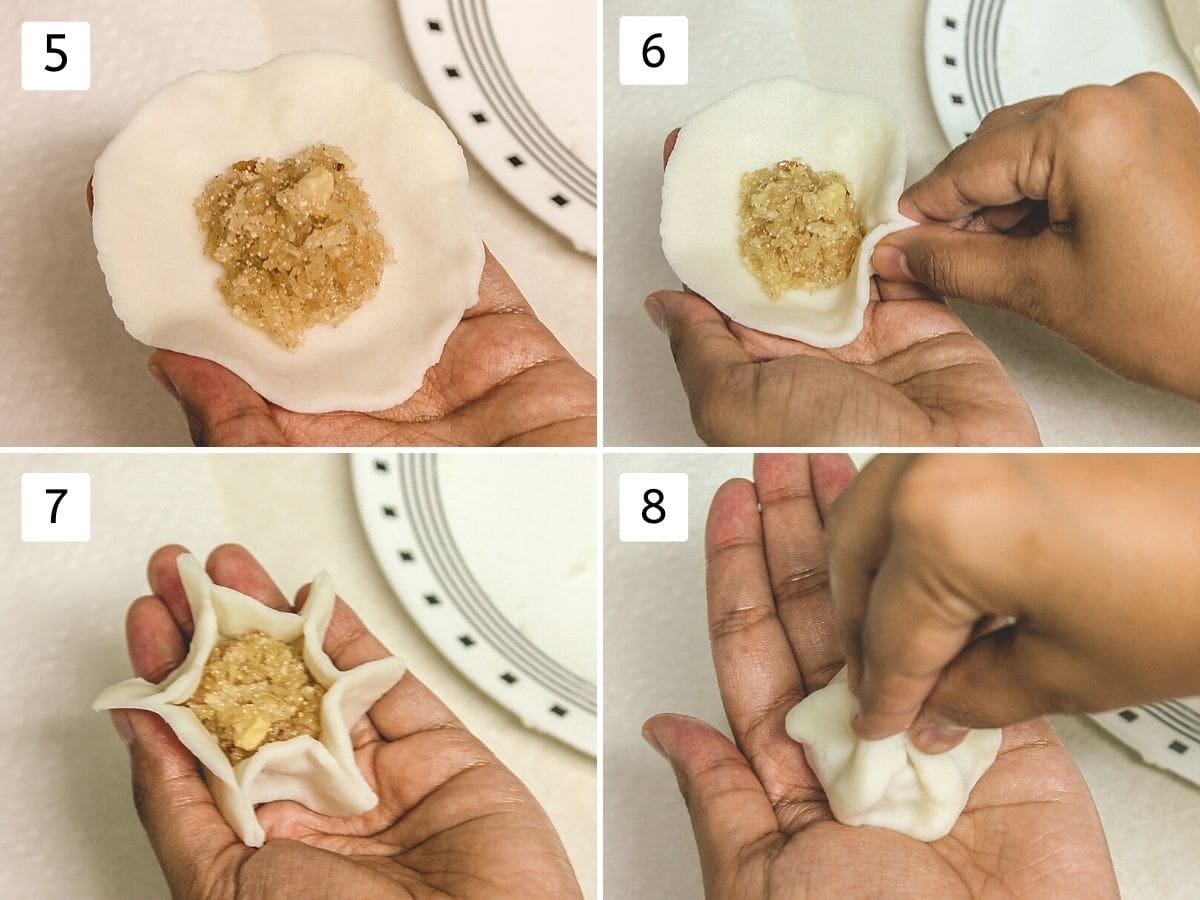
- Now comes the pleating — the most skill-intensive part. Using the thumb and index finger of one hand, pinch a small fold at the edge of the disc and crease it. Work around the circumference, making small, even pleats — 10–12 pleats is the traditional goal, as a beginner I did only 5. Each pleat should be close to the last.
- As you make pleats, gently bring the edges up around the filling, gathering and pinching them together at the top to form the characteristic pointed tip. Twist lightly to seal.
- Don’t worry if your first few look imperfect — it genuinely takes practice. Even 5–6 rough pleats tastes exactly the same as 12 perfect ones.
Steaming the Modak
- Bring water to a boil in your steamer pot.
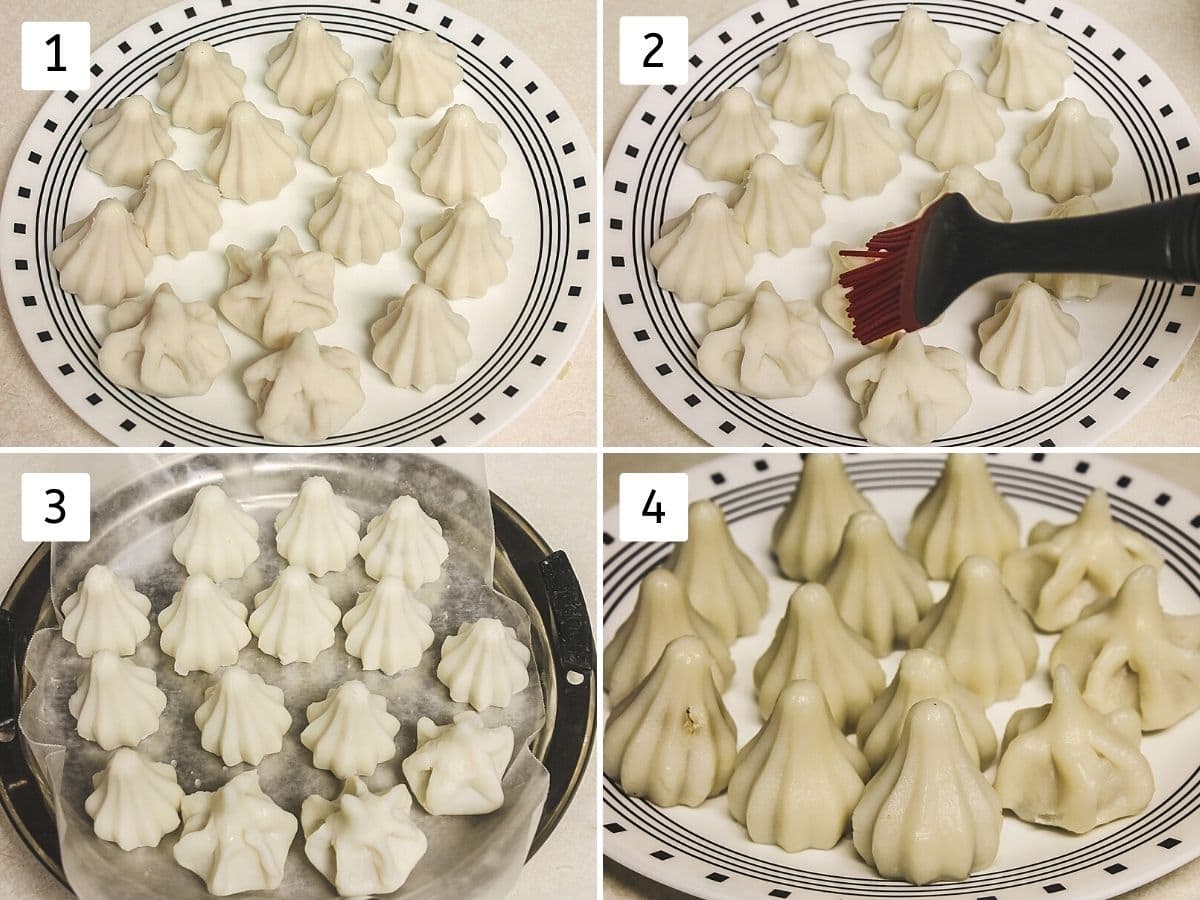
- While waiting, lightly brush each shaped modak with water using a pastry brush (or dip briefly in a bowl of water). This prevents the outer surface from drying and cracking in the steam.
- Line the steamer plate or basket with parchment paper, a muslin cloth, or a fresh banana leaf. The lining prevents the modak from sticking to the metal. Arrange the modak on the lined plate with a small gap between each.
- Place the plate in the steamer and cover. Steam for 13–15 minutes on medium heat. Do not open the lid during steaming.
Let them cool for 5 minutes in the steamer after turning off the heat before attempting to remove them — they are fragile when very hot. They firm up as they cool.
Transfer carefully to a plate. Drizzle with a little warm ghee or a tablespoon of saffron-infused milk before serving.
How to know when they’re done: The outer shell will change from matte white to slightly translucent and shiny — you can often see this through a glass steamer lid. The surface should feel firm (not sticky or soft) when lightly touched.
💡 Expert Tips for Perfect Modak
🛠️ Troubleshooting — Why Did My Modak…
🧊 Storage and Make-Ahead
❓ Frequently Asked Questions
Check Out All Modak Recipes
- 12 Modak Recipes for Ganesh Chaturthi
- Rava Modak
- Chocolate Modak
- Mawa Modak
- Kaju Modak
- Coconut Modak
- Malai Modak
More Ganesh Chaturthi Recipes
- Ganesh Chaturthi Recipes (Full Collection)
- Panchamrut
- Puran Poli
- Basundi
Tried this ukadiche modak recipe? Please leave a star rating and a comment below! Tag me on Instagram @spice.up.the.curry — I love seeing your festival prasad plates! 🙏
Ukadiche Modak Recipe (Steamed Modak with Coconut Filling)
US measuring cups are used (1 cup = 240 ml)
Ingredients
For Stuffing:
- 1 cup Coconut, (Fresh or frozen), grated
- ½ cup Jaggery (Gur), powdered or grated
- ½ teaspoon Green cardamom seeds powder
- 1 tablespoon Khas khas (White poppy seeds)
- 5-6 Cashew nuts, chopped
- 1 tablespoon Raisins
For Outer Covering:
- 1 ¼ cups Water
- ⅛ teaspoon Salt
- ¼ teaspoon Ghee (Clarified butter)
- 1 cup Rice flour
Instructions
- The Modak Filling Recipe: Take the grated coconut and powdered/grated jaggery together in a heavy-bottomed pan on medium heat. As the pan heats up, the jaggery will begin to melt and the mixture will become loose and almost liquid-looking. This is normal — do not panic.
- Continue cooking, stirring frequently, until the mixture thickens and comes together. The moisture from both the coconut and the melted jaggery needs to evaporate. This takes approximately 6–8 minutes depending on how much moisture your coconut has.
- Turn off the stove. Add the cardamom powder, poppy seeds, chopped cashews, and raisins.
- Transfer the stuffing to a plate and spread it out to cool. The filling must be completely cool before you use it.
- Making The Dough: Measure 1¼ cups of water into a saucepan. Add the salt and ghee. Bring to a full, rolling boil over medium heat.
- Once boiling, reduce heat to medium-low. Add the rice flour all at once and immediately stir vigorously with a wooden spoon or spatula. The flour will absorb the water rapidly and come together into a mass almost instantly. Keep stirring to incorporate all the flour — there should be no dry white patches remaining.Cover with a lid and cook for 2–3 minutes on the lowest heat, stirring once or twice during this time. This brief cooking ensures all the raw rice flour starch is hydrated.
- Remove the dough to a plate and let it cool until warm to the touch — not hot. This takes about 5–7 minutes.
- Once warm enough to handle (apply water on your palms if it feels too hot), knead firmly for 2–3 minutes until the dough is completely smooth, soft, and pliable with no lumps. If the dough feels stiff or is cracking while kneading, add water a teaspoon at a time and continue kneading. If it feels sticky, add a tiny bit more rice flour.
- Keep the kneaded dough covered with a clean damp cloth at all times when you're not actively working with it — the surface dries out quickly and causes cracking.
- Shaping Method 1 (Using a Modak Mould): See the step-by-step photos shared above for visual understanding.
- Grease the inside of the mould using ghee. Take a small ball from the dough and add it into the mould.
- Press it tightly and make the hollow center using your fingers. Add the stuffing & lightly press it. Take little dough and seal the open part.
- Open and gently remove it and place it on the plate. Keep it covered with a clean kitchen towel while you shape the rest.
- Shaping Method 2 (Using your hands): Grease your hand with ghee or just wet with water. take one ball on your palm.
- Now using your other hand, slightly press it to make the small disc. Now using two hands (thumbs and fingers), gently press it and keep shaping it to make about 3-4 inch diameter circle.
- In the center, add 2-3 teaspoons of stuffing. Now using your thumb and first finger, start pinching the little edges and make the pleats. I made only 5 pleats only. Now carefully pinch it together and seal it.
- Steaming: While shaping, don’t forget to keep them covered to avoid drying.
- Prepare the steamer and let the water come to a boil. Meanwhile, Brush all the modak using water. Or alternately you can dip them in a glass of water.
- Prepare the steamer thali. Arrange the parchment paper or muslin cloth or banana leaf on the steamer thali. Arrange them on the thali.
- Steam them for 13-15 minutes on medium heat. Let it cool to touch. Meantime they will firm up. Now remove them and place them on the plate. Drizzle ghee or saffron-milk over ukadiche modak.

Hi Kanan,
I want to make this receipe but I dont have a steamer. Can I use pressure cooker for this? The measurements will change?
Yes you can use pressure cooker without whistle. And make sure that water in the cooker does not touch the thali or tin (in which you place the modaks.)
No change in the measurements. If you have small cooker then you might need to steam them in batches
WOW! These modak looks so beautiful and perfect. I can never do it like this. lovely share dear 🙂
Thank you Kushi, You should give it a try. It is not that hard