Punjabi Samosa Recipe
The BEST and only Punjabi samosa recipe you’ll ever need! These samosa turn out perfect every time with a crispy, flaky outer cover and deliciously spiced potato stuffing. Here you’ll learn all the tips and tricks to shaping and frying them to perfection.
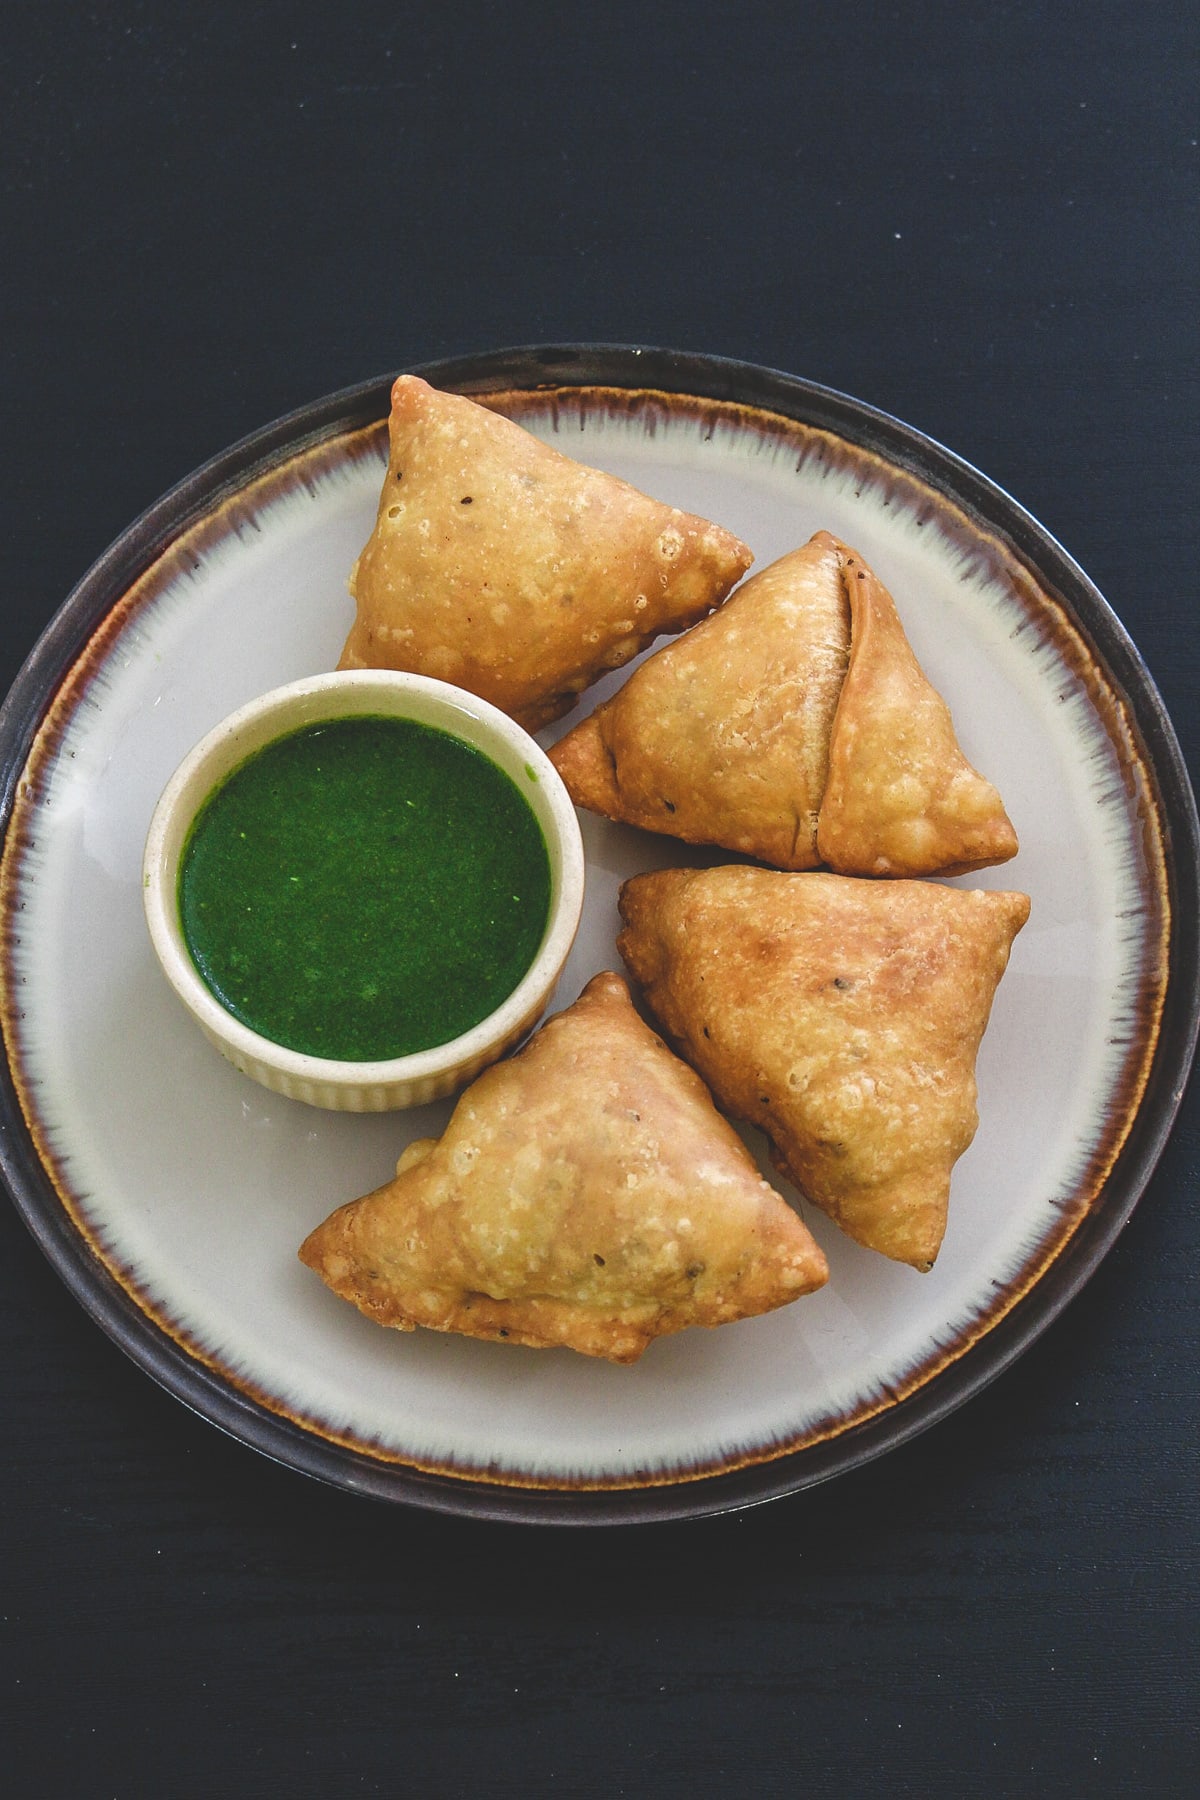
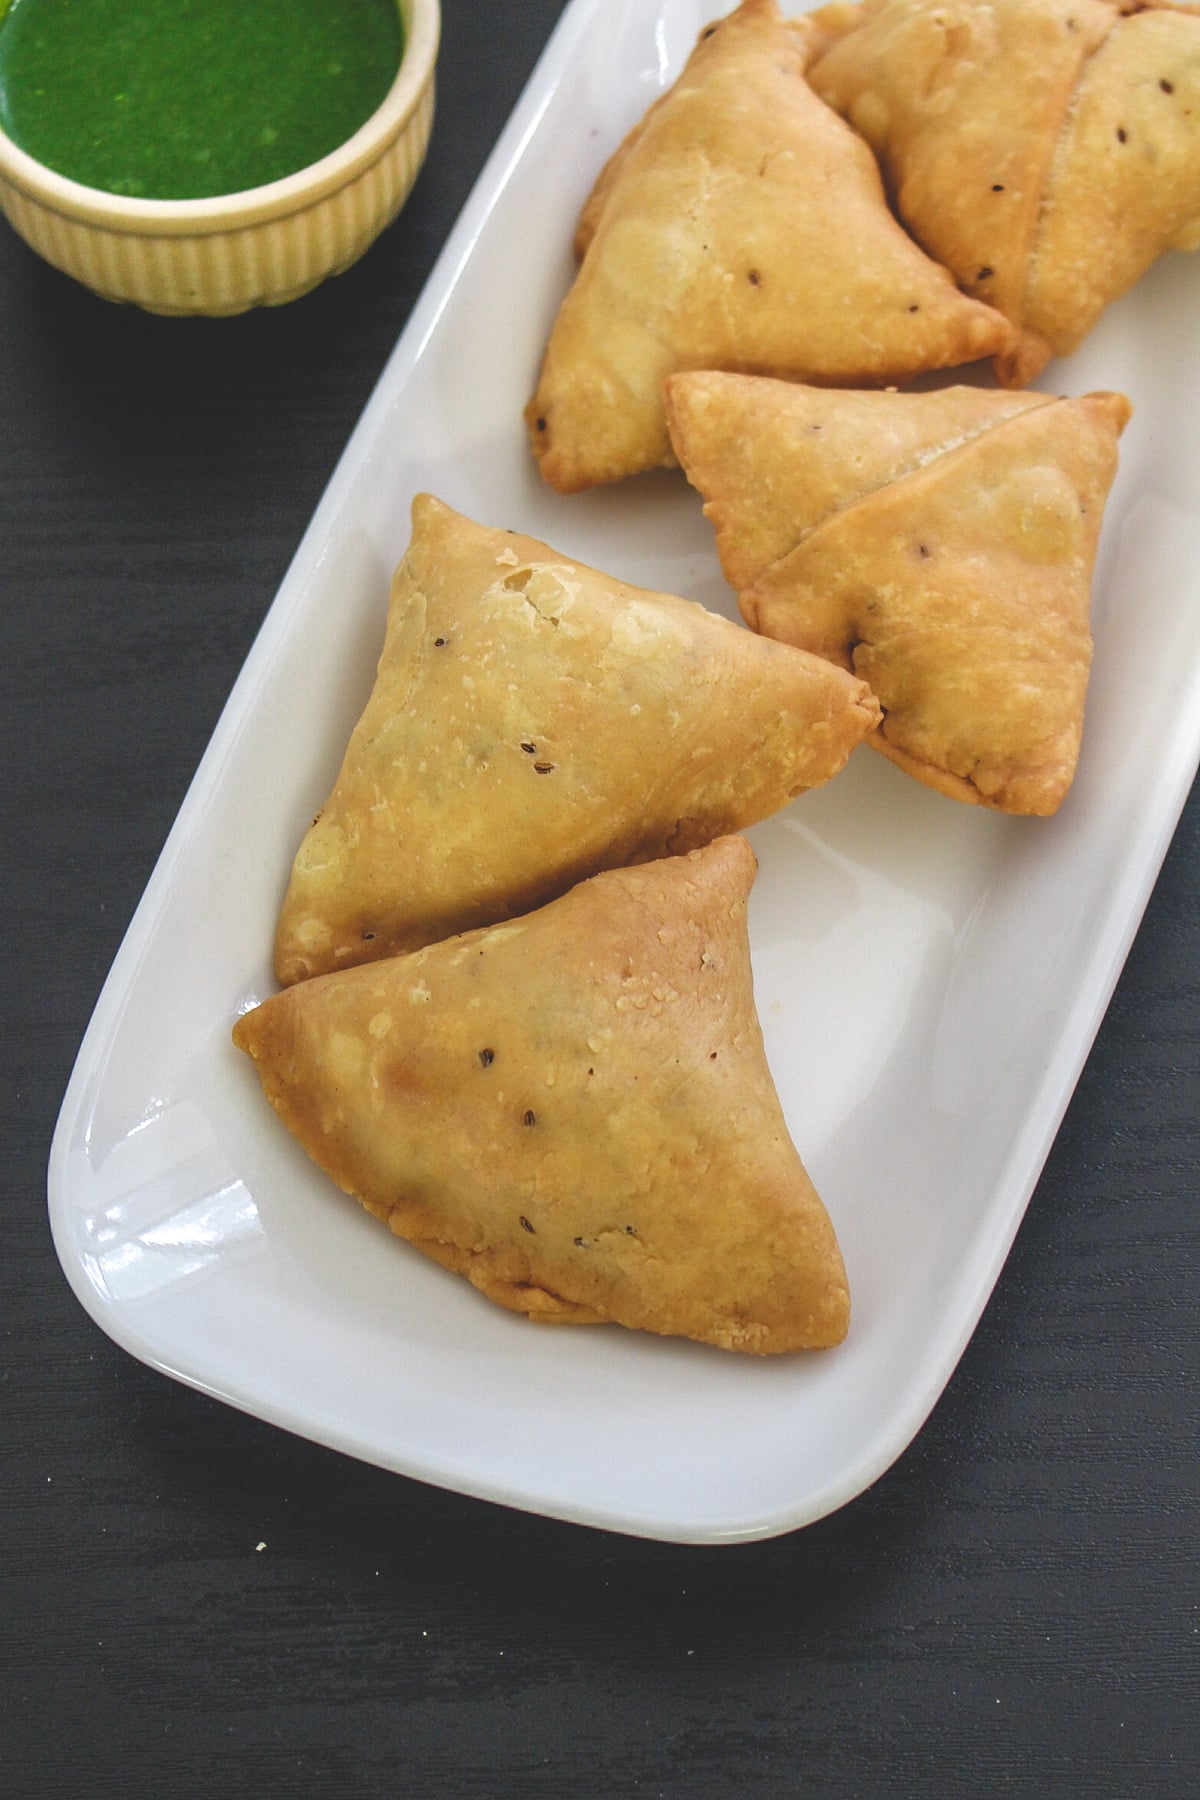
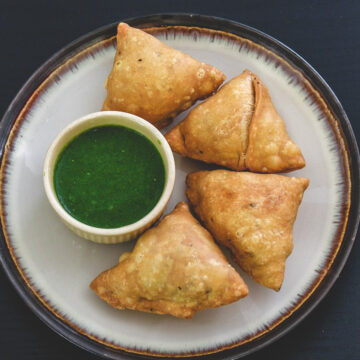
The most eaten Indian snack/appetizer, samosa is served with dipping sauces like green chutney and tamarind date chutney. This can be enjoyed with a hot cup of coffee or tea.
What Is Samosa?
Samosa is a popular Punjabi snack that you’ll find in any restaurant, cafe menu, and street vendor across India. You’ll see them at parties or special occasions, get-to-gathers as an appetizer.
Samosa has a flaky, crispy pastry (made from flour) that is stuffed with medium spicy potato and green peas stuffing. This triangular-shaped pastry is deep fried into hot oil and served hot/warm with chutneys.
The most popular version of samosa is vegetarian and consists of potato stuffing. Hence it is also called aloo samosa where aloo is the Hindi term for potatoes. You’ll also find non-veg samosa that has a stuffing of keema or chicken.
The size of the punjabi samosa is really big. The ones I made here are of medium size and the ones you get from street vendors or in restaurants are double the size compared to what you see here in the pic.
Making a samosa recipe is a multi-step process but sure it’s easy to make with below step-by-step photos and tips.
❤️ You’ll Love This Samosa Recipe Because
- It tastes exactly the same as your favorite Indian restaurant or farsaan shop.
- It has the perfect texture: crisp and flaky.
- The stuffing flavor is too good with an adjustable spice level.
- Make ahead option (double fry method): If making for guests or small parties at home, half fry the samosa ahead of time. Then do the second fry at the time of the serving. (See the detailed instructions below).
- Freezer-friendly: You can make way ahead of time and freeze the shaped samosa or half fry samosa and enjoy it whenever you’re craving it (detailed instructions below).
👩🍳 How To Make Punjabi Samosa Recipe? (Pics)
Prep (Cooking Veggies):
- Potatoes:
- Boil potatoes in instant pot on manual for 8-10 minutes or steam pressure cook on the stovetop for 2 whistles.
- Once the potatoes are cool to touch (still warm) then peel and discard the skin. Let them cool down completely.
- Cut the boiled potatoes into cubes and keep them aside.
- Green peas:
- If using frozen peas, then you can microwave them with a pinch of salt and 2-3 tablespoons of water for 5 minutes. Drain the excess water and the peas are ready.
- Alternatively, you can boil on the stovetop in a pan or in a pressure cooker.
- If using fresh peas then it takes a little longer to cook. So increase the cooking time accordingly.
Make Stuffing For Aloo Samosa:
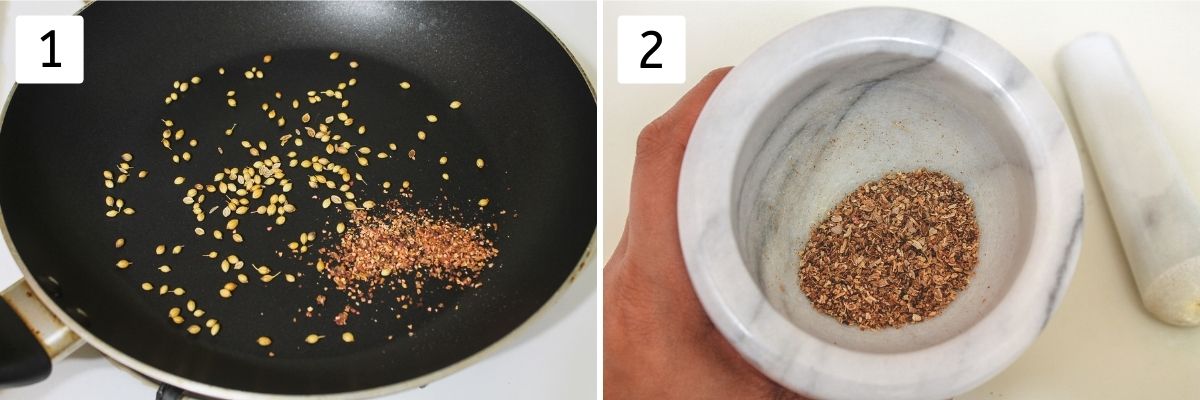
1) Take coriander seeds and anardana powder in a small pan. Dry roast on medium-low heat with stirring constantly until you get a nice aroma of roasted coriander seeds.
2) Remove it to a plate and let it cool down completely. Then make a powder using a mortar and pestle or a spice grinder.
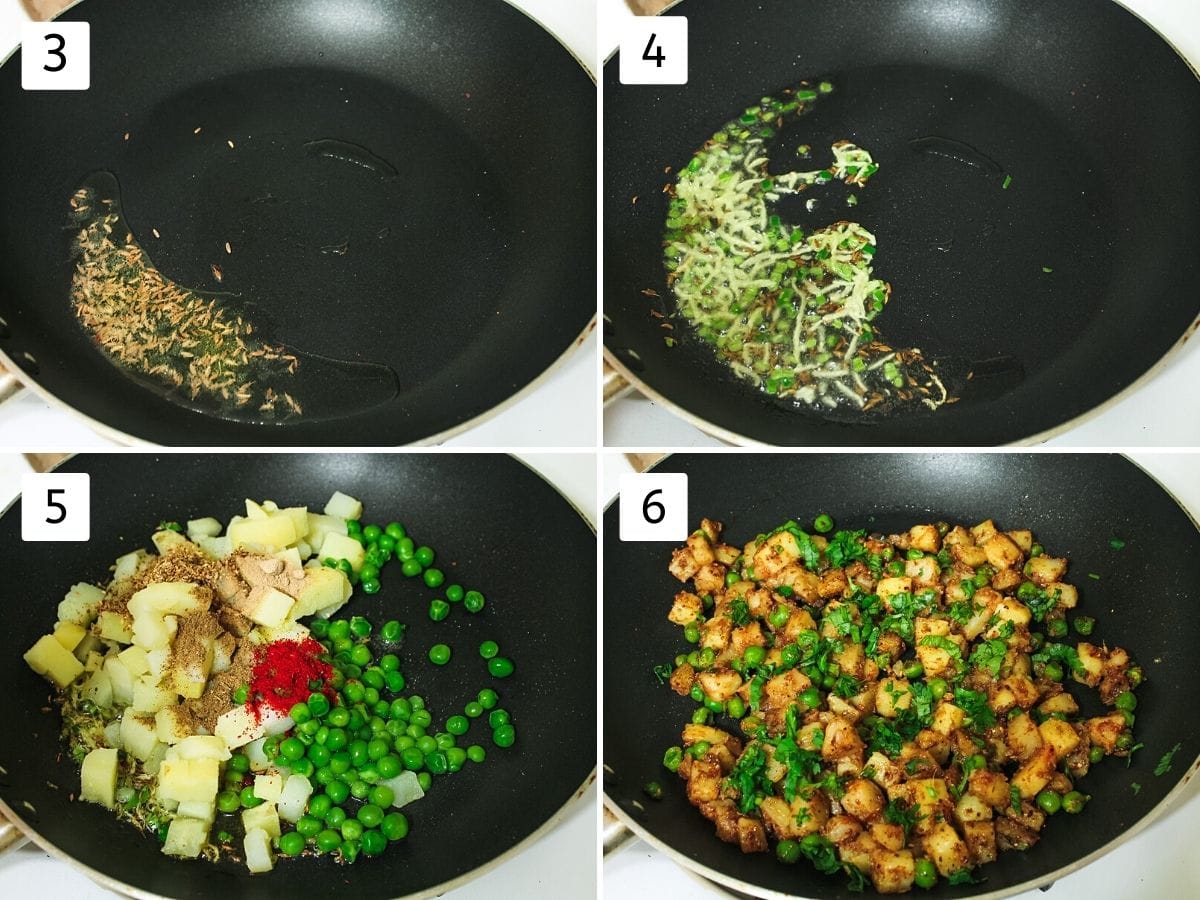
3) Heat the oil in a pan on medium heat. Once hot add cumin seeds and let them sizzle a bit.
4) Add chopped green chili and ginger paste (or grated). Saute for 30-40 seconds or until the raw smell of ginger goes away.
5) Add chopped potatoes, green peas, salt, and spices (red chili powder, amchur, garam masala, and prepared coriander-anardana powder).
6) Mix everything well and cook for 2-3 minutes. Turn off the stove and mix in freshly chopped cilantro. Remove the stuffing to a plate and let it cool down completely.
Make The Dough:
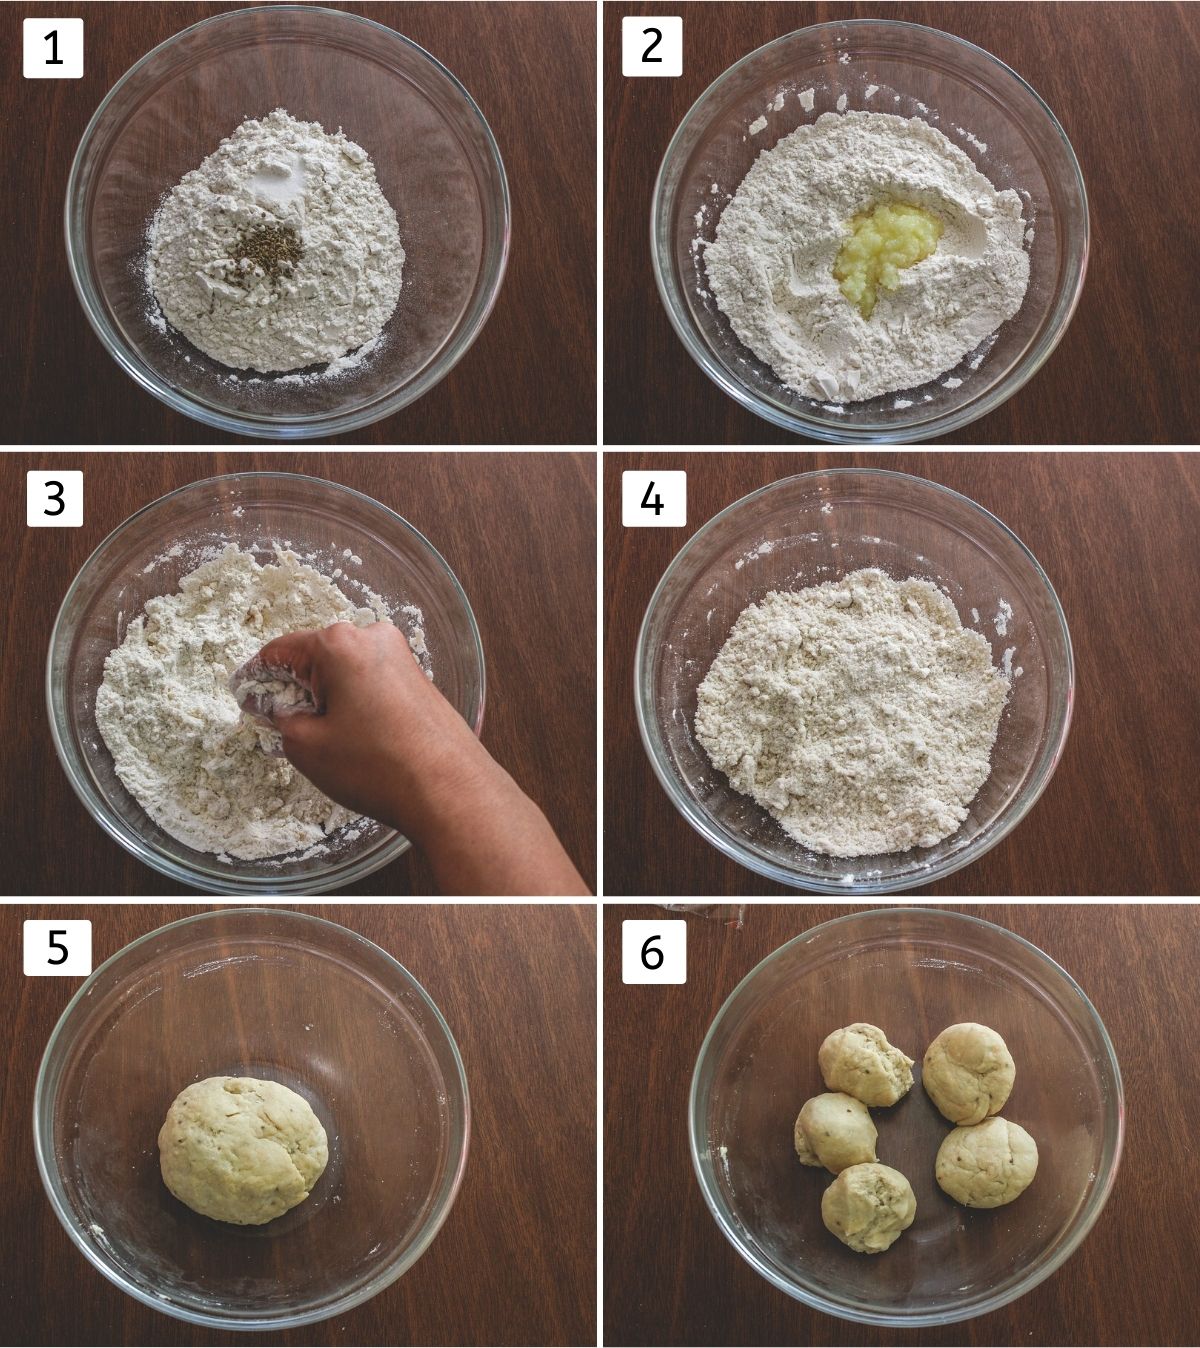
1) Take all purpose flour in a bowl. Add salt and ajwain. Mix well.
2) Add ghee.
3) Using your fingertips start rubbing the ghee and flour until mixed evenly.
4) You’ll get a crumbly, breadcrumb-like mixture.
5) Add little water at a time and start kneading the dough until it comes together into a smooth yet little stiff dough. Make sure not to make the dough soft or too soft. Cover it and let it rest for 20 minutes.
6) After resting time, knead the dough again 2-3 times to smooth it out. Divide into 5 equal portions. Work with one portion at a time, make a smooth ball, and press lightly by keeping it between your palms and make a flat disc.
Shaping Punjabi Samosa:
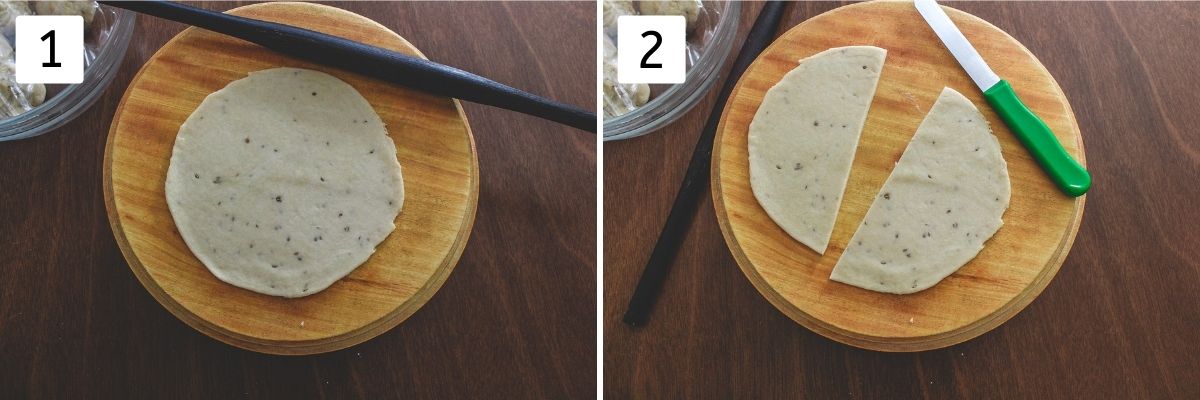
1) Take one flattened disc and start rolling using a rolling pin. Roll into a 6-7 inches diameter circle. Do not use dry flour while rolling, if needed you can use a few drops of oil. The thickness should be medium (not too thick like paratha or not too thin like roti).
2) Using a knife cut it into half (so you’ll have 2 half-moon shaped portions). Apply some water on the edges using your fingers or use a brush. This water helps as a glue.
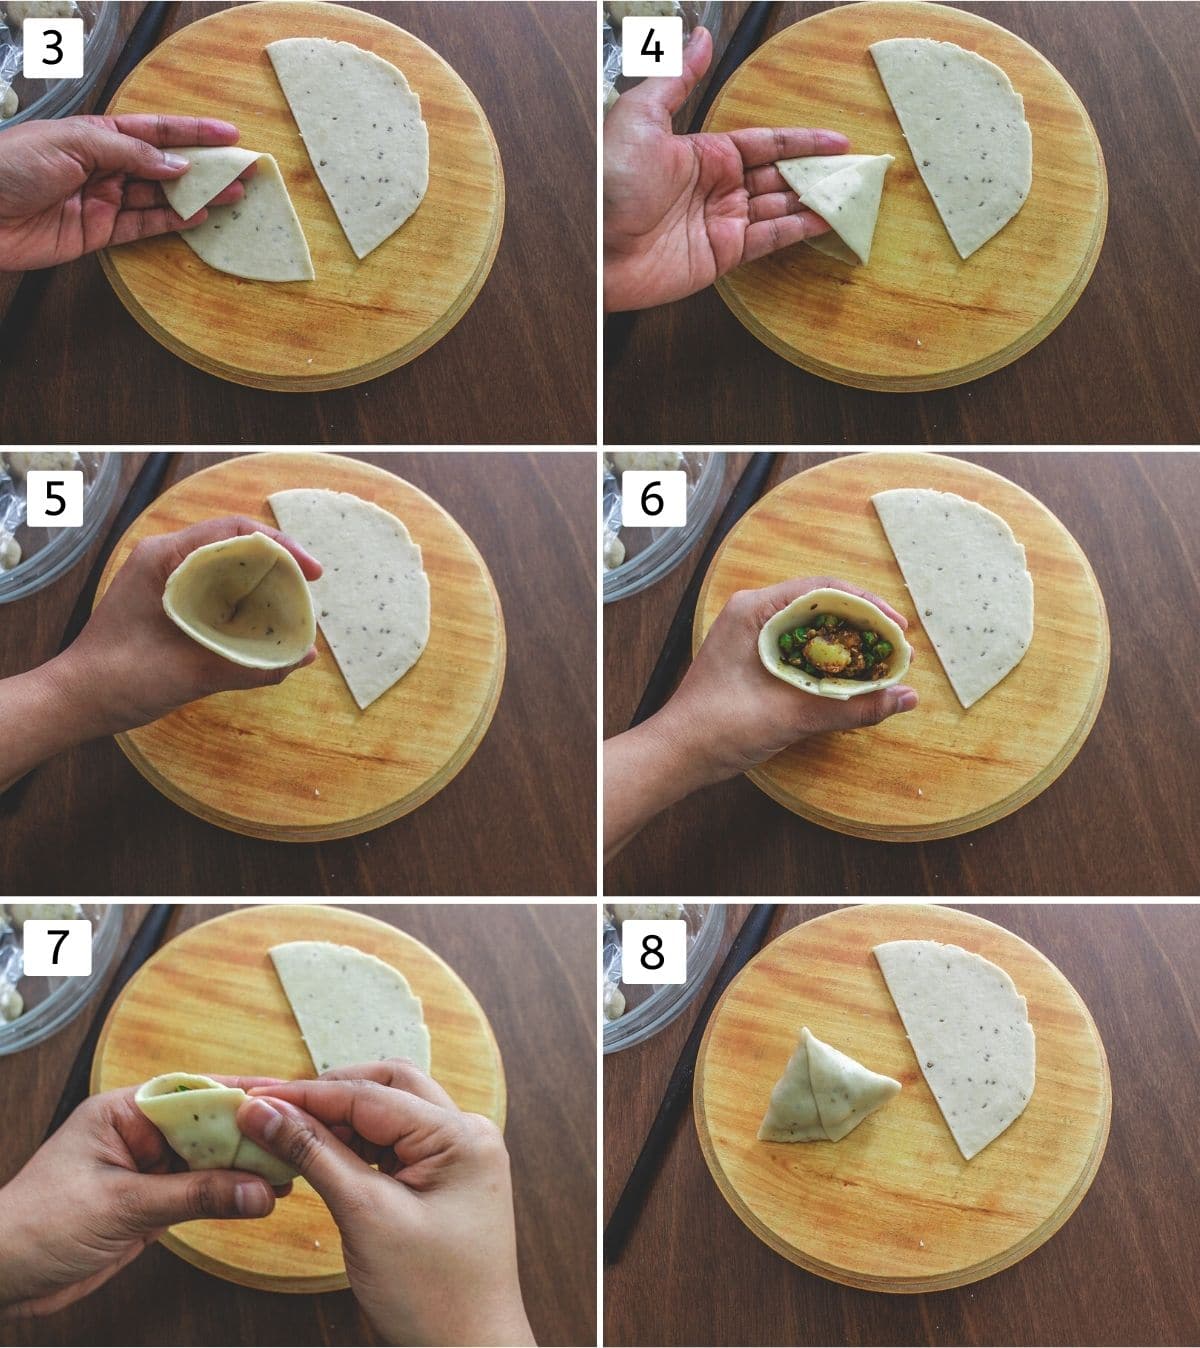
3) To make a cone shape, fold one half-moon shape into half again by keeping your fingers under it (as shown in pic).
4) Fold the other half by overlapping slightly, and press the overlapping edges to seal them.
5) Hold the cone shape in your hand as shown.
6) Stuff it with around 2-3 spoonfuls of potato mixture. TIP: add 1-2 green peas in the bottom of the cone to maintain the triangle corner.
7) If needed apply the water again inside the edges, and press it to seal them tightly.
8) Repeat the same for the rest, keep all samosa on a plate. Keep the plate covered with a clean kitchen towel so they don’t dry out.
Frying Samosa:
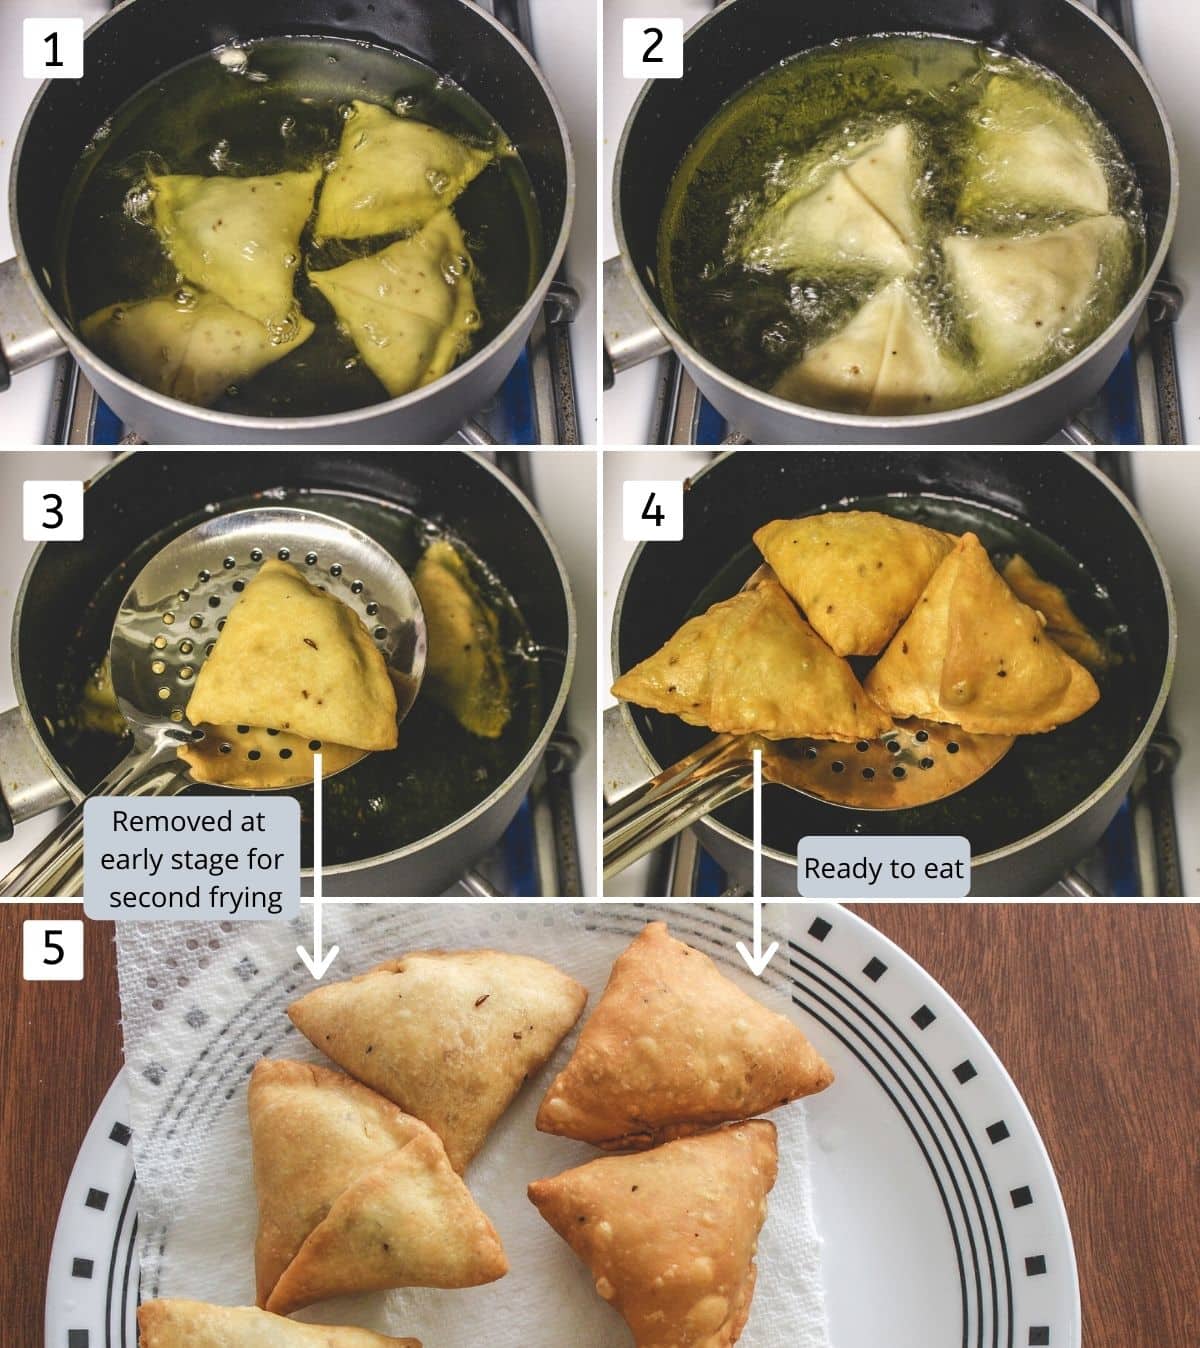
When you’re about to be done with shaping, heat the oil in a pan (kadai) for deep frying on medium heat.
The temperature of the oil should be just hot. (Not hot like we do for frying aloo pakora). If the oil is too hot then you will get bubbles on the crust and not the flaky crust.
Check the temperature of the oil: Add a small pinch of dough ball into the oil, it should stay at the bottom for a few seconds and comes up on the surface slowly. This is the right temperature for frying samosa. If the dough ball comes on the surface super quickly then the oil is too hot.
1) Slide 3-4 samosas carefully into the hot oil. (Notice, the samosa sank into the bottom of the pan).
2) After some time, they will float on the surface. Now lower the heat and continue frying. You need to adjust the gas heat throughout the frying process to maintain the temperature of the oil and make sure that the oil does not get too hot.
Keep turning them for even browning from both sides.
3) Half-Fry Stage: You can see there is no more raw doughy part and samosa are very light brown in color. Or you can say they are about to get some brown color soon. At this stage, you can drain the excess oil and remove them to a plate, if planning to go for double fry (or second fry) later on at the time of serving.
4) If serving right away then keep frying until they get golden brown and crisp. One batch of samosa will take around 7-8 minutes for frying to perfection.
Drain the excess oil with the help of a perforated spoon and remove it to a plate.
💭 Tips To Make BEST Samosa Recipe
- The fat (ghee or oil) to flour ratio should be right to get a flaky texture. The addition of ghee into flour is called ‘Moyen’ or ‘Moyan’. If you’ve used less fat in proportion to flour then you will get a crispy crust but not flaky.
- The dough should be smooth yet medium stiff. If it is too soft then the crust will be slightly crispy but not flaky at all. If it is too hard then it will be hard to roll and it may break while shaping.
- The thickness of the rolled dough should be medium thick. If it’s too thin then samosa may break while shaping or frying. Plus, the thin crust will not become flaky. If it’s too thick then it takes longer to fry. Plus, no one likes too thick, doughy crust.
- The stuffing must be at room temperature at the time of shaping the samosa.
- Never use dry flour while rolling. That dry flour will get burned during the frying process and those burnt particles will stick to the next batch of samosa.
- The temperature of the oil must be right to get a flaky texture. The oil should be just hot (not too hot) when you add samosa to it. Then after a few seconds, you’ll need to lower the heat to low or medium-low and fry samosa until golden brown.
- If the oil is too hot then you’ll get bubbles or blisters or the crust and it won’t get a flaky texture.
- If the oil is not hot enough then samosa crust will soak up so much oil that the end product feels too greasy.
🥣 Storage Instructions
- Leftover samosa can be stored in an airtight container in the refrigerator.
- Reheating samosa in air fryer: Arrange potato bajji in air fryer basket in a single layer. Air fry them at 370°F (190°C) for 3-5 minutes or until becomes crispy again.
- Freezing uncooked samosa: Shape all the samosa, arrange on a baking tray, cover with plastic wrap, and place it into the freezer until frozen. Transfer the frozen samosa into a freezer-safe ziplock bag and store it. Defrost the samosa completely before frying.
- Freezing half-fry samosa: Let the half-fry samosa cool down completely and freezer. Similarly, defrost completely then do a second fry.
- Freezing Completely cooked samosa: Leftovers or a big batch of fried samosa can be frozen for up to 3-4 months. Just reheat in the air fryer as mentioned above, but increase the time by 1-2 minutes as these were frozen.
🍽 Serving Ideas
- As an appetizer or starter: Serve samosa with cilantro chutney and tamarind date chutney. You can have ketchup on the side as well.
- As a snack: Samosa and chai (tea) are the best combinations to enjoy as a snack. You can have it with a cup of coffee or chutneys.
- Leftover samosa: You can make samosa chaat or samosa sandwich.
FAQs
Yes, you can. But you’ll need a little more amount of water while kneading the dough. The texture of the crust will have a slight difference not as flaky as made with all purpose flour. But it will be still good.
There could be any of these two reasons.
1. The dough is soft. After frying it looks crispy, not flaky. But as soon as samosa cools down, the crust becomes soft and soggy. To avoid that, always knead the dough to medium stiffness.
2. The oil temperature is low. If you have added samosa into not hot enough oil then it will soak up too much oil and result in a soggy samosa crust.
There could be any of these two reasons.
1. The dough is soft and has more moisture in it. If so as soon as you add samosa to oil, the moisture part will turn into tiny bubbles on the crust,
2. The oil is too hot. When samosa is added to too hot oil then curst will have so many bubbles and won’t get a flaky texture.
Check Out Other Indian Snack Recipes
Did you try this punjabi samosa recipe? I’d love to hear about it! Comment here to leave a review.
Punjabi Samosa Recipe
US measuring cups are used (1 cup = 240 ml)
Ingredients
For Aloo Stuffing:
- 1 ½ teaspoon Coriander seeds (sabut dhaniya)
- ½ teaspoon Anardana powder (dried pomegranate seeds powder)
- 2 small Potatoes, 1 ½ cups boiled, peeled and cubed
- ½ cup Green peas, cooked
- 1 ½ tablespoons Oil
- ½ teaspoon Cumin seeds
- 1 Green chili, chopped finely
- ½ teaspoon Ginger paste or freshly grated or crushed
- ½ teaspoon Salt, or to taste
- 1 teaspoon Red chili powder
- ½ teaspoon Amchur powder (dried mango powder)
- ½ teaspoon Garam masala
- 2 tablespoons Cilantro or coriander leaves, chopped finely
For Dough:
- 1 cup All purpose flour (Maida)
- ¼ teaspoon Salt, to taste
- ¼ teaspoon Ajwain (Carom seeds)
- 2 tablespoons Ghee (clarified butter), or oil to make vegan samosa
- 3-4 tablespoons Water
- Oil, for deep frying, canola, safflower, corn, vegetable or peanut oil
Instructions
Prep (Cooking Veggies):
- Potatoes:Boil potatoes in instant pot on manual for 8-10 minutes or steam pressure cook on the stovetop for 2 whistles.Once the potatoes are cool to touch (still warm) then peel and discard the skin. Let them cool down completely.Cut the boiled potatoes into cubes and keep them aside.
- Green peas:If using frozen peas, then you can microwave them with a pinch of salt and 2-3 tablespoons of water for 5 minutes. Drain the excess water and peas are ready.Alternatively, you can boil on the stovetop in a pan or in a pressure cooker.If using fresh peas then it takes a little longer to cook. So increase the cooking time accordingly.
Make Stuffing For Aloo Samosa:
- Take coriander seeds and anardana powder in a small pan. Dry roast on medium-low heat with stirring constantly until you get a nice aroma of roasted coriander seeds.
- Remove it to a plate and let it cool down completely. Then make a powder using a mortar and pestle or a spice grinder.
- Heat the oil in a pan on medium heat. Once hot add cumin seeds and let them sizzle a bit.
- Add chopped green chili and ginger paste (or grated). Saute for 30-40 seconds or until the raw smell of ginger goes away.
- Add chopped potatoes, green peas, salt, and spices (red chili powder, amchur, garam masala, and prepared coriander-anardana powder).
- Mix everything well and cook for 2-3 minutes. Turn off the stove and mix in freshly chopped cilantro. Remove the stuffing to a plate and let it cool down completely.
Make The Dough:
- Take all purpose flour in a bowl. Add salt and ajwain. Mix well.
- Add ghee. Using your fingertips start rubbing the ghee and flour until mixed evenly. You’ll get a crumbly, breadcrumb-like mixture.
- Add little water at a time and start kneading the dough until it comes together into a smooth yet little stiff dough. Make sure not to make the dough soft or too soft. Cover it and let it rest for 20 minutes.
- After resting time, knead the dough again 2-3 times to smooth it out. Divide into 5 equal portions. Work with one portion at a time, make a smooth ball, and press lightly by keeping it between your palms and make a flat disc.
Shaping Punjabi Samosa:
- Take one flattened disc and start rolling using a rolling pin. Roll into a 6-7 inches diameter circle. Do not use dry flour while rolling, if needed you can use a few drops of oil. The thickness should be medium (not too thick like paratha or not too thin like roti).
- Using a knife cut it into half (so you’ll have 2 half-moon shaped portions). Apply some water on the edges using your fingers or use a brush. This water helps as a glue.
- To make a cone shape, fold one half-moon shape into half again by keeping your fingers under it (as shown in pic above).
- Fold the other half by overlapping slightly, and press the overlapping edges to seal them.
- Hold the cone shape in your hand. Stuff it with around 2-3 spoonfuls of potato mixture. TIP: add 1-2 green peas in the bottom of the cone to maintain the triangle corner.
- If needed apply the water again inside the edges, and press it to seal them tightly.
- Repeat the same for the rest, keep them on a plate. Keep the plate covered with a clean kitchen towel so they don’t dry out.
Frying Samosa:
- When you’re about to be done with shaping, heat the oil in a pan (kadai) for deep frying on medium heat.
- The temperature of the oil should be just hot. (Not hot like we do for frying aloo pakora). If the oil is too hot then you will get bubbles on the crust and not the flaky crust.
- Check the temperature of the oil: Add a small pinch of dough ball into the oil, it should stay at the bottom for a few seconds and comes up on the surface slowly. This is the right temperature for frying samosa. If the dough ball comes on the surface super quickly then the oil is too hot.
- Slide 3-4 samosas carefully into the hot oil. (Notice, the samosa sank into the bottom of the pan).
- After some time, they will float on the surface. Now lower the heat and continue frying. You need to adjust the gas heat throughout the frying process to maintain the temperature of the oil and make sure that the oil does not get too hot.
- Keep turning them for even browning from both sides.
- Half-Fry Stage: You can see there is no more raw doughy part and samosa are very light brown in color. Or you can say they are about to get some brown color soon. At this stage, you can drain the excess oil and remove them to a plate, if planning to go for double fry (or second fry) later on at the time of serving.
- If serving right away then keep frying until they get golden brown and crisp. One batch of samosa will take around 7-8 minutes for frying to perfection.
- Drain the excess oil with the help of a perforated spoon and remove it to a plate.
Notes
- The fat (ghee or oil) to flour ratio should be right to get a flaky texture. The addition of ghee into flour is called ‘Moyen’ or ‘Moyan’. If you’ve used less fat in proportion to flour then you will get a crispy crust but not flaky samosa.
- The dough should be smooth yet medium stiff. If it is too soft then the crust will be slightly crispy but not flaky at all. If it is too hard then it will be hard to roll and it may break while shaping.
- The thickness of the rolled dough should be medium thick. If it’s too thin then samosa may break while shaping or frying. Plus, the thin crust will not become flaky. If it’s too thick then it takes longer to fry. Plus, no one likes too thick doughy crust.
- The stuffing must be at room temperature at the time of shaping samosa.
- Never use dry flour while rolling. That dry flour will get burned during the frying process and those burnt particles will stick to the next batch of samosa.
- The temperature of the oil must be right to get a flaky texture. The oil should be just hot (not too hot) when you add samosa to it. Then after a few seconds, you’ll need to lower the heat to low or medium-low and fry samosa until golden brown.
- If the oil is too hot then you’ll get bubbles or blisters or the crust and it won’t get a flaky texture.
- If the oil is not hot enough then samosa crust will soak up so much oil that the end product feels too greasy.
I have also made samosa at home. It tastes so good.
true, homemade is always better
Thanks Kanan, definitely a must try. Would love to see your baked vsersion recipe, taste bhi aur health bhi:))
yes coming soon..