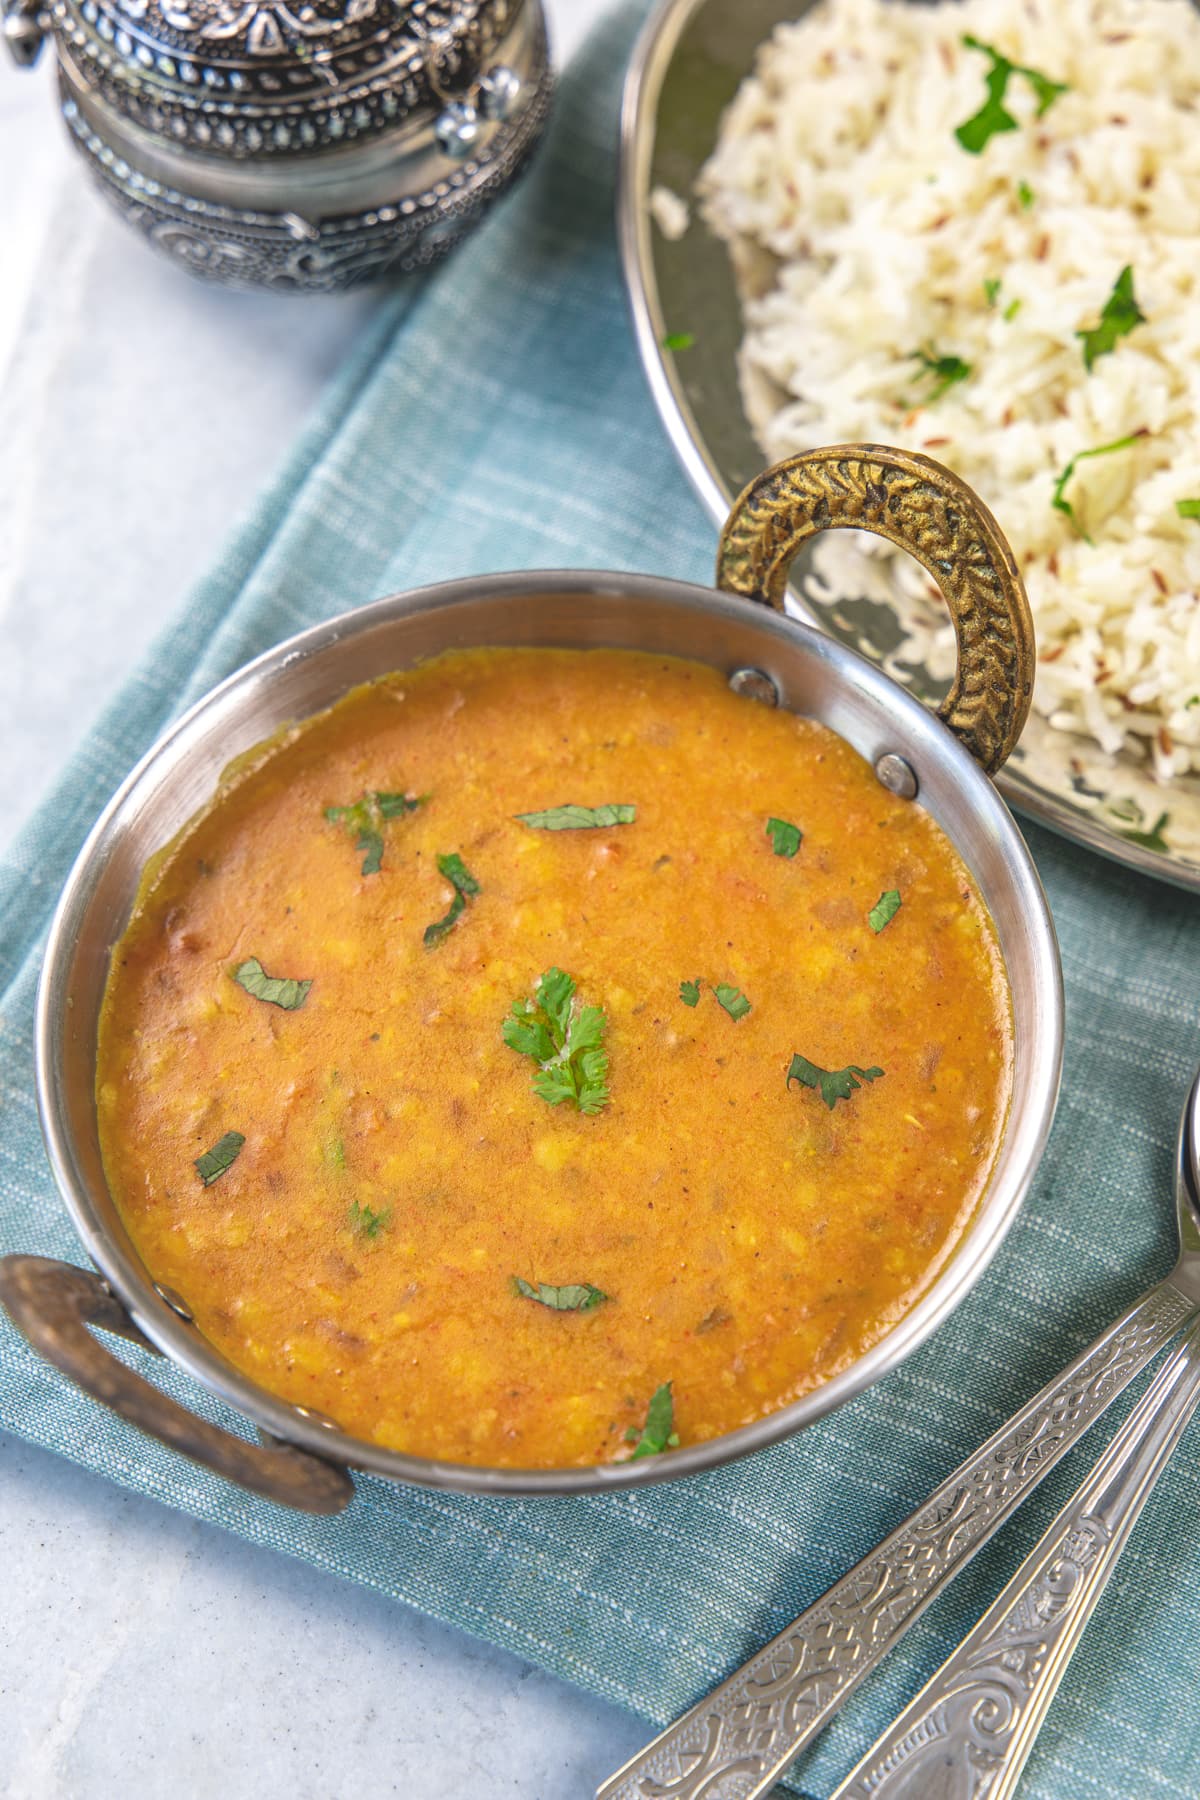
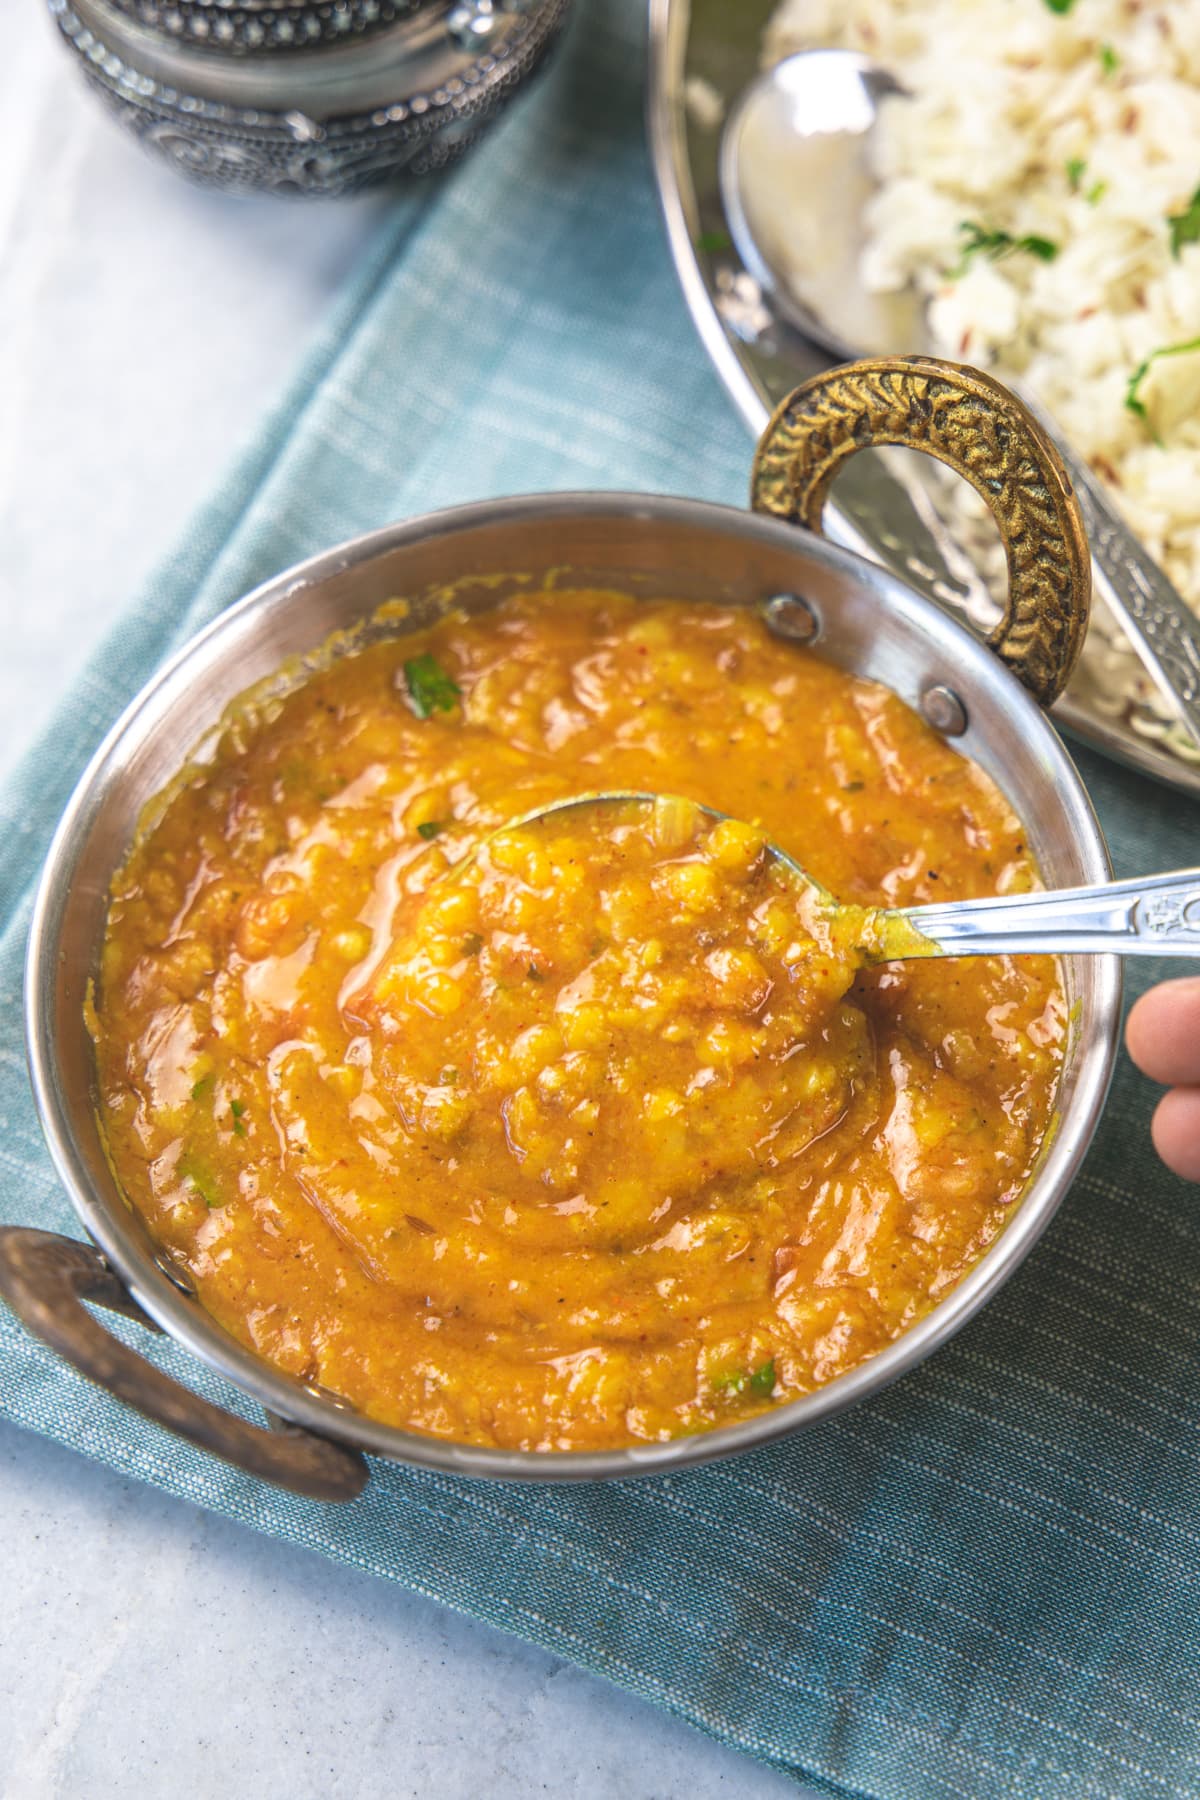
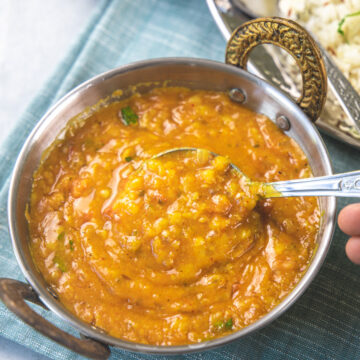
Dal Fry (Restaurant style)
The BEST dal fry recipe! This restaurant style dal fry is one of my most frequently made recipes at home! It’s perfect when served with jeera rice or plain basmati rice.
This super satisfying and delicious dal is made with toor dal (split pigeon peas) and it is cooked with Punjabi onion tomato masala and spices.
What Is Dal Fry?
- dal=split lentils and fry=saute (in typical Indian terms).
- Technically fry means something deep or shallow fried in the oil. But that is not the case here, nothing is fried here.
- Here onion and tomato are sauteed in the oil and this process is called ‘frying onion tomato’ in the typical Indian language. Hence the name dal fry.
If you follow the recipe and use the proportion of ingredients exactly as mentioned, I bet it will taste exactly the same as the restaurant one.
❤️ You’ll Love This Dal Fry Recipe Because
- It tastes just like restaurant style dal fry.
- It is made with basic ingredients that you’ll find easily in any Indian pantry.
- Dal fry making process is super easy that even beginners can make it without fail.
- It is healthy (+vegan) that you can make it frequently on day-to-day basis unlike dal makhani.
- Just like many other dal recipes, this dal fry makes a comforting meal when served with rice or roti.
NOTE: In this dal fry recipe, lentils are cooked in a stovetop pressure cooker (can be cooked in instant pot) first. Then onion tomato masala is cooked in a pan and mixed with boiled dal along with spices and simmered. For the complete instant pot version, check out this instant pot dal fry recipe.
🧾Ingredient Notes
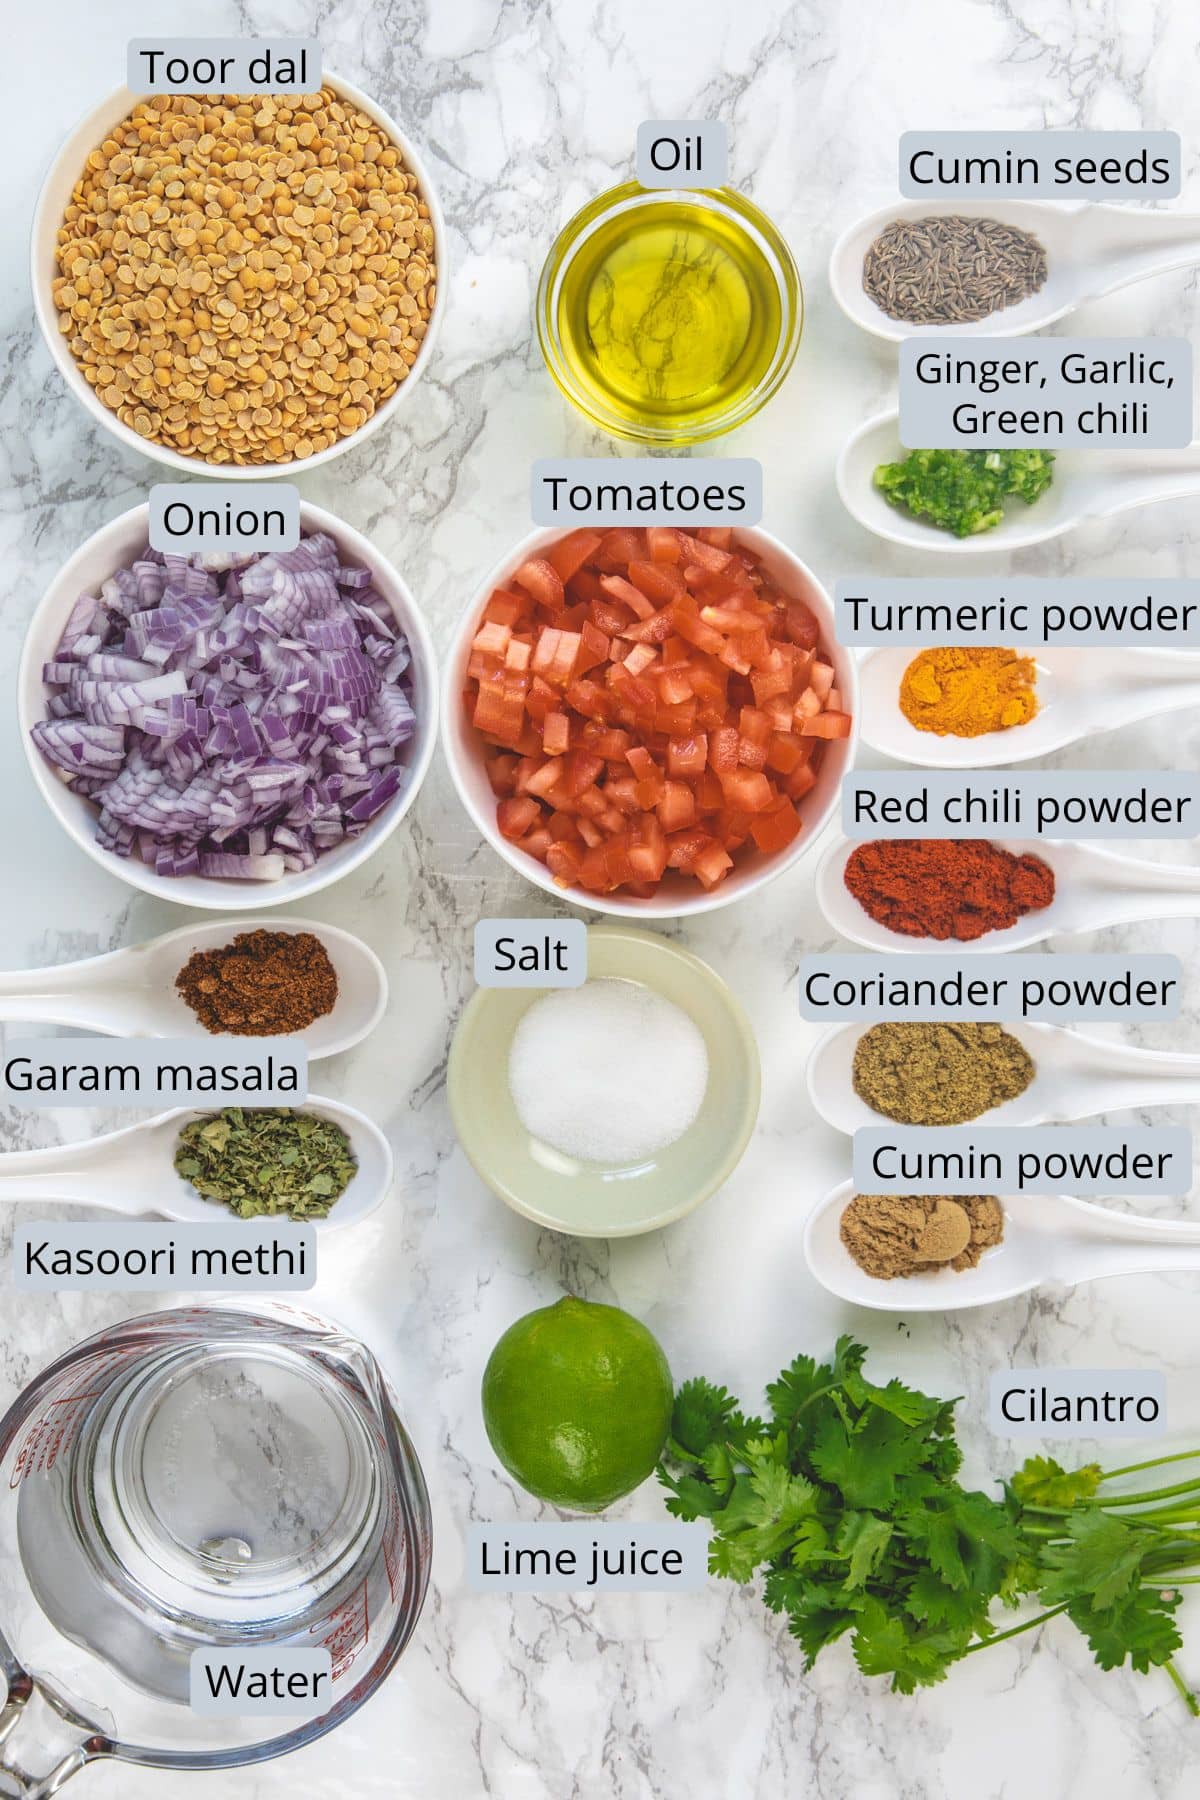
- Lentils: Toor dal or arhar dal (split pigeon peas) is used here as that’s what restaurant people use. But for home-style versions, you can use other dal e.g. Moong dal, chana dal, urad dal, masoor dal or you can make using a mix of dal.
- Ginger, Garlic, Green chili: I recommend using fresh ones here and crushing using a mortar and pestle or a wet jar of a spice grinder. However, you can use ready ginger garlic paste and finely chopped green chili. But fresh gives better flavor.
- Onion, Tomato: Both are finely chopped here. So they get super soft and almost mushy-kind quickly.
- Kasoori methi (dried fenugreek leaves): It brings the restaurant style flavor and add always at the end of the cooking process to retain its flavor and aroma.
👩🍳 How To Make Dal Fry (Stepwise Photos)
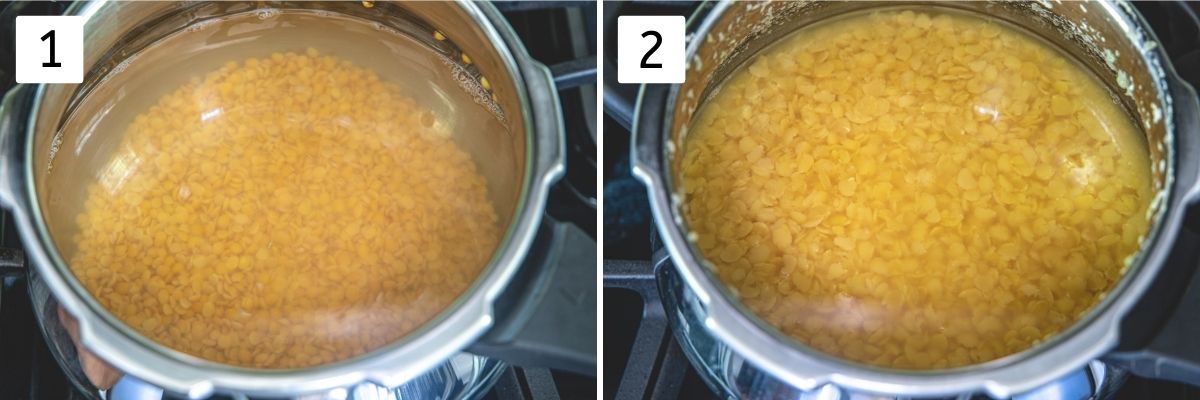
1) Take toor dal in a colander and wash under running cold until the water runs clear. Or rinse the dal 2-3 times in a bowl until the water is not cloudy anymore. Take rinsed dal in a pressure cooker along with fresh water.
2) Cover the cooker with a lid, put the weight on and cook on medium heat for 2-3 whistles. (Instant pot: manual, high pressure for 5 minutes) Let the pressure go down by itself and then open the lid.
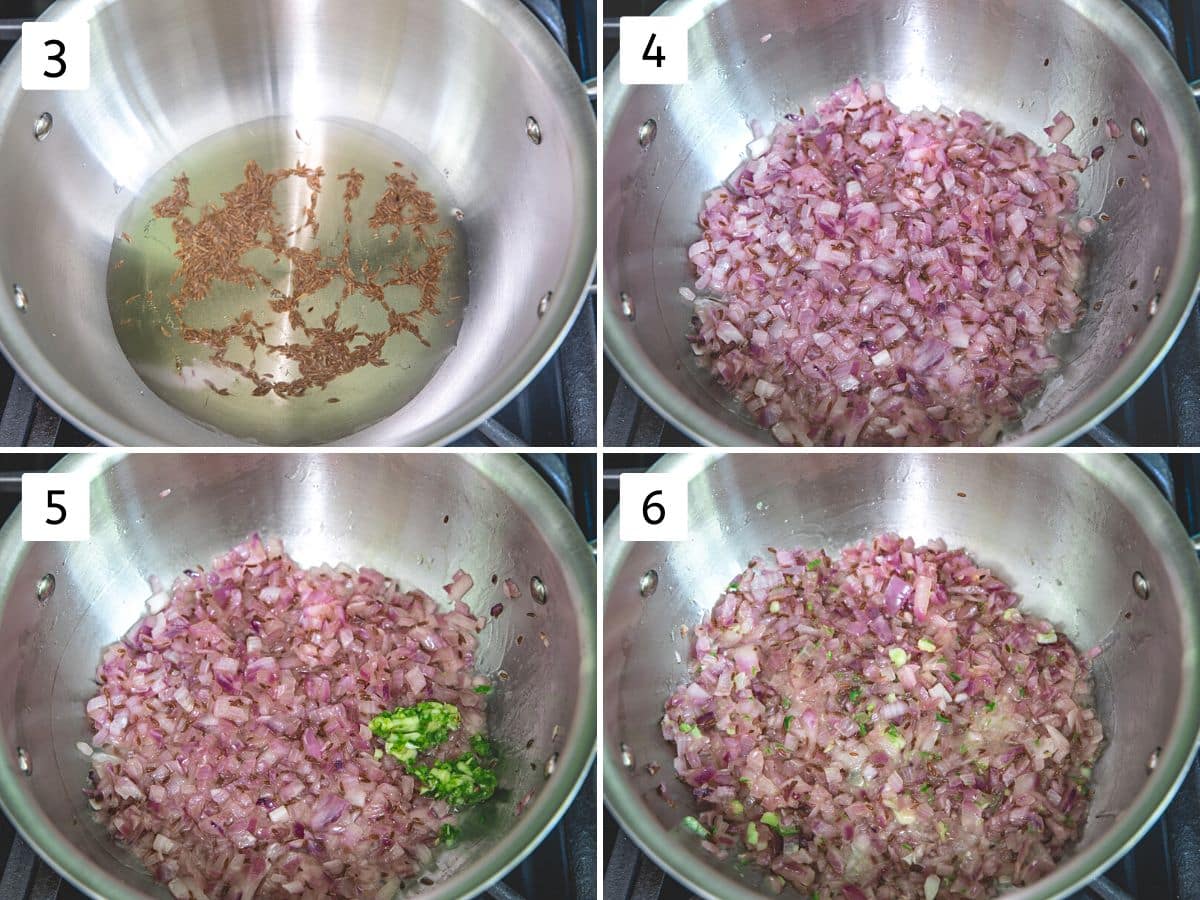
3) Meanwhile, the pressure is released, let’s start cooking masala. Heat oil in a pan or kadai on medium heat. Once hot add cumin seeds and let them sizzle.
4) Add onion and sprinkle a little salt to speed up the cooking process. Cook until onion turns light brown or pink and super soft.
5) Add crushed ginger garlic and green chili.
6) Mix and saute for 1 minute or until the raw smell of ginger garlic goes away.
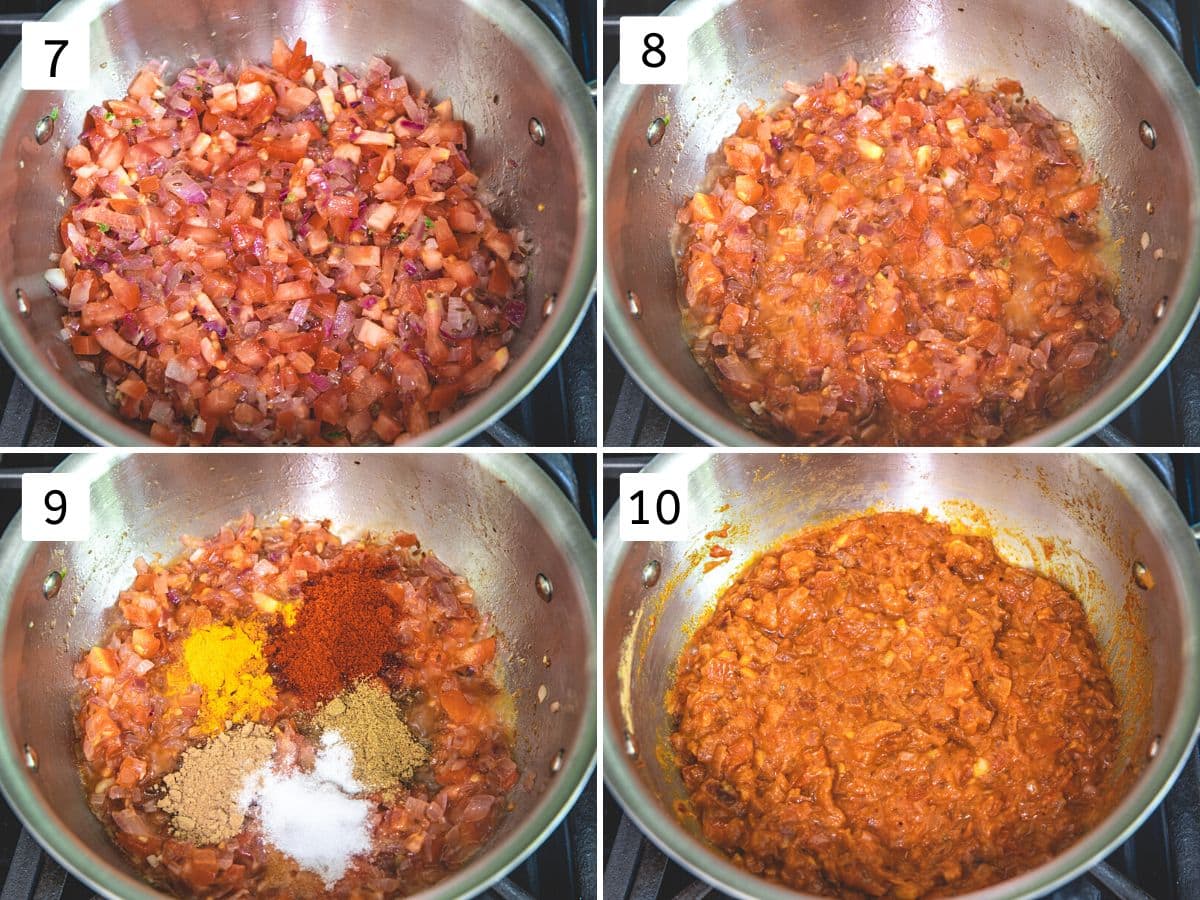
7) Add chopped tomatoes.
8) Cook until tomatoes are soft and almost mushy.
9) Add remaining salt, turmeric powder, red chili powder, cumin powder and coriander powder.
10) Mix and cook for a minute, oil will starts to ooze out from the sides.
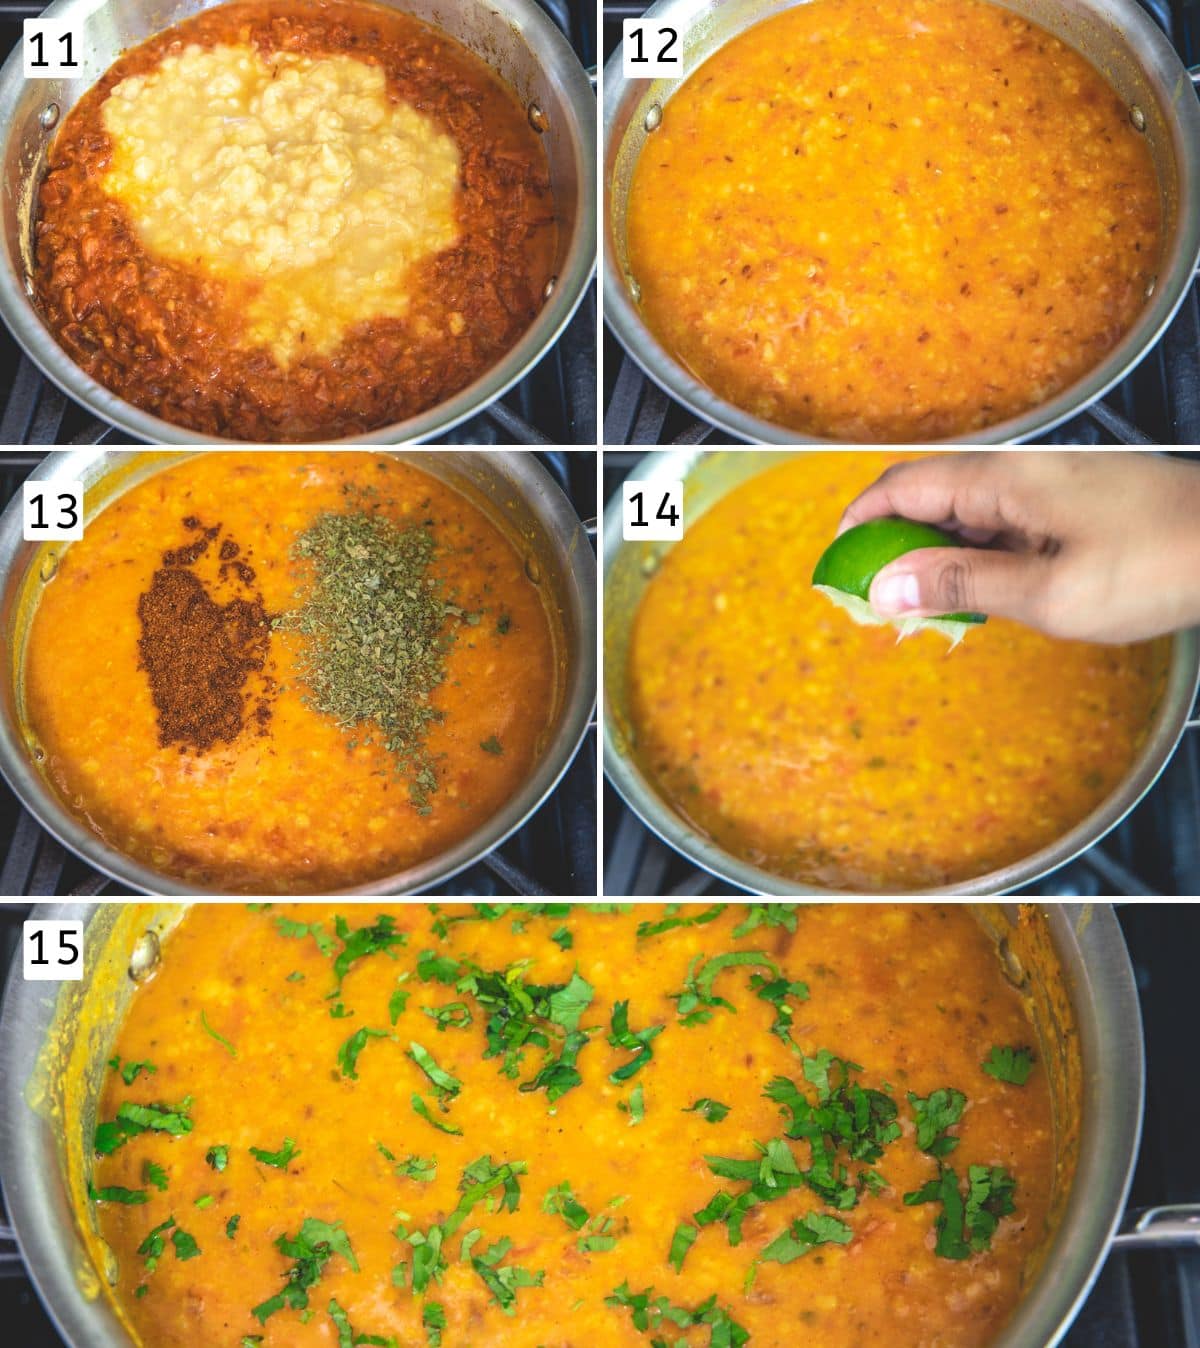
11) Add cooked dal and more water (if needed).
12) Mix and let it simmer for 5 minutes on low. Do stir in between to make sure that the dal is not sticking to the bottom of the pan.
13) Add garam masala and kasoori methi (crush between your palm before adding). Mix well.
14) Add lemon or lime juice, and mix.
15) Lastly, garnish with freshly chopped cilantro. If not serving right away then keep it covered. So it stays warm till the time of serving.
💭 Expert Tips
- Older batch or stale lentils (more than a year old) take longer to cook and requires more water than mentioned. Try to use the fresh one but if trying to use up the old one then adjust the water and cooking time.
- Soaking toor dal is not required. But if you have time then soaking for 30 minutes doesn’t hurt. Make sure to discard the soaking water. It reduces the pressure cooking time.
- Adjust the spice level as per your preference by reducing (or increasing) the green chili and red chili powder quantity.
- The preferred consistency of the dal is medium thick. While simmering if it gets too thick then add a splash of water to adjust the consistency.
- Don’t make too thin dal otherwise, the flavor will get diluted and won’t taste good.
- Always add garam masala and kasoori methi after simmering the dal (meaning at the end of the cooking process) to retain their flavor, taste and aroma.
- Do not simmer the dal after adding lemon or lime juice. Always squeeze and add at the end and turn off the stove right away.
🥣 Storage Instructions
- In the refrigerator, It stays good for 2-3 days in an airtight container.
- In the freezer, it stays good for up to 3 months. I always make a double or triple batch and store in family serving portions in a freeze-safe container.
- Thaw the dal in the refrigerator overnight or leave the container on the counter for a few hours or until defrosted.
- Reheat the dal in the pan until it starts to simmer. Use the defrosted and reheated dal within a day.
🍽 How To Serve Dal Fry?
- Serve dal fry with jeera rice or plain rice or mild-flavored pulao like peas pulao.
- It can be served with paratha, naan or tandoori roti.
- A side of Indian salad (kachumber salad), a glass of chaas and papad will complete the meal.
Did you try this recipe? I’d love to hear about it! Click here to leave a review.
Dal Fry Recipe (Restaurant Style)
US measuring cups are used (1 cup = 240 ml)
Ingredients
- 1 cup Arhar dal (toor dal or split pigeon peas)
- 2 ½ cups Water, for pressure cooking
- 3 tablespoons Oil
- 1 teaspoon Cumin seeds
- 1 cup Red onion, finely chopped
- 2 teaspoon Ginger paste or freshly grated or crushed
- 2 teaspoon Garlic paste or freshly grated
- 1 Green chili, finely chopped
- 1 cup Tomato, finely chopped
- ½ teaspoon Turmeric powder
- 1 ½ teaspoon Red chili powder
- 1 teaspoon Coriander powder
- 1 teaspoon Cumin powder
- Salt, to taste
- ½ – 1 cup Water, to adjust the dal consistency
- 1 teaspoon Garam masala
- 1 ½ teaspoon Kasoori methi (Dried fenugreek leaves), crush between palm before adding
- 2 teaspoon Lemon juice or Lime juice
- 2 tablespoons Cilantro or coriander leaves, finely chopped
Instructions
- Take toor dal in a colander and wash under running cold until the water runs clear. Or rinse the dal 2-3 times in a bowl until the water is not cloudy anymore.
- Take rinsed dal in a pressure cooker along with fresh water. Cover the cooker with a lid, put the weight on and pressure cook on medium heat for 2-3 whistles. (Instant pot: manual, high pressure for 5 minutes.) Let the pressure go down by itself and then open the lid.
- While pressure is released, start cooking masala. Heat oil in a pan or kadai on medium heat. Once hot add cumin seeds and let them sizzle.
- Add onion and sprinkle a little salt to speed up the cooking process. Cook until onion turns light brown or pink and super soft.
- Add crushed ginger garlic and green chili. Mix and saute for 1 minute or until the raw smell of ginger garlic goes away.
- Add chopped tomatoes. Cook until tomatoes are soft and almost mushy.
- Add remaining salt, turmeric powder, red chili powder, cumin powder and coriander powder. Mix and cook for a minute, oil will starts to ooze out from the sides.
- Add cooked dal and more water (if needed). Mix and let it simmer for 5 minutes on low. Do stir in between to make sure that the dal is not sticking to the bottom of the pan.
- Add garam masala and kasoori methi (crush between your palm before adding). Mix well.
- Add lemon or lime juice, and mix.
- Lastly, garnish with freshly chopped cilantro.
Video
Notes
- Older batch or stale lentils (more than a year old) take longer to cook and requires more water than mentioned.
- Soaking toor dal is not required. But if you have time then soaking for 30 minutes doesn’t hurt. Make sure to discard the soaking water. It reduces the pressure cooking time.
- Adjust the spice level as per your preference by reducing (or increasing) the green chili and red chili powder quantity.
- The preferred consistency of the dal is medium thick. While simmering the dal fry if it gets too thick then add a splash of water to adjust the consistency.
- Don’t make too thin dal otherwise, the flavor will get diluted and won’t taste good.
- Always add garam masala and kasoori methi after simmering the dal (meaning at the end of the cooking process) to retain their flavor, taste and aroma.
- Do not simmer the dal after adding lemon or lime juice. Always squeeze and add at the end and turn off the stove right away.
Thanks a ton for the provided recipe. I served it to my neighbor and they were like how could pulses turn so delicious. Made my day.
That is great. Nice to hear that everyone liked it. Thanks for the feedback
Thank u fr such a nice n tasty receipe this help a lot fr newly married girl to prepare in easy way
Thank you Shalini. Nice to know that recipe is helpful to you.