Idli Recipe (Idli Batter Ratio & Tips)
Looking for a fluffy and soft idli recipe? I bet your search ends here. Keep reading for tips and tricks to make homemade idli batter and how to ferment idli batter perfectly every single time.
This is by far the best idli recipe. The instructions are very detailed and easy to follow. ⭐⭐⭐⭐⭐ – Leslie
What Is Idli?
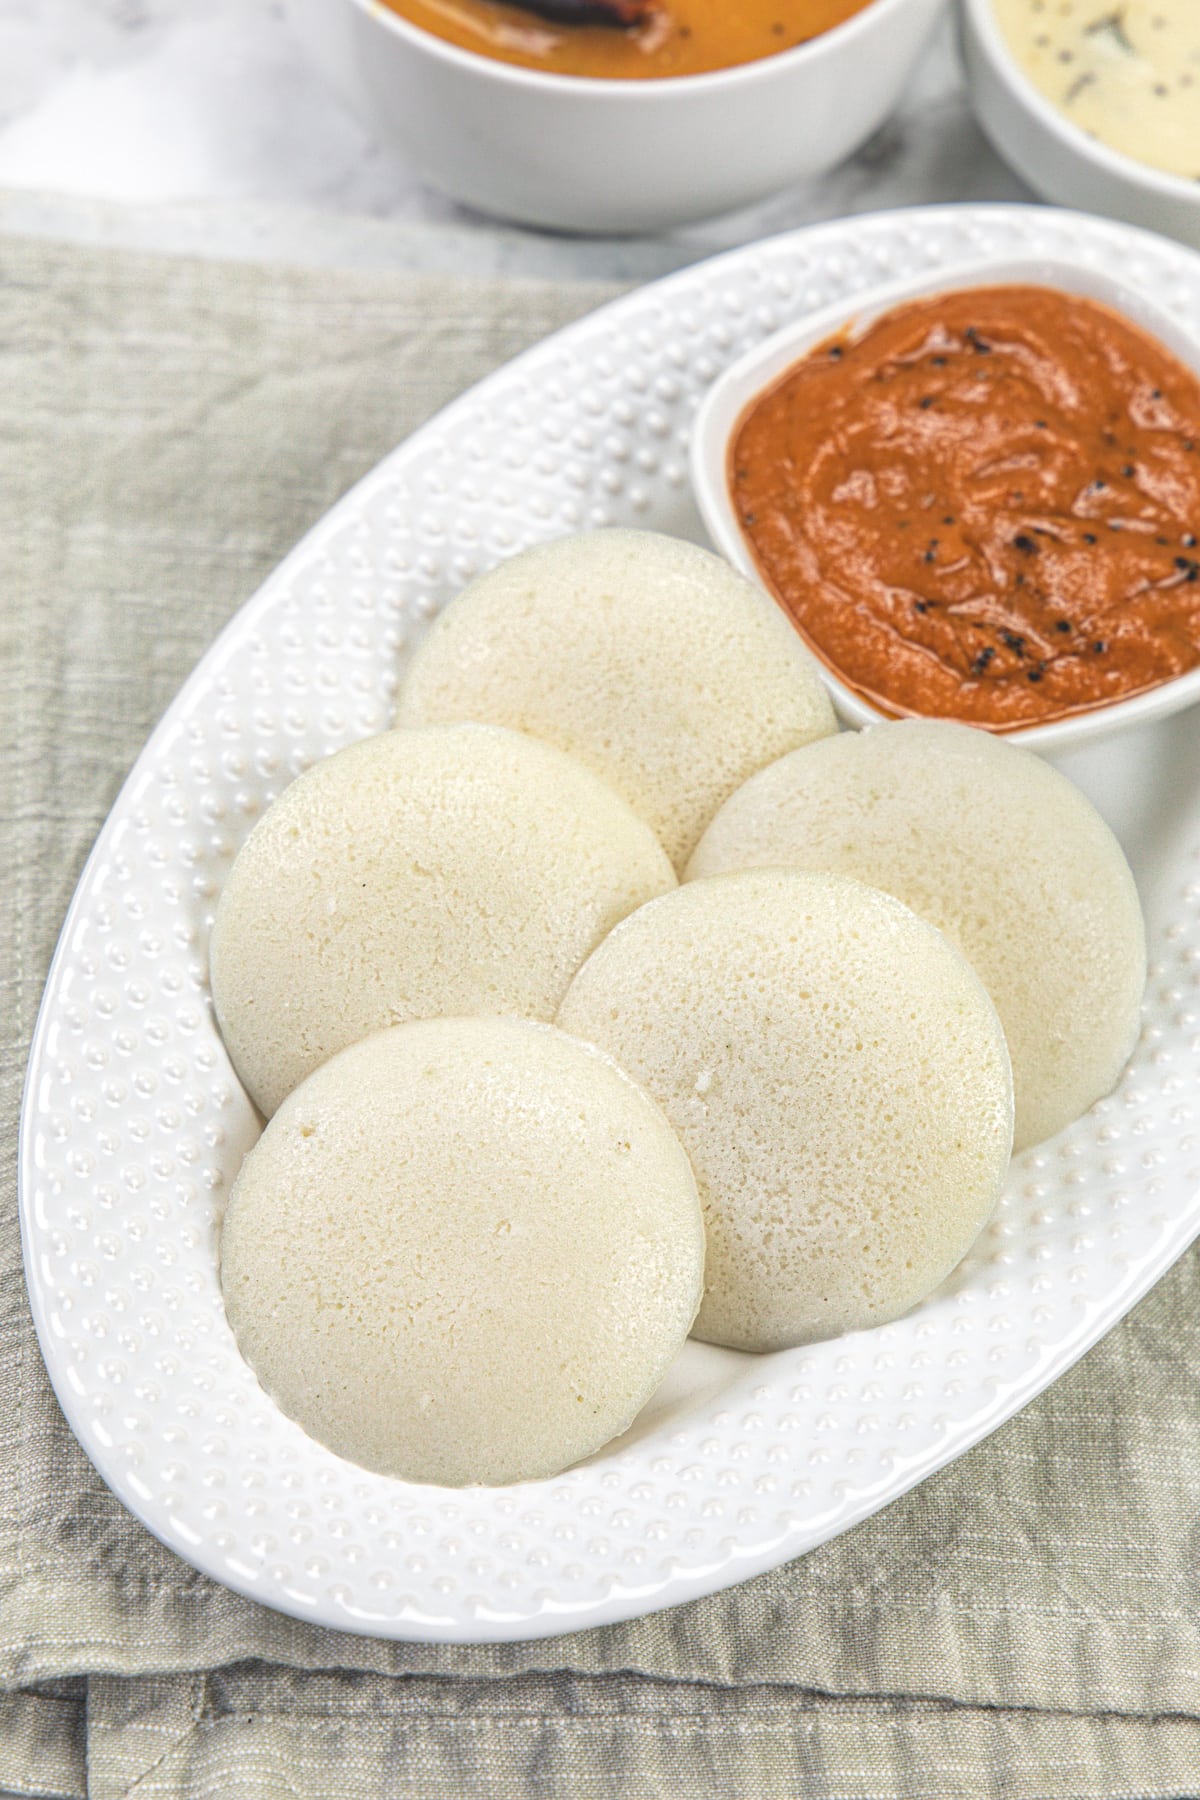
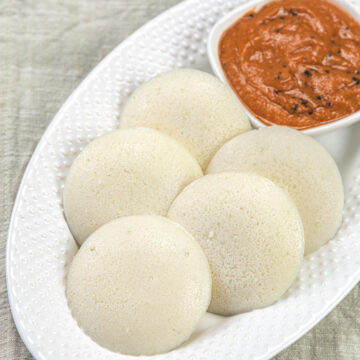
Idli is a popular and beloved traditional South Indian dish that is enjoyed across India and around the world. These soft, fluffy, savory steamed rice cakes are made from a fermented batter consisting of two main ingredients: rice and urad dal (split black gram). The fermentation process breaks down the starches so it is easy to digest and good for your gut health.
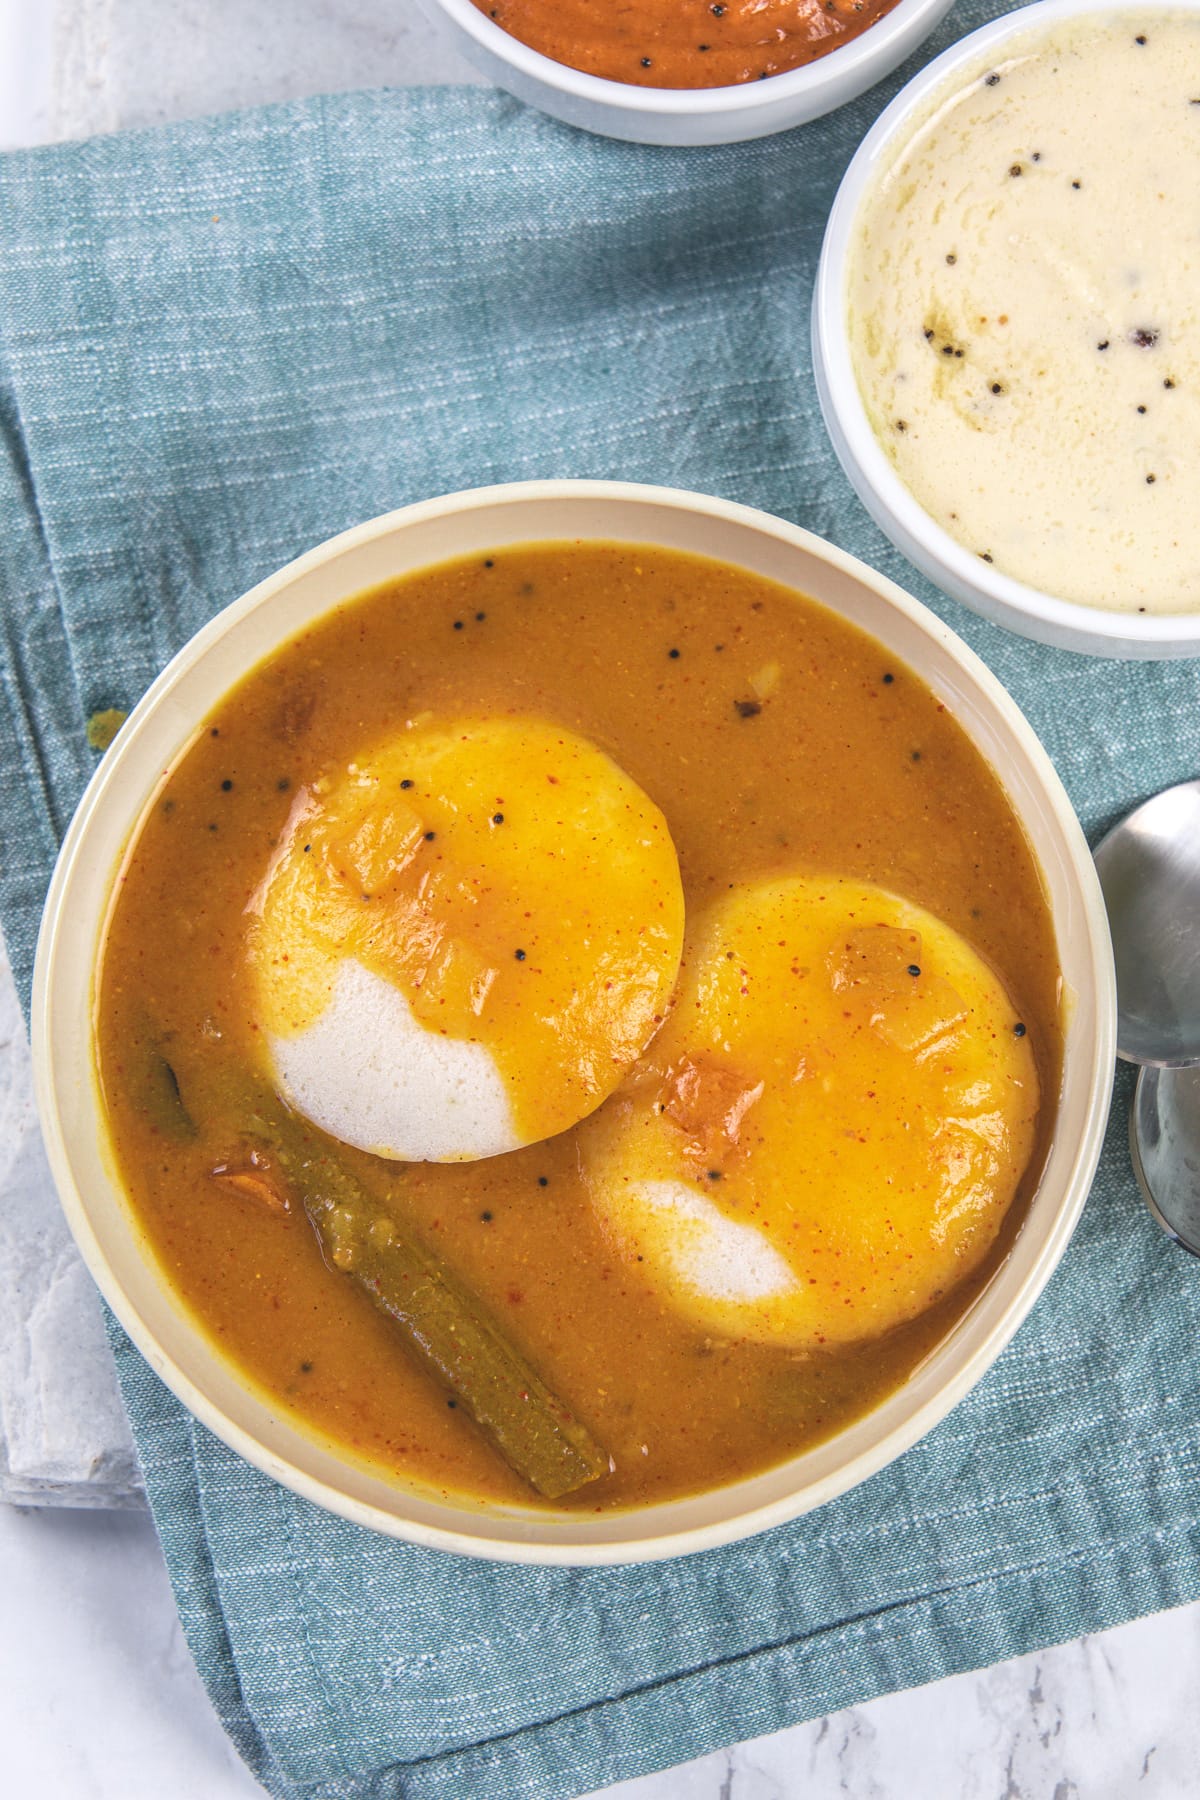
Idlis are commonly served as a breakfast or snack, accompanied by a variety of chutneys (like coconut chutney, tomato chutney, idli podi) and sambar.
The whole process of making idli at home with homemade idli batter is divided into 4 parts, soaking, grinding, fermenting, and steaming.
This process is time-consuming and requires some pre-planning. But there are many instant versions of it like rava idli, and oats idli and these don’t require grinding and fermenting steps.
My Idli Recipe
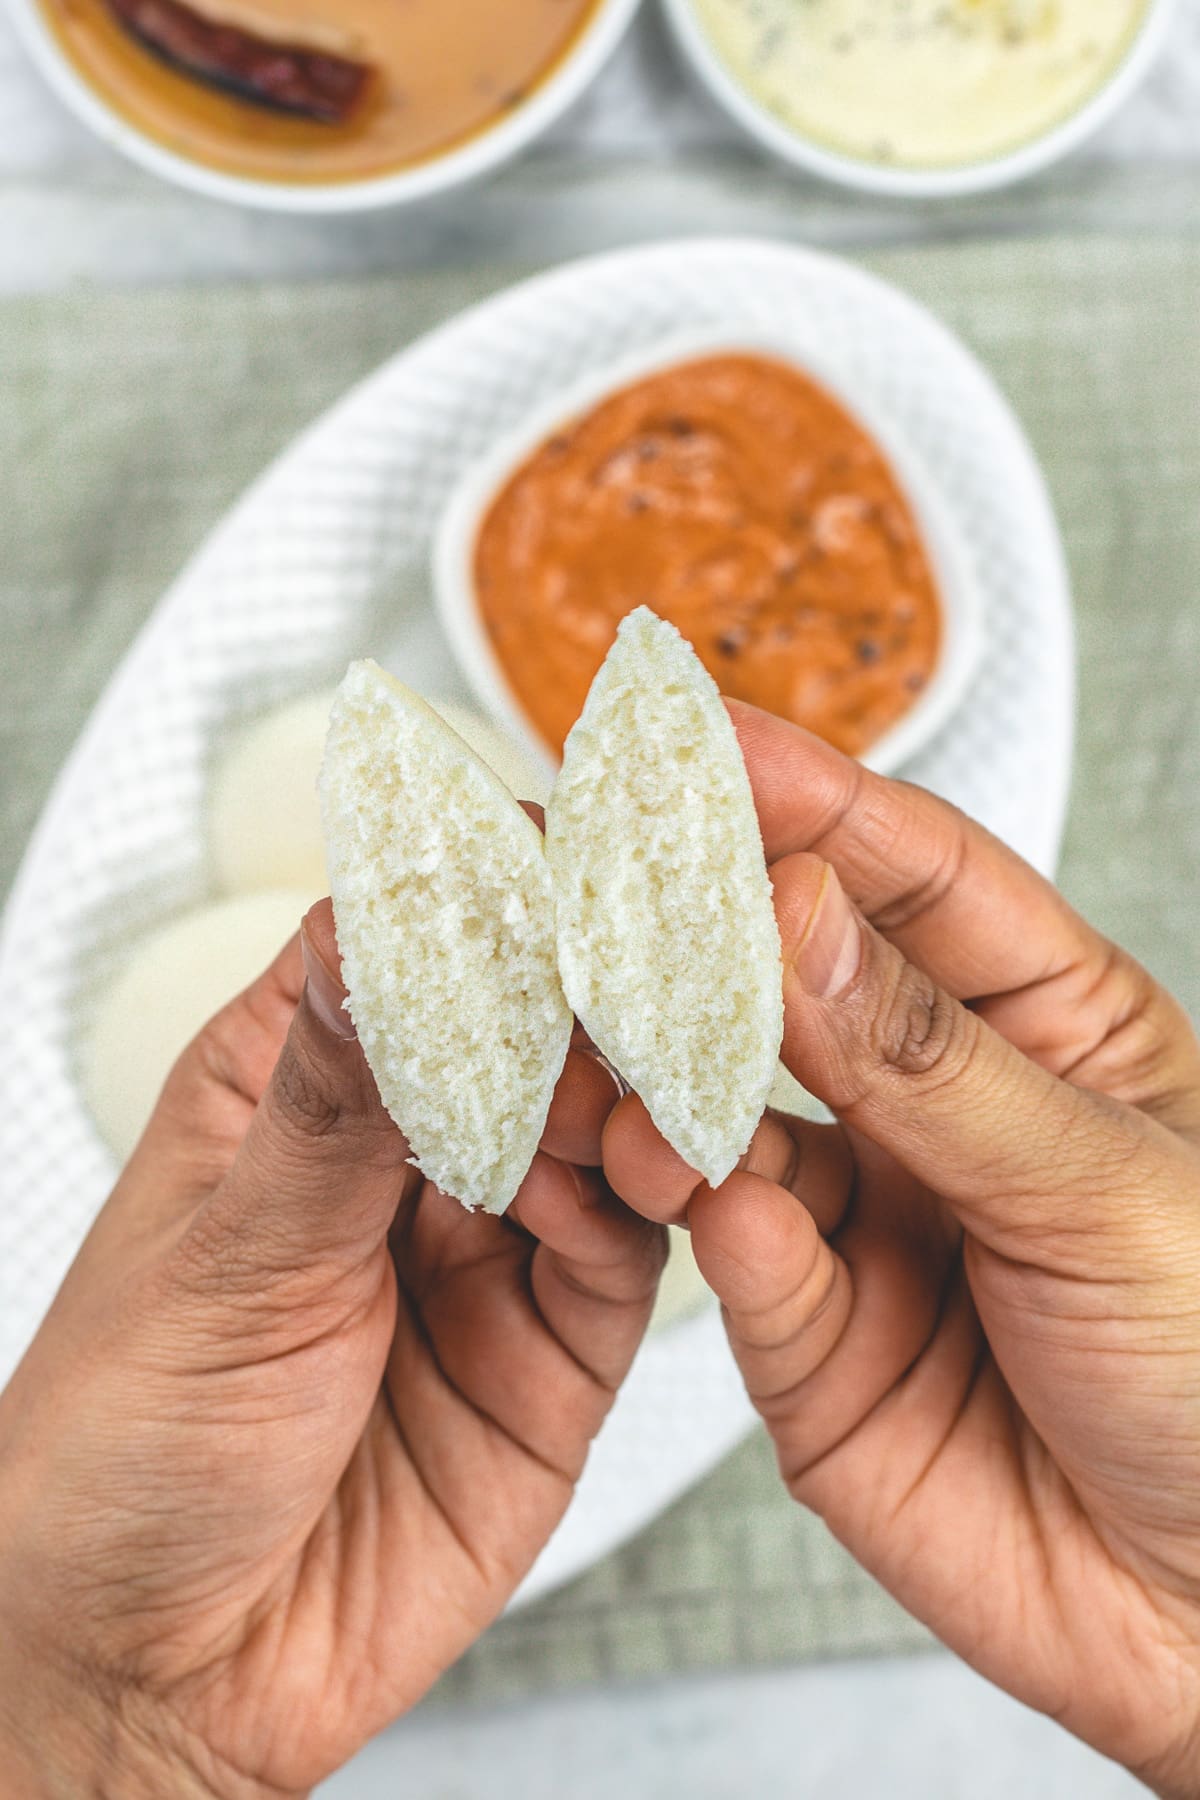
- This idli recipe gives the BEST, soft, fluffy, and pillowy texture.
- No Wet Grinder Needed: I use a Vitamix (blender or mixie) to grind the rice and lentils, making the process simpler and more accessible.
- Instant Pot for Fermentation: Fermenting the batter in an Instant Pot guarantees consistent, successful fermentation, even in colder climates where traditional fermentation can be a challenge. It’s the secret to perfect, airy idlis.
- A perfect ratio of lentils and rice is given with so many tips and tricks to perfect the idli recipe. Even a beginner can make it without a fail.
- Healthy & Nutritious: Idlis are naturally low in calories. Because of fermentation. The fermentation helps improve digestive efficiency, gut health, and even increases the production of vitamin B12.
- Dietary Info: Vegan, Gluten-Free, Nut-free
Ingredient Notes
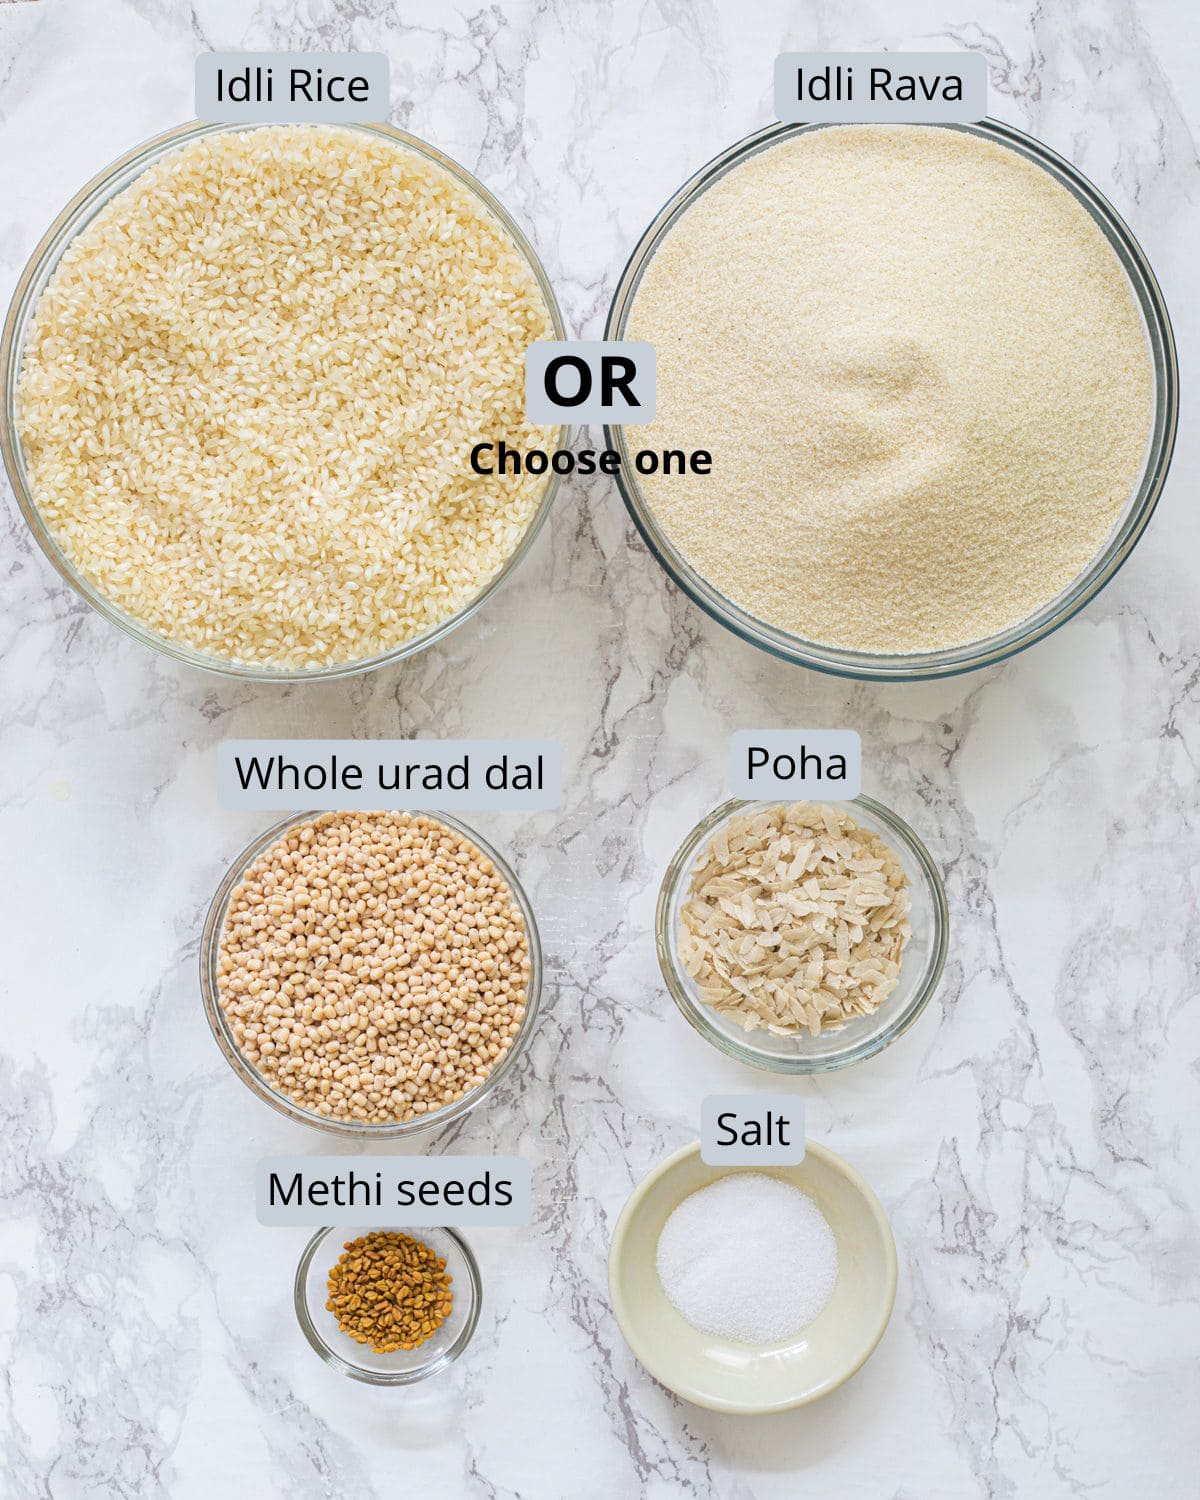
Idli Batter: Ratio Of Lentils & Rice
The right proportion of rice to lentils is key to achieving the perfect idli texture. The ratio purely depends on the freshness and quality of the whole urad dal.
How To Make Idli Recipe? (Pics & Tips)
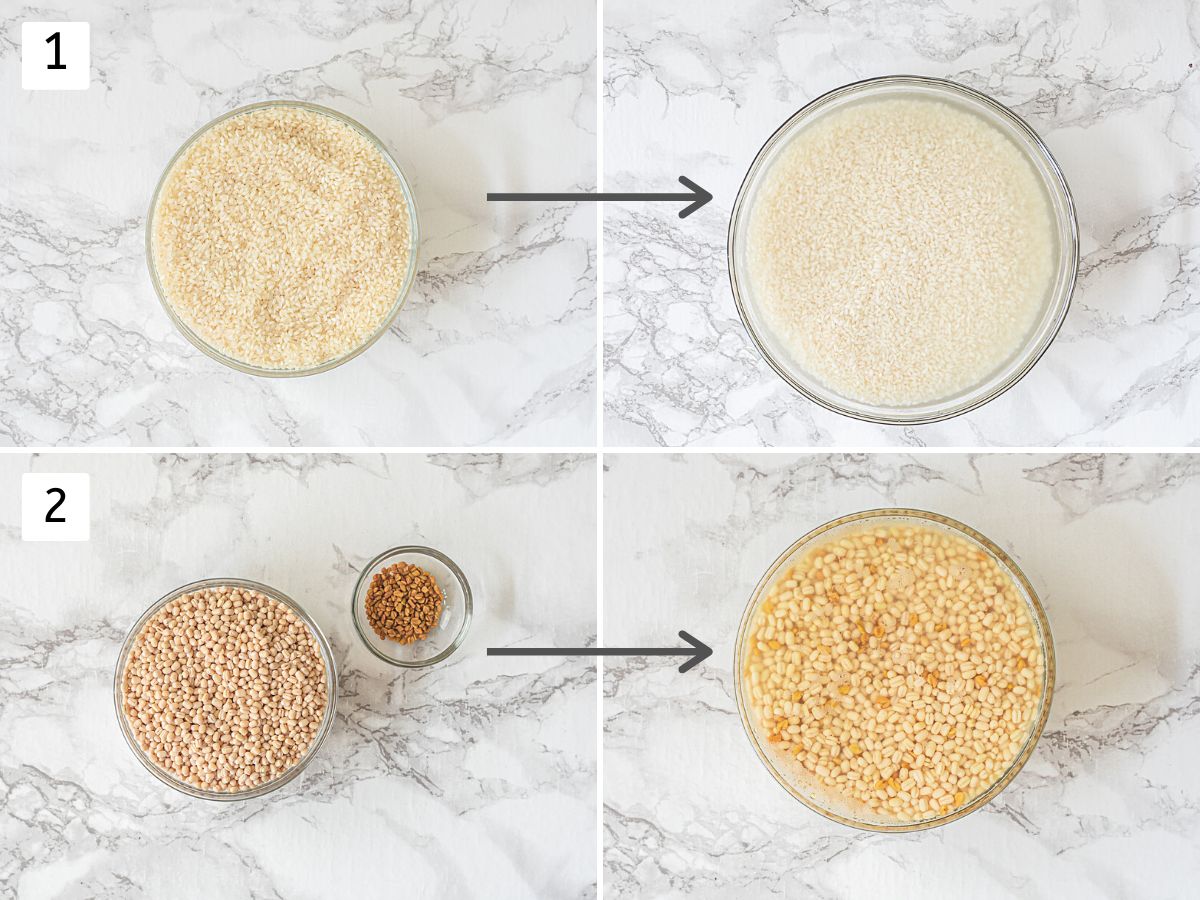
Rinse & Soak:
Time required: at least 6-8 hours or overnight.
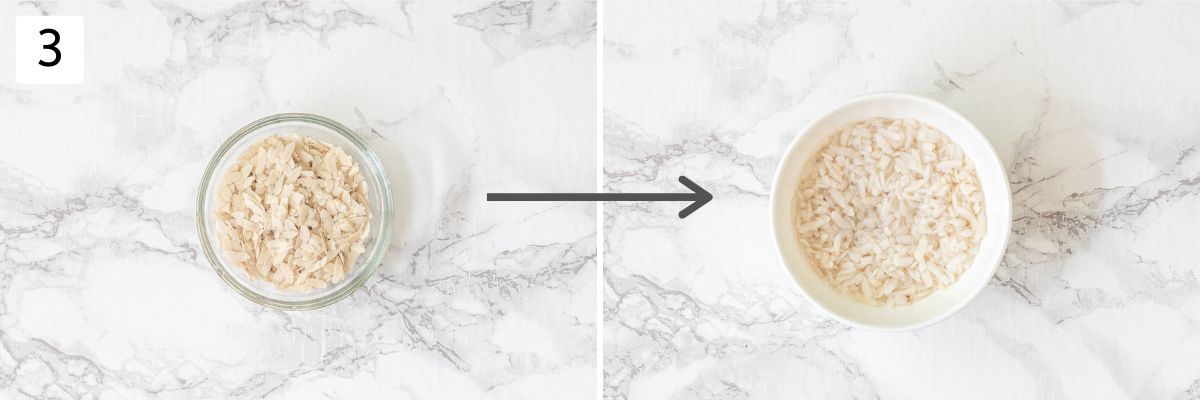
- Wash/rinse idli rice 2-3 times using regular tap water until the water is clear and not cloudy anymore. Massage lightly using your finger before rinsing the water.
Soak in enough water (2 inches of water above the rice) for at least 6 hours or overnight. - Similarly, rinse the mixture of whole urad dal and methi seeds. And soak for at least 6 hours or overnight.
Soak lentils and rice separately, because we are grinding them separately. Both take different times and amounts of water while grinding. So it is recommended to soak and grind separately.
- 30 minutes before grinding, rinse poha once using tap water. Soak poha in ⅓ cup of water for 30 minutes only.
Grind & Ferment Idli Batter:
Time required: 10 minutes for grinding and 12-14 hours for fermentation.
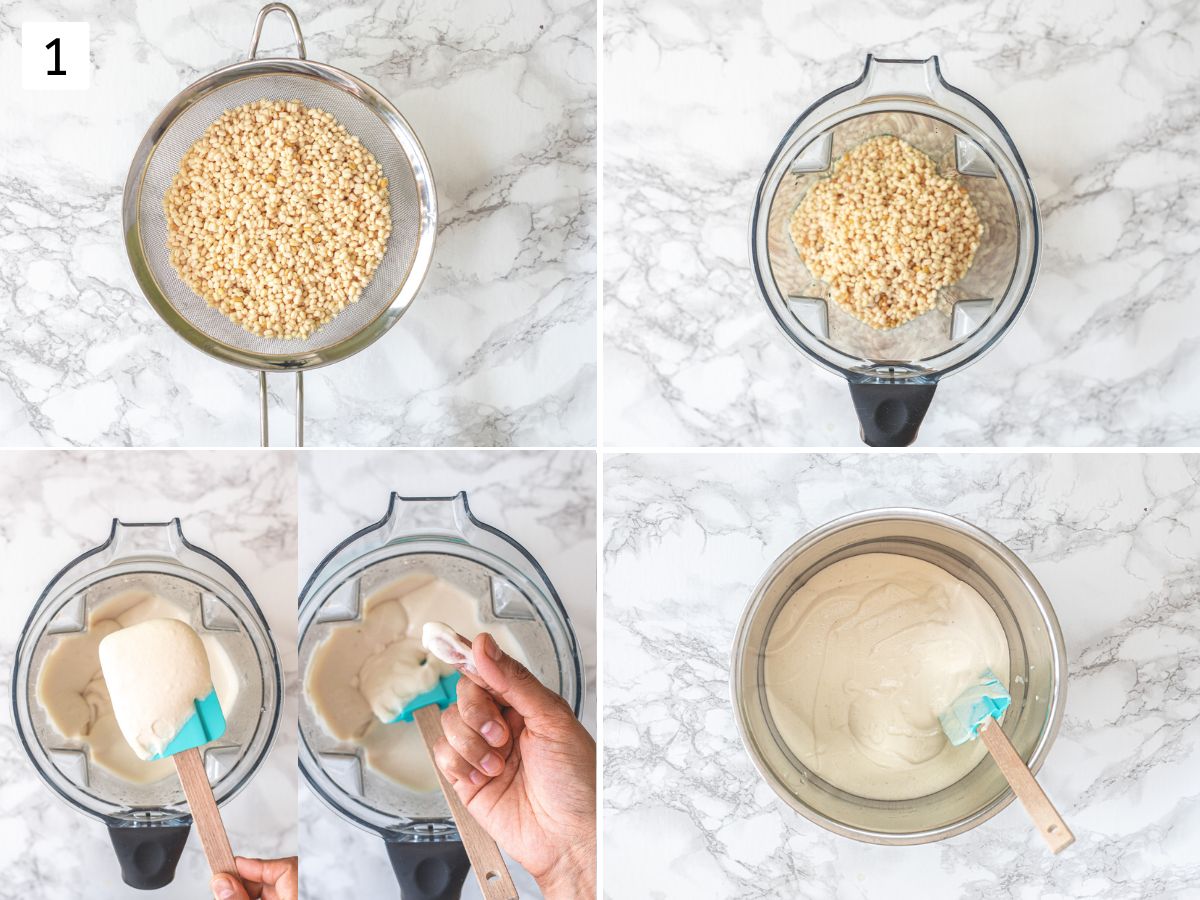
- Drain the water completely from lentils, and methi seeds using a strainer.
– Transfer them to a blender or mixie jar along with 1 cup of cold water.
– Make a smooth paste out of it. Check by rubbing between your thumb and finger, it feels smooth and sticky.
– Remove it to the instant pot liner.
- Drain the water completely from idli rice using a strainer.
– Transfer it to a blender, and add soaked poha and 2 cups of water.
– Grind into a coarse-fine paste. If your rub between your finger and thumb, the batter feels slightly grainy.
– Remove it to the same liner as the lentil batter.
NOTE: If using idli rava then it doesn’t require grinding. Simply squeeze out the water from the soaked idli rava and add it to the lentil batter and mix. If needed add water to make the right batter consistency.
GRINDING TIPS:
– Always use cold water while grinding. Sometimes blender or grinder get hot/warm during the grinding process and cold water prevents the batter to become warm.
– If your blender gets too hot then let it rest for 5-10 minutes, let it cool down, and then continue grinding again. This happens mostly with an Indian-style grinder (Preethi brand), I have never faced this issue with my Vitamix.
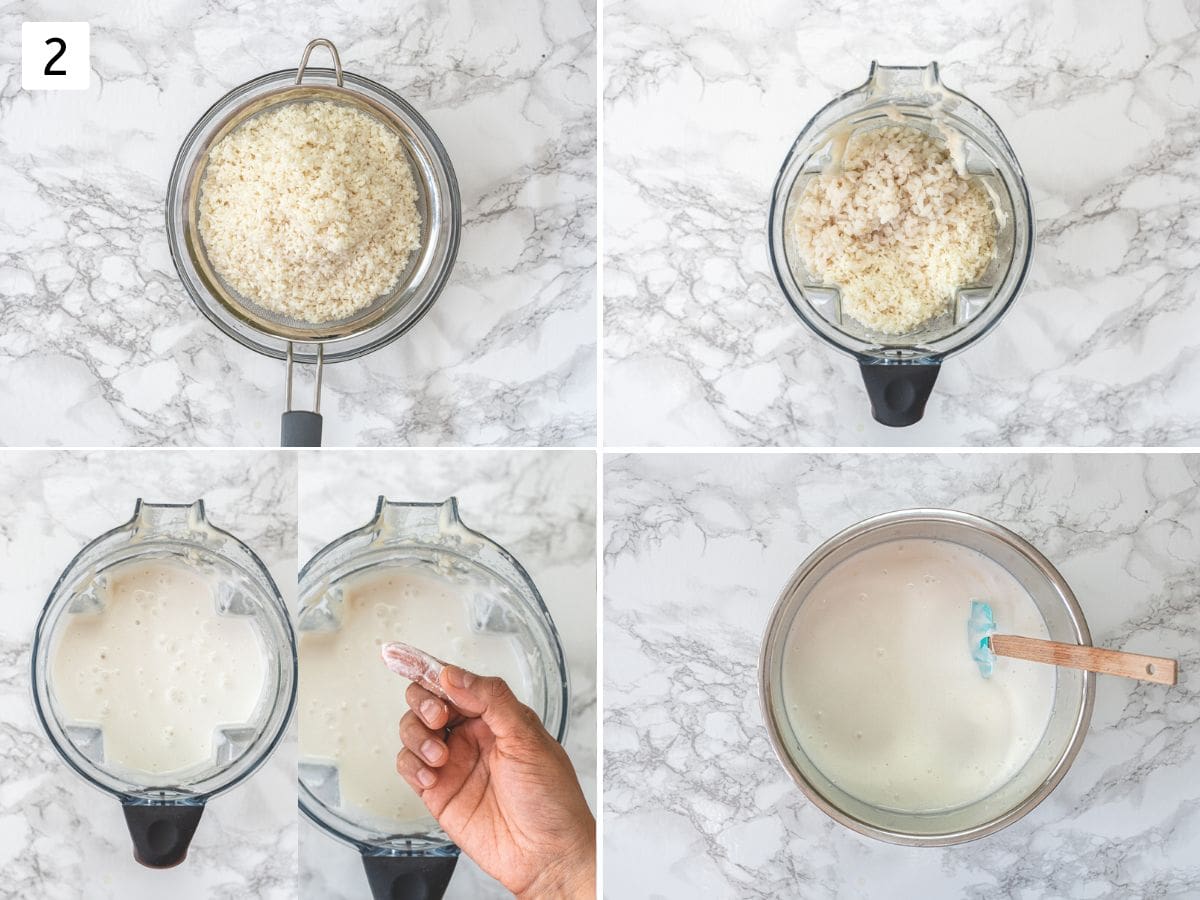
- Mix both batters vigorously (for around 1-2 mins) using a spatula or your hand until mixed evenly. The batter consistency should be medium thick (not too thin, runny, and not too thick). It should be flowy consistency and when it falls in ribbons and disappear within seconds.
- Place the instant pot steel liner into the instant pot.
- Cover it with a lid (a separate lid, not a pressure cooker lid).
- Set the instant pot on yogurt mode for 8-12 hours.
TIP:
Batter consistency has to be right to get fermentation. If the batter is too thick or too thin then it won’t ferment properly and result in dense or flat idli. When you pour the batter back into the bowl, it should be flowy, with pouring consistency, also as your pour ribbons form in the batter and disappear right away.
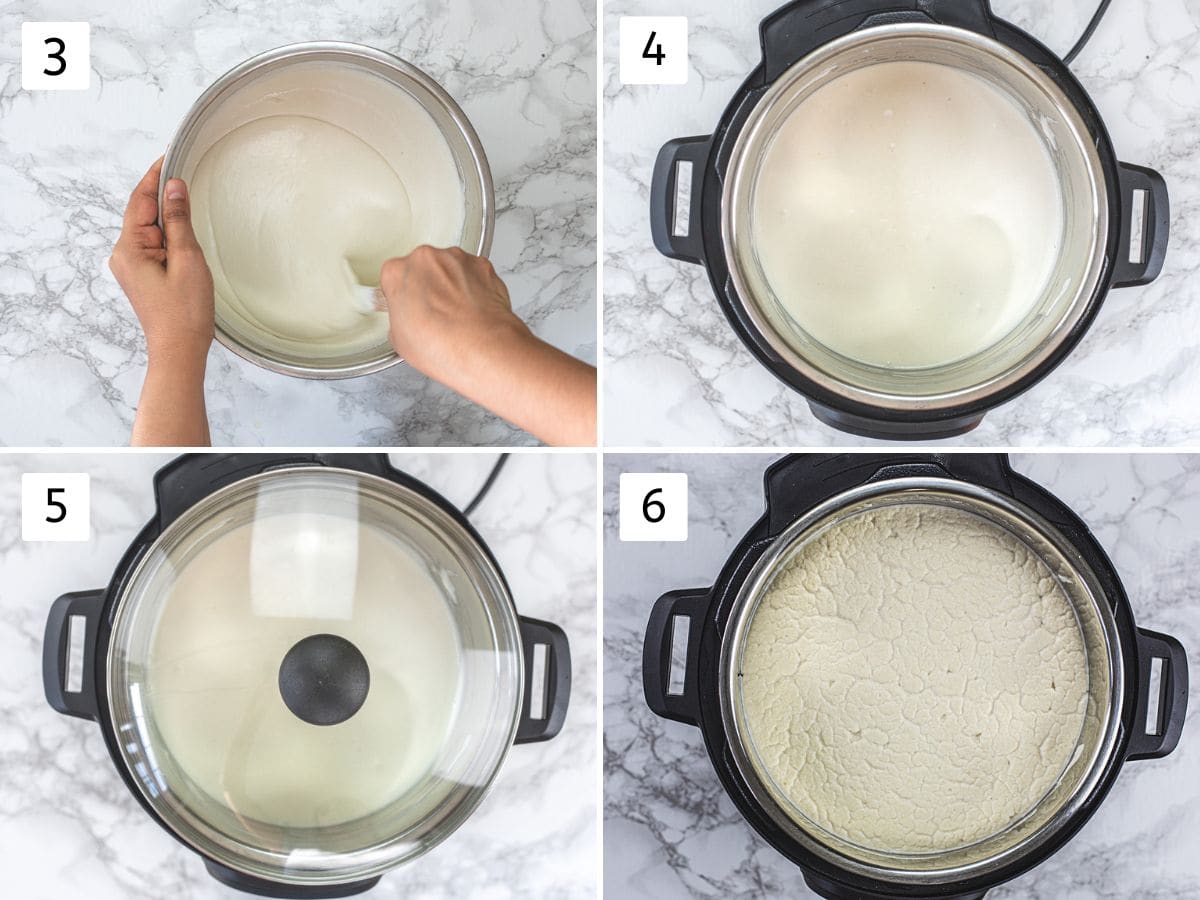
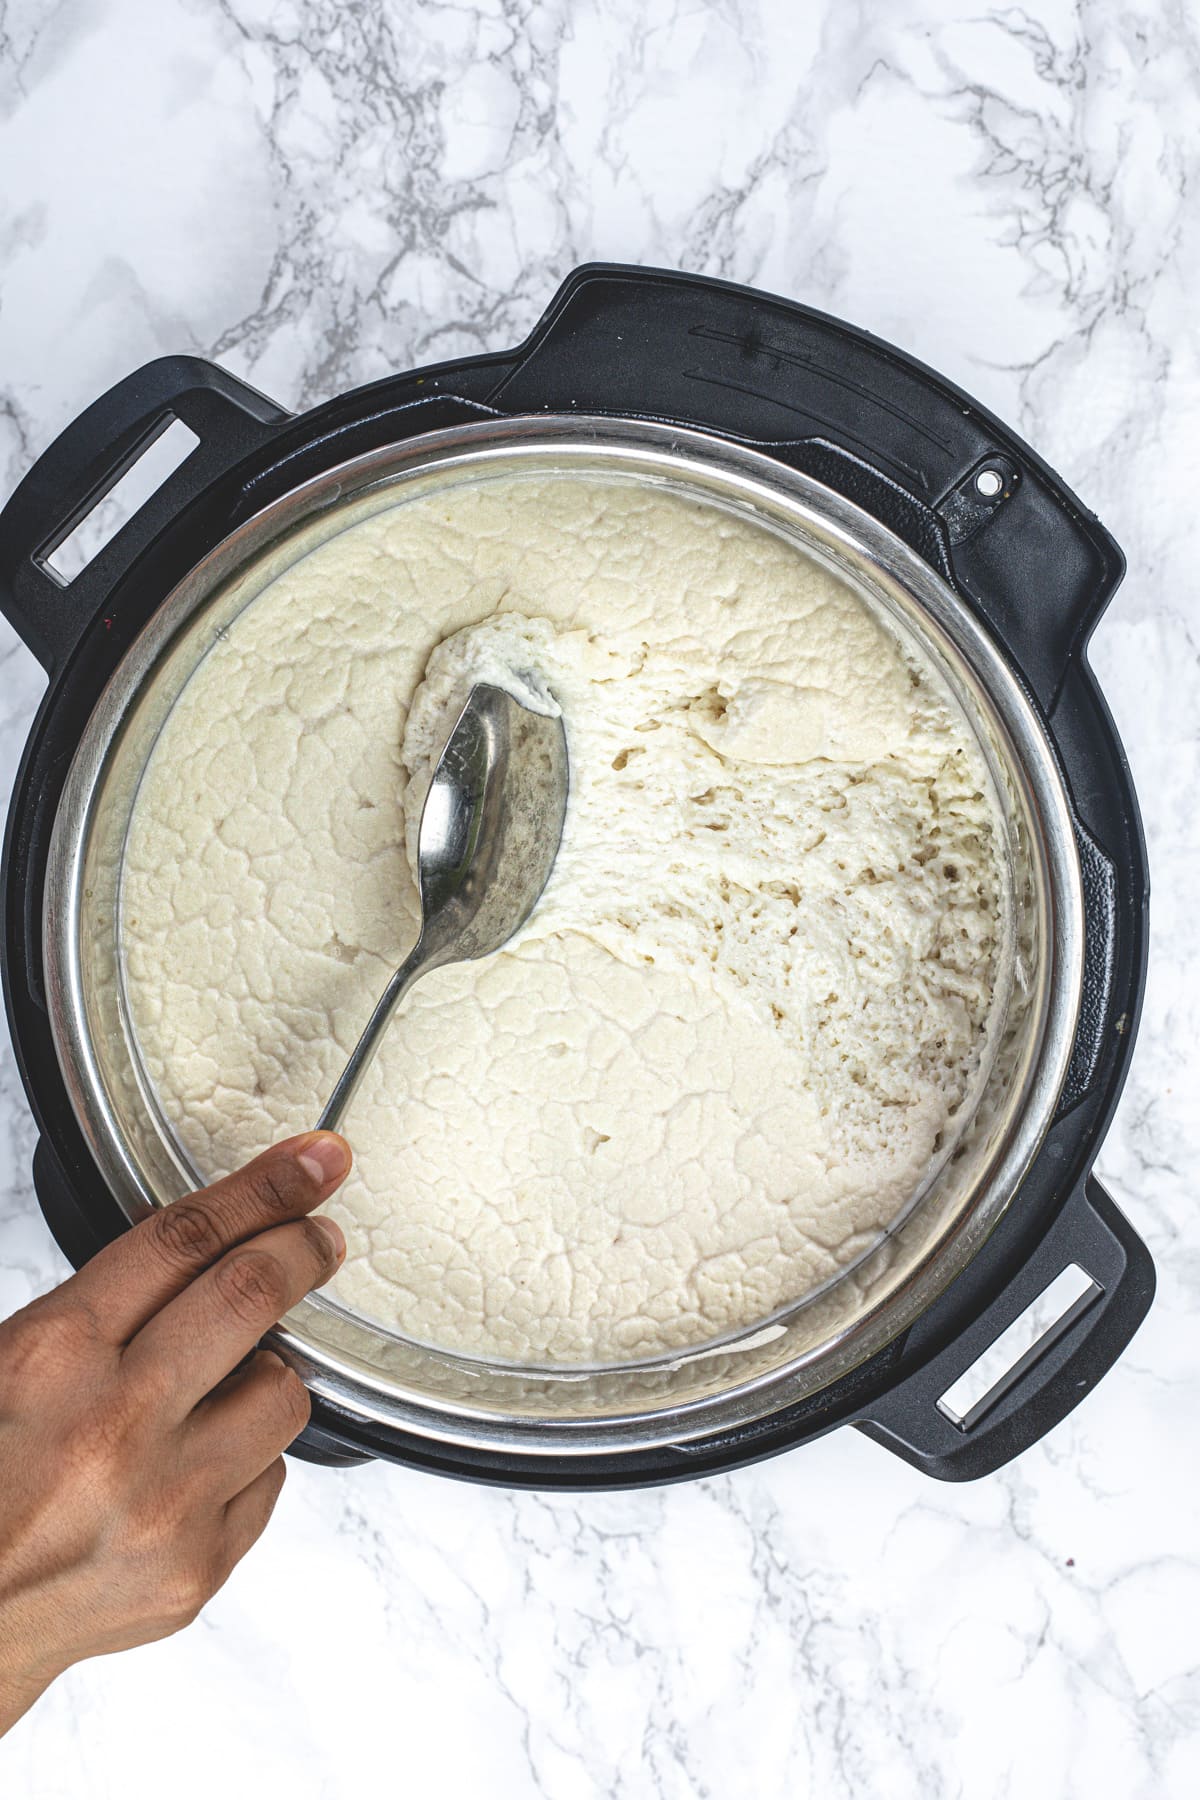
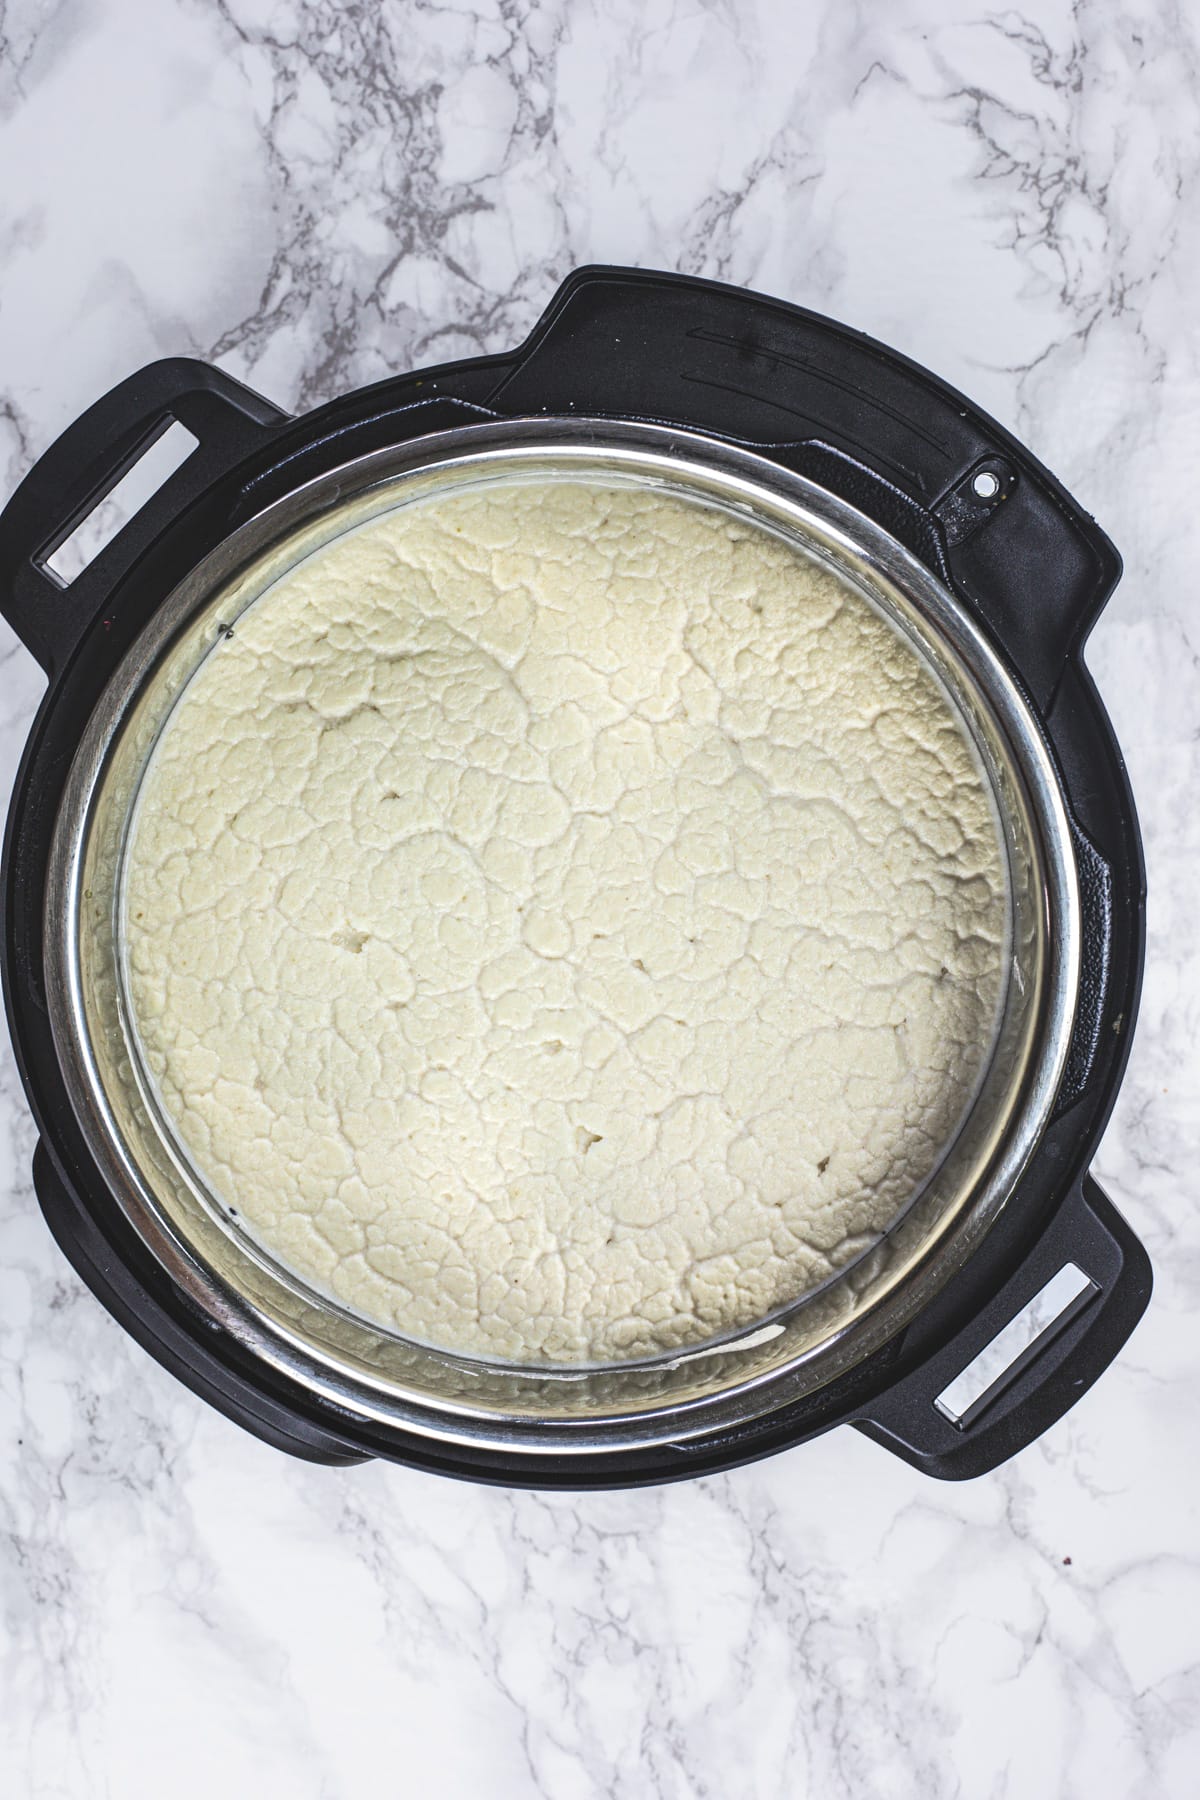
After fermentation, idli batter gets double (sometimes more than double) the volume. It also turns light, fluffy, airy, and bubbly.
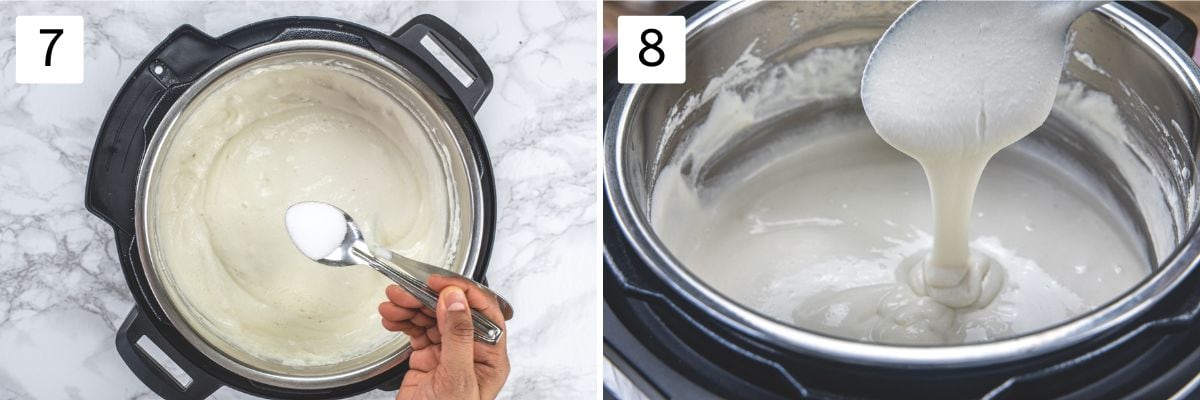
- Gently mix the batter, add salt, and mix again. I have added salt later as I am using iodized salt.
- If the batter consistency looks too thick then you can add a splash of water to adjust it. But make sure not to make it too thin. If you have followed the water amount while grinding as mentioned then your batter consistency will be perfect.
Steaming Idli:
Time required: 10 minutes per batch
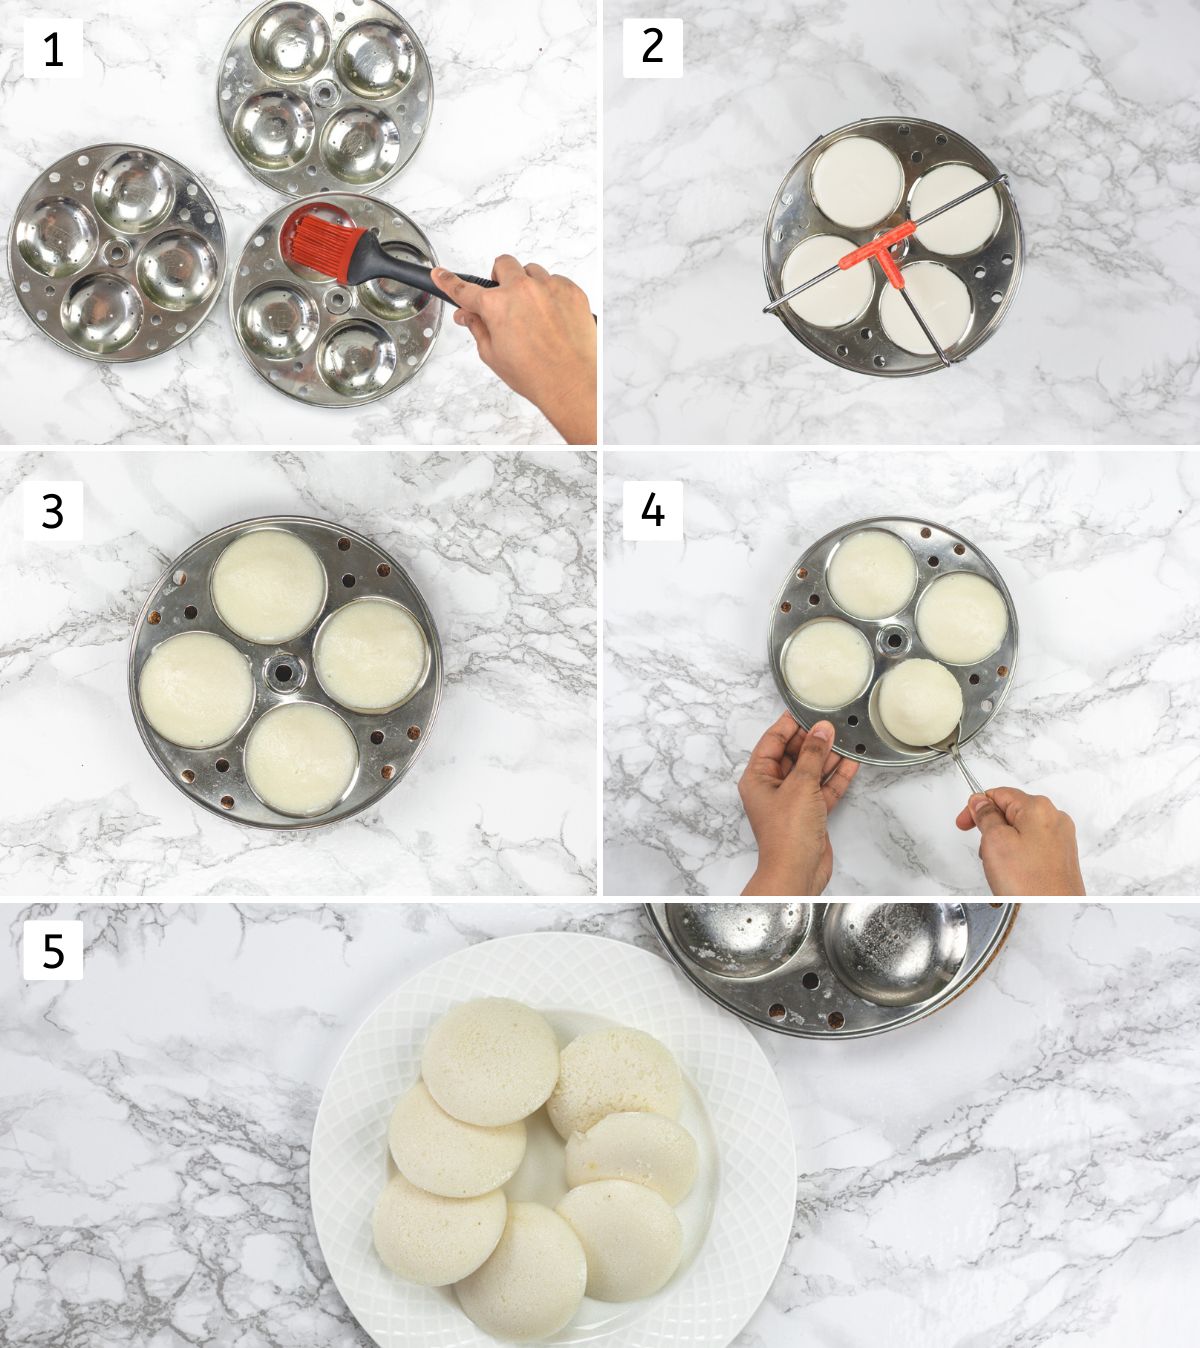
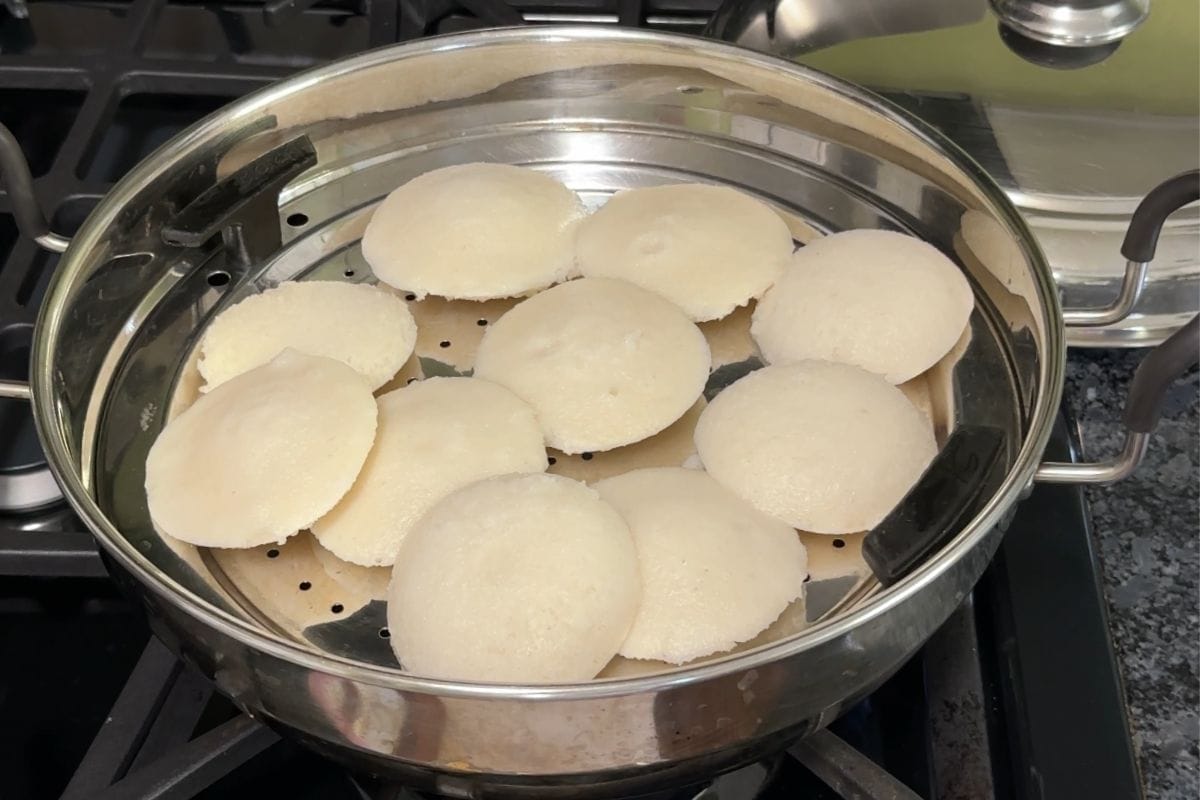
- Bring water to a boil in a steamer. Grease the idli plates using oil.
- Pour the batter into the molds.
- Steam for 10 minutes on medium heat.
- Remove the idli plates and let them sit for 2 minutes.
- Then using a wet spoon or butter knife, loosen the idli from the mold and transfer it to a plate. Repeat the steaming process for the rest of the batter. Or store leftover batter.
Fermentation Tips
- Follow the instant pot method to get perfectly fermented idli batter every single time.
- Traditional method: Keep the bowl covered in a warm place overnight. In India, it should get ready in 8-10 hours or sometimes even less time.
- During winter months, it takes more time (from 10 hours to 24 hours). The batter may not double or triple in size, but there should be some bubbles in the batter that shows fermentation.
- Oven method: Preheat the oven to 180 F and then turn off the oven. Place the bowl in the oven and keep the oven light ON, so it continues to give enough warmth for fermentation.
- The over-fermented batter turns sour and idli won’t taste good.
Storage & Freezing Instructions
Idli Storage:
- Refrigerating Leftover Idli: You can store leftover idlis in the refrigerator for 2-3 days. However, keep in mind that they tend to become dry as they sit. To preserve their softness, it’s best to consume them next day or freeze them.
- Freezing Idli: You can easily freeze idli for up to 3 months.
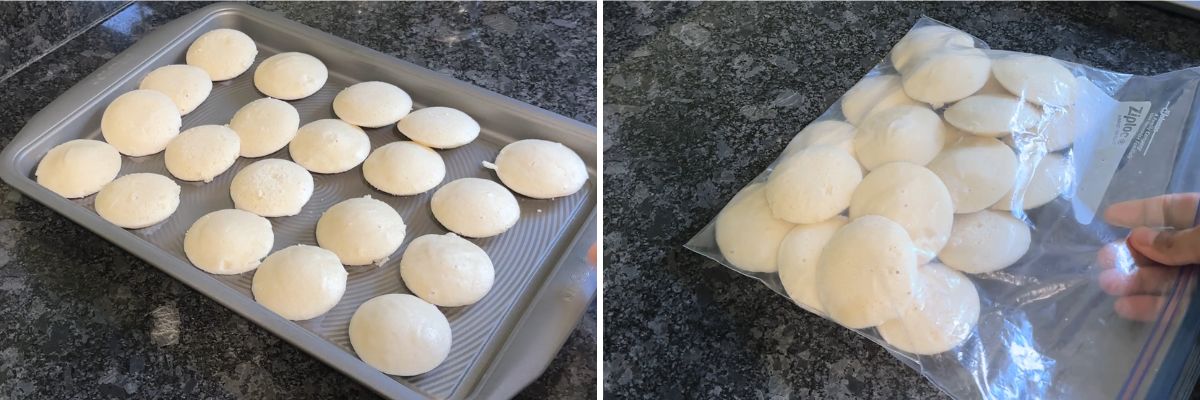
- Arrange the idlis on a cookie tray in a single layer, ensuring they are not touching each other.
- Cover them with plastic wrap and freeze until they are solid.
- Once frozen, transfer the idlis to a freeze-safe ziplock bag for long-term storage.
- Reheating Frozen Idli: Place the frozen idlis in a steamer tray and Steam for about 5 minutes, or until the idlis are heated through and soft again.
- This method ensures that the idlis stay moist and fluffy, just like when they were freshly made!
- I do not recommend reheating idli in microwave as it becomes dry and chewy.
Idli Batter Storage:
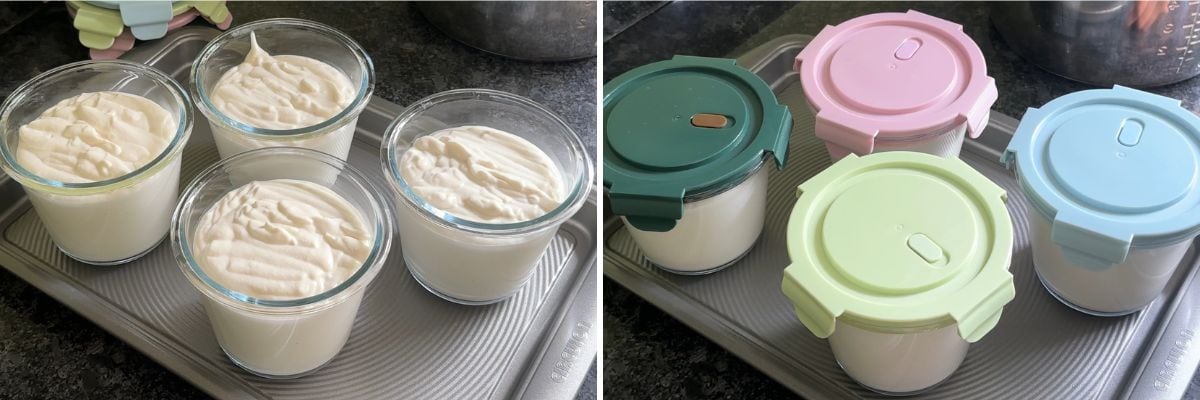
- Refrigerating: Fermented idli batter can be stored in the refrigerator for 4-5 days in an airtight container.
- Freezing: For longer storage, freeze the fermented batter for up to 3 months. Divide it into portions to thaw only what you need later.
- Thawing: To use frozen batter, place the container on the counter and allow it to thaw completely at room temperature. This may take a 4-8 hours depending on the quantity. I usually take it out in the morning for dinner or a night before for breakfast or lunch.
How To Serve Idli?
As a breakfast or meal:
- Serve piping hot idli with a bowl of sambar and chutney (like coconut chutney, or tomato chutney).
- Toss idli in idli podi along with some ghee or sesame oil (gingelly oil).
Leftovers: You can make masala idli, fried idli, idli upma, idli manchurian, idli chaat, etc.
Check Out Other Breakfast Recipes
Did you try this idli recipe? I’d love to hear about it! Leave a review in the comment section below.
Idli Recipe (Idli Batter Ratio & Tips)
US measuring cups are used (1 cup = 240 ml)
Ingredients
- 4 cups Idli Rice, or Idli rava
- 1 cup Whole urad dal, skinless
- 1 teaspoon Fenugreek seeds (methi dana)
- ¼ cup Thick Poha (beaten rice)
- ⅓ cup Water, for soaking poha
- 1 ¼ cups Water, for grinding lentils
- 2 cups Water, for grinding rice
- 1 ½ teaspoon Salt
- Oil, to grease idli plates
Instructions
Soaking:
- Wash/rinse idli rice 2-3 times using regular tap water until the water is clear and not cloudy anymore. Massage lightly using your finger before rinsing the water.
- Soak in enough water (2 inches of water above the rice) for at least 6 hours or overnight.
- Similarly, rinse the mixture of whole urad dal and methi seeds. And soak for at least 6 hours or overnight.
- 30 minutes before grinding, rinse poha once using tap water. Soak poha in ⅓ cup of water for 30 minutes only.
Grinding:
- Drain the water completely from lentils, methi seeds using a strainer.
- Transfer them to a blender or mixie jar along with 1 cup of cold water. Make a smooth paste out of it. Check by rubbing between your thumb and finger, it feels smooth and sticky.
- Remove it to the instant pot liner.
- Drain the water completely from idli rice using a strainer. Transfer it to a blender, and add soaked poha and 2 cups of water. Grind into a coarse-fine paste. If your rub between your finger and thumb, the batter feels slightly grainy.
- Remove it to the same liner as the lentil batter.
- NOTE: If using idli rava then it doesn’t require grinding. Simply squeeze out the water from the soaked idli rava and add it to the lentil batter and mix. If needed add water to make the right batter consistency.
- Mix both batters vigorously (for around 1-2 mins) using a spatula or your hand until mixed evenly. The batter consistency should be medium thick (not too thin, runny, and not too thick). It should be flowy consistency and when it falls in ribbons and disappear within seconds.
Fermenting Idli Batter In Instant Pot:
- Place the instant pot steel liner into the instant pot, and cover it with a lid (a separate lid, not a pressure cooker lid).
- Set the instant pot on yogurt mode for 8-12 hours.
- After fermentation, idli batter gets double (sometimes more than double) the volume. It also turns light, fluffy, airy, and bubbly.
- Gently mix the batter, add salt, and mix again. I have added salt later as I am using iodized salt.
- If the batter consistency looks too thick then you can add a splash of water to adjust it. But make sure not to make it too thin. If you have followed the water amount while grinding as mentioned then your batter consistency will be perfect.
Steaming:
- Bring water to a boil in a steamer. Grease the idli plates using oil.
- Pour the batter into the molds.
- Steam for 10 minutes on medium heat. Remove the idli plates and let them sit for 2 minutes.
- Then using a spoon or butter knife, loosen the idli from the mold and transfer to a plate. Repeat the steaming process for the rest of the batter. Or store leftover batter.
Notes
- Quality & Freshness of lentils: Fresh urad dal helps in the fermentation process. The fresh lentils are white in color while older or stale lentils start to turn pale yellow and which shows the aging process.
- Salt: If using iodized salt then add after fermentation is done, as iodine and anti-caking agents in salt interfere with the fermentation process. If using non-iodized salt then you can add in the idli batter earlier.
- Soak lentils and rice separately, because we are grinding them separately. Both take different times and amounts of water while grinding. So it is recommended to soak and grind separately.
- Always use cold water while grinding. Sometimes blender or grinder get hot/warm during the grinding process and cold water prevents the batter to become warm.
- If your blender gets too hot then let it rest for 5-10 minutes, let it cool down, and then continue grinding again. This happens mostly with Indian-style grinders (preethi brand), I have never faced this issue with Vitamix.
- Batter consistency has to be right to get fermentation. If the batter is too thick or too thin then it won’t ferment properly and result in dense or flat idli. When you pour the batter back into the bowl, it should be flowy, with pouring consistency, also as your pour ribbons form in the batter and disappear right away.
For idli what is the exact proportion of daal and rice
IS it 1.:2 or 1:3 ????
It’s very confusing when different sites mention different proportions for the batter
1:4 dal to rice is the safest ratio.
No one give full recepie
Always hide something
full recipe is there. please read carefully
Is it possible to grind the rice and urad dal before fermenting/soaking? Thanks
no. Soaking is must in order to make batter.
There is another method where you can use rice four and urad dal flour to make batter. In that case no grinding required.